認証プラットフォームAuth0

 
カテゴリー SaaS   タグ

Auth0

IDaaS(Identity as a Service)

STANDARD PROTOCOLS

SAML, OpenID Connect, JSON Web Token, OAuth 2.0, OAuth 1.0a, WS­-Federation and OpenID.

標準的なプロトコルに対応。

  • SAML … XMLベースの標準シングルサイオン形式のフレームワーク
  • OpenID Connect … 認証・認可プロトコル、属性情報を取得する機能も含む
  • JWT(JSON Web Token) … 安全にクレームを表現するための方式
  • OAuth 1.0a/2.0 … 認可プロトコル
  • WS-Federation … SAMLライクなクレームベース認証仕様(Microsoft, IBM, Novel)
  • OpenID … 認証プロトコル(認可はしない)

MULTIFACTOR AUTHENTICATION

Typically, Multifactor Authentication requires a combination of something the user knows, something the user has, and sometimes something the user is.

  • Knowledge factors, such as passwords, PINs, or secret questions.
  • Possesion factors, such as an access card, phone, or hardware key.
  • Inherence factors, which are biometric information, such as the user’s fingerprint, face, or voice.

多要素認証はユーザが「知っていること」「持っていること」「自身であること」を組み合わせて認証する。

  • 知っていること … パスワード、PIN、秘密の質問
  • 持っていること … アクセスカード、ハードウェアキー、電話
  • 自身であること … 指紋、顔、声などの生体情報

「記憶」「所持」「バイオメトリクス」であったり「SYK:Something You Know」「SYH:Something You Have」「SYA:Something You Are」など、表現はいろいろあるが、認証の3要素として基本。
多要素認証はこれら異なる要素を用いる認証方式のことで、同じ要素の認証を複数組み合わせる場合は多段階認証(Multi Step Authentication)である。

ADAPTIVE CONTEXT-AWARE MULTIFACTOR
Adaptative Context-aware Multifactor allows you to enforce MFA or additional layers of authentication based on different conditions such as: geographic location, time of day/week, type of network, custom domains or certain IPs, or any arbitrary condition that can be expressed in code on the Auth0 platform.

地理的位置、時刻、ネットワークの種類、カスタムドメイン、特定のIPなどの条件でMFAや追加の認証レイヤーを適用することができる。

いわゆるステップアップ認証やリスクベース認証を実現する機能で、Ruleによって多要素認証を適用する条件を記述する。

CUSTOM MFA PROVIDERS
If you are using a different MFA provider or want to build your own, you can use the redirect protocol in Auth0.

To use a custom MFA provider, you can interrupt the authentication transaction and redirect the user to an arbitrary URL where an additional authentication factor can happen. After this completes (successfully or not), the transaction can then resume in Auth0 for further processing.

途中で別のMFAプロバイダーにredirectして処理できる。リダイレクト先の処理が完了すると成功か否かにかかわらずAuth0側での処理が再開される。

SINGLE SIGN ON

You can enable Single Sign On for your corporate applications like Salesforce, Dropbox, Slack, and much more! With Auth0, this is just a few clicks away. Auth0 provides out-of-the-box support for more than 15 cloud applications.
These applications are: Microsoft Azure Active Directory, Box, CloudBees, Concur, Dropbox, Microsoft Dynamics CRM, Adobe Echosign, Egnyte, New Relic, Office 365, Salesforce, Sharepoint, Slack, Springcm, Zendesk, and Zoom.

標準で多くのクラウドアプリにシングルサインオンできる。

SINGLE LOG OUT
Single Log Out is the inverse process of Single Sign On, once you log out of one of the configured applications, your session will end in all of them. You will save time, and will never forget your sessions opened again.

シングルサインアウトもできる。

LAST MILE INTEGRATION THROUGH JAVASCRIPT
If you need further customization, you can always use Auth0’s rules engine. Rules are JavaScript code snippets that run in Auth0 and empowers you to control and customize any stage of the authentication and authorization pipeline. We know that every case is completely different!
See the Rules documentation for more information.

JavaScriptでRuleを記述し、認証パイプラインを構築できる。

SOCIAL LOGIN

SOCIAL PROVIDERS WITH AUTH0
Auth0 supports 30+ social providers: Facebook, Twitter, Google, Yahoo, Windows Live, LinkedIn, GitHub, PayPal, Amazon, vKontakte, Yandex, 37signals, Box, Salesforce, Salesforce (sandbox), Salesforce Community, Fitbit, Baidu, RenRen, Weibo, AOL, Shopify, WordPress, Dwolla, miiCard, Yammer, SoundCloud, Instagram, The City, The City (sandbox), Planning Center, Evernote, Evernote (sandbox), and Exact. Additionally, you can add any OAuth2 Authorization Server you need.

標準で多くのソーシャルプロバイダーをサポート。さらにOAuth2の認証サーバを追加することができる。

Every provider has its own profile properties, required headers, and response format, and some use OAuth1 (Twitter) while others use OAuth2. Auth0 simplifies this for you, encapsulating the differences, and unifying the way to call providers and the information retrieved from all of them.

各プロバイダーが持つ独自のプロファイルプロパティやヘッダー情報、応答フォーマット、プロトコルの違い(OAuth1, OAuth2)を吸収する。
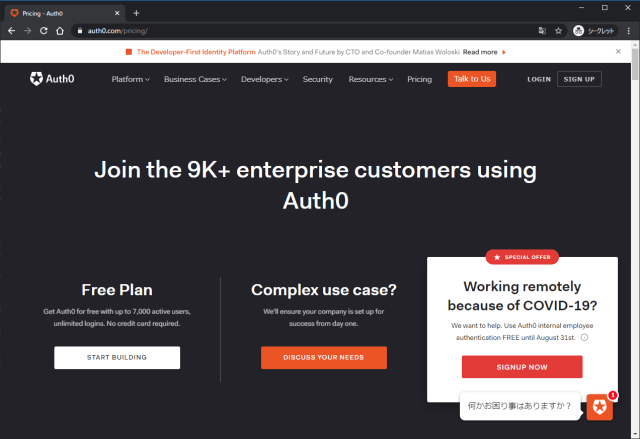
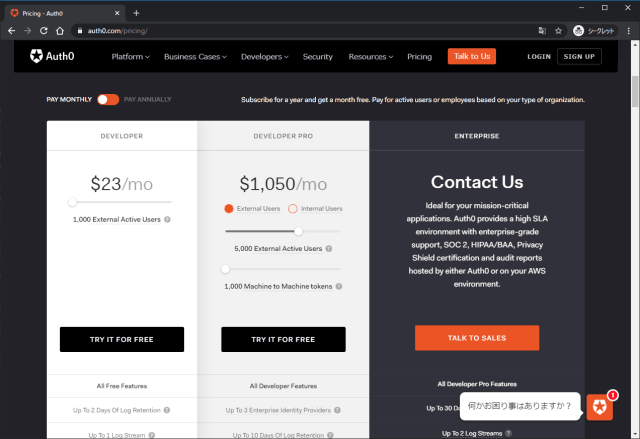
料金

Get Auth0 for free with up to 7,000 active users, unlimited logins. No credit card required.

7000アクティブユーザまで無料。登録ユーザ数ではなくアクティブユーザである点は素晴らしい。
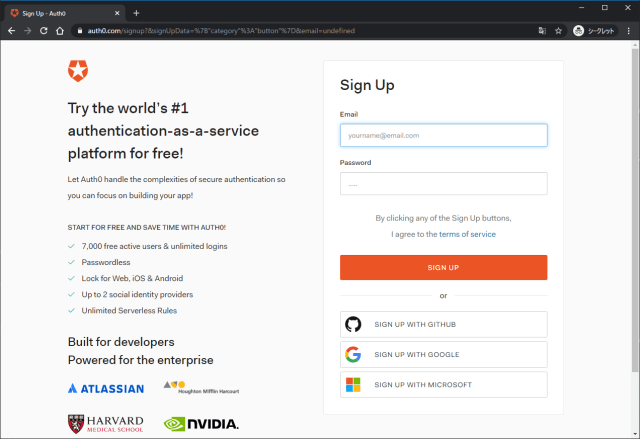
サインアップ

Auth0 width=640

Auth0 width=640

Auth0 width=640

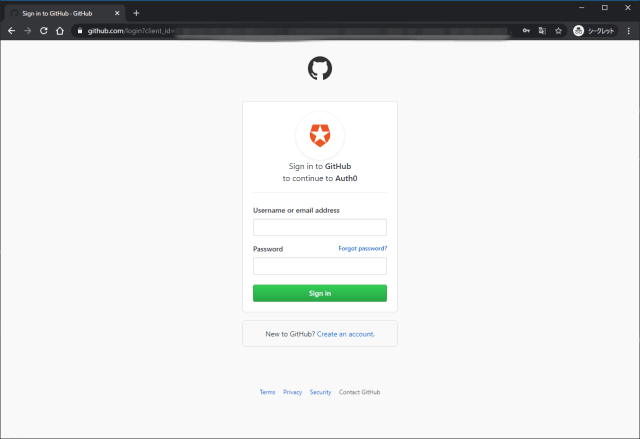
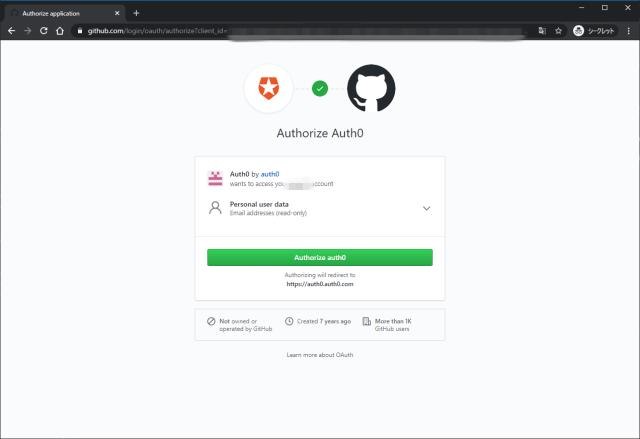
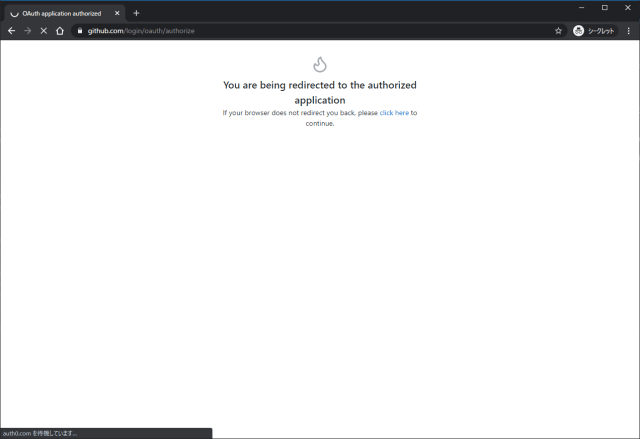
ソーシャルログインに対応している。ここではGitHubアカウントを使用する。

Auth0 width=640

Auth0 width=640

Auth0 width=640

Auth0 width=640

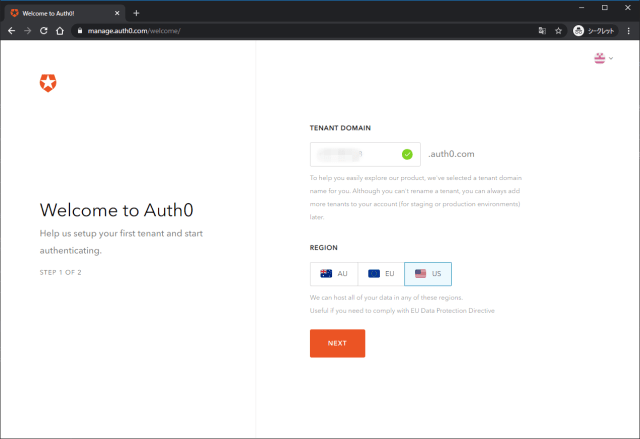
REGIONを選択。後から変更することはできない。
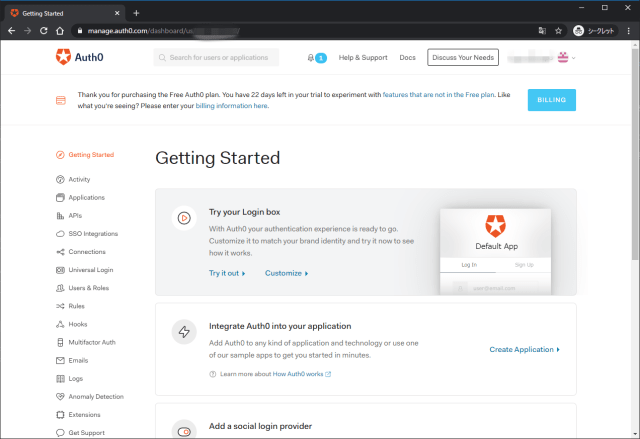
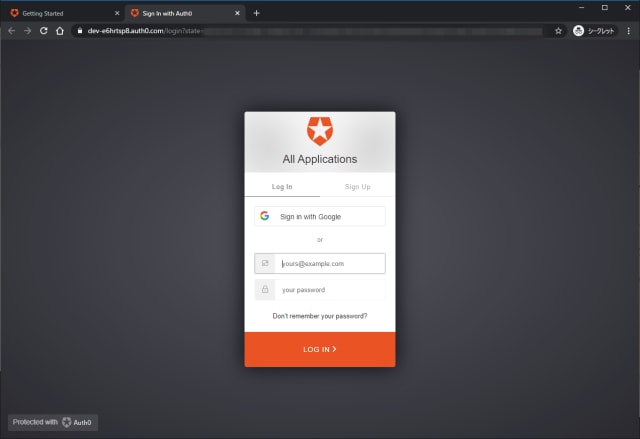
Auth0 width=640

Auth0 width=640

Auth0 width=640

使ってみる

Try your Login boxからログインを試すことができる。Try it outを押すとログイン画面が表示される。

Auth0 width=640

Auth0 width=640

Auth0 width=640

Auth0 width=640

コメント・シェア

DooD(Docker outside of Docker)

起動したDockerコンテナの中で、dockerを利用する方法の1つで、Dockerデーモンはホスト側にバイパスしてDockerコンテナを動作させる方法。dockerやdocker-composeの操作をdockerコンテナ内で行っていても、コンテナから起動したコンテナはホスト側で動いている。

コンテナにDockerをインストール

起動させるコンテナ側でdockerやdocker-composeのCUIを使用するので、必要パッケージをインストール。

1
2
apt-get install -y --no-install-recommends docker.io
apt-get install -y --no-install-recommends docker-compose

Dockerサーバの共有

Dockerのホスト側へは/var/run/docker.sockをバイパスすることでアクセス。
docker-comopose.yml/var/run/docker.sockをvolumeとしてマウント。

1
2
volumes:
- /var/run/docker.sock:/var/run/docker.sock

DooDで起動したDockerでVolumeマウント

ボリュームマウントは注意が必要。
Dockerデーモンが動作する親ホスト、そこから起動した子コンテナ、DooDでさらに起動する孫コンテナとした場合、孫コンテナが行うボリュームマウントは親ホストのボリュームで、子コンテナのボリュームではない。

子コンテナが親ホストのボリュームをマウントする場合

親ホスト側でdocker-compose.ymlを記述する場合、以下のような相対パスで指定できる。
これはdocker-composeを起動しているのは親ホストで、相対パスは自身の認識する相対パスだから可能。

1
2
volumes:
- .:/work/:rw

孫コンテナが親ホストのボリュームをマウントする場合

子コンテナで起動するdocker-compose.ymlでは相対パスで記述することはできない。
記述してもエラーにはならないが、空のディレクトリとしてマウントされるだけだ。DooDの仕組みから考えれば直感的に理解できる。

1
2
volumes:
- /host/full/path:/work/:rw

どちらでも起動できるようにするには

docker-compose.ymlは動かす環境ごとに記述したくないので、docker-compose.yml内で、環境変数を使って環境ごとにボリューム先を変える。

1
2
volumes:
- ${WORK_DIR}:/work/:rw

親ホストで実行する場合は.envファイルでWORK_DIR=.を指定する。
子コンテナから起動する場合は親ホストのフルパスを環境変数としてWORK_DIRを実行ホストの絶対パスで指定する。

コメント・シェア

DockerでCIFSマウントする

 
カテゴリー Container   タグ

cifs-utilsのインストール

1
apt-get install -y --no-install-recommends cifs-utils

cifs-utilsがない場合はmount: /mnt: cannot mount //xxx.xxx.xxx.xxx/xxxxxx read-only.となる。

コンテナからcifs-utilsでマウントする例

ENTRYPOINTでCIFSをマウントするにはcifs-utilsをインストールして、mount -t cifsでマウントする。

1
2
3
4
5
6
7
8
9
10
11
12
13
14
15
16
17
18
19
20
21
22
23
24
25
26
#
# CIFS Mount
#
if [ -z ${CIFS_USER} ] || [ -z ${CIFS_PASS} ] || [ -z ${CIFS_HOST} ] || [ -z ${CIFS_REMOTE_PATH} ] || [ -z ${CIFS_LOCAL_PATH} ]; then
echo "need export CIFS_XXXXXX"
exit 1
fi

mkdir -p ${CIFS_LOCAL_PATH}
mount -t cifs -o username=${CIFS_USER},password=${CIFS_PASS} //${CIFS_HOST}${CIFS_REMOTE_PATH} ${CIFS_LOCAL_PATH}
MOUNT_STATUS=$?
if [ ${MOUNT_STATUS} = "0" ]; then
echo "Mount Status: ${MOUNT_STATUS}"
echo "Mount From: ${CIFS_HOST}:${CIFS_REMOTE_PATH}"
echo "Mount To: ${CIFS_LOCAL_PATH}"
else
echo "Mount Status: ${MOUNT_STATUS}"
exit 1
fi

…略…

#
# CIFS Umount
#
umount ${CIFS_LOCAL_PATH}

権限がない(privilegedとcapabilities)

デフォルトでDockerでmountを試みた場合、Unable to apply new capability set.でマウントできない。

これはDockerのRuntime privilege and Linux capabilitiesに記載がある。

By default, Docker containers are “unprivileged” and cannot, for example, run a Docker daemon inside a Docker container. This is because by default a container is not allowed to access any devices, but a “privileged” container is given access to all devices (see the documentation on cgroups devices).

デフォルトではDockerコンテナはunprivilegedで動作し、デバイスへのアクセスを許可されていない。

When the operator executes docker run –privileged, Docker will enable access to all devices on the host as well as set some configuration in AppArmor or SELinux to allow the container nearly all the same access to the host as processes running outside containers on the host.

docker run --privilegedで実行したとき、privileged状態で起動することができる。その場合、Dockerはホストすべてのデバイスにアクセス可能で、AppArmorやSELinuxの設定を行い、他のホスト上のプロセスと同じ権限を与えてしまう。

If you want to limit access to a specific device or devices you can use the –device flag. It allows you to specify one or more devices that will be accessible within the container.

--device付きで実行すれば、特定のデバイスの利用許可を与えることができる。

In addition to –privileged, the operator can have fine grain control over the capabilities using –cap-add and –cap-drop. By default, Docker has a default list of capabilities that are kept. The following table lists the Linux capability options which are allowed by default and can be dropped.

--privilegedに加えて、--cap-addで細かく権限を制御することができる。

docker-composeで権限付与を行う

privilegedはprivileged: trueで有効化することができる。
privilegedはすべての権限を付与するので以下の例に意味はないが、--cap-addcap_addとして設定することができる。

1
2
3
4
5
6
7
8
9
10
11
12
…略…
volumes:
- /var/run/docker.sock:/var/run/docker.sock
environment:
CIFS_USER: ${CIFS_USER}
CIFS_PASS: ${CIFS_PASS}
CIFS_HOST: ${CIFS_HOST}
CIFS_REMOTE_PATH: ${CIFS_REMOTE_PATH}
CIFS_LOCAL_PATH: ${CIFS_LOCAL_PATH}
privileged: true
cap_add:
- SYS_ADMIN

コメント・シェア

Dockerでsudoを実行する

 
カテゴリー Container   タグ

Dockerでsudoしようとするとエラーになる

Dockerでsudoを実行すると、パスワード入力を求められるためエラーになる。

1
2
3
4
5
6
7
8
We trust you have received the usual lecture from the local System
Administrator. It usually boils down to these three things:

#1) Respect the privacy of others.
#2) Think before you type.
#3) With great power comes great responsibility.

sudo: no tty present and no askpass program specified

対話型でパスワードを入力しないようにecho "<user> ALL=(ALL) NOPASSWD: ALL" > /etc/sudoersで指定ユーザはパスワードなしで実行可能にする。

環境変数が引き継がれない

sudoで実行した場合、環境変数が引き継がれない。これはenv_resetが有効になっているため。Defaults:<user> !env_resetで指定ユーザのみenv_resetを無効化することができる。

sudoを利用するためのDockerfile記述内容

1
2
3
4
RUN apt-get install -y --no-install-recommends sudo && \
echo "Defaults:<user> !env_reset" > /etc/sudoers && \
echo "<user> ALL=(ALL) NOPASSWD: ALL" >> /etc/sudoers
USER <user>

コメント・シェア

GitHub APIでSecretを同期する

 
カテゴリー CI/CD Git Python   タグ

.envファイルとGitHub Secretの同期

環境変数を記述した.envファイルの内容とGitHUbのSecretを同期する。

GitHub APIでSecretsを操作する

  • REST API v3 Secrets

  • 一覧取得 GET /repos/:owner/:repo/actions/secrets

  • Secret取得 GET /repos/:owner/:repo/actions/secrets/:secret_name

  • Secret更新 PUT /repos/:owner/:repo/actions/secrets/:secret_name

Name Type Description
encrypted_value string Value for your secret, encrypted with LibSodium using the public key retrieved from the Get a repository public key endpoint.
key_id string ID of the key you used to encrypt the secret.

暗号化した値を作成する必要がある。

Pythonの例は以下だが、GET /repos/:owner/:repo/actions/secrets/public-keyからpublic-keyを取得する必要がある。

1
2
3
4
5
6
7
8
9
from base64 import b64encode
from nacl import encoding, public

def encrypt(public_key: str, secret_value: str) -> str:
"""Encrypt a Unicode string using the public key."""
public_key = public.PublicKey(public_key.encode("utf-8"), encoding.Base64Encoder())
sealed_box = public.SealedBox(public_key)
encrypted = sealed_box.encrypt(secret_value.encode("utf-8"))
return b64encode(encrypted).decode("utf-8")

登録/削除

シークレットの登録~削除の流れは以下。secret_value.pyは前述のスクリプトをコマンドライン引数を受けて実行するようにしたもの。

1
2
3
4
5
6
7
8
9
10
11
12
13
14
15
16
17
18
19
20
21
22
23
24
25
26
27
28
29
30
31
32
33
34
35
36
37
38
39
40
41
42
43
44
45
46
47
48
49
50
51
52
53
PUBLIC_KEY=$(curl --silent -H "Authorization: token ${GITHUB_TOKEN}" "https://api.github.com/repos/${GITHUB_USER}/${REPO_NAME}/actions/secrets/public-key" | jq '.key')
PUBLIC_KEYID=$(curl --silent -H "Authorization: token ${GITHUB_TOKEN}" "https://api.github.com/repos/${GITHUB_USER}/${REPO_NAME}/actions/secrets/public-key" | jq '.key_id')
ENCRYPTED_VALUE=$(python secret_value.py ${PUBLIC_KEY} ${SECRET_VALUE})

$ curl -H "Authorization: token ${GITHUB_TOKEN}" -X PUT -d "{ \"encrypted_value\": \"${ENCRYPTED_VALUE}\", \"key_id\": \"${PUBLIC_KEYID}\" }" -i "https://api.github.com/repos/${GITHUB_USER}/${REPO_NAME}/actions/secrets/testkey"
HTTP/1.1 201 Created
…略…

$ curl -H "Authorization: token ${GITHUB_TOKEN}" -i "https://api.github.com/repos/${GITHUB_USER}/${REPO_NAME}/actions/secrets"
HTTP/1.1 200 OK
…略…

{
"total_count": 1,
"secrets": [
{
"name": "testkey",
"created_at": "2020-05-21T03:30:27Z",
"updated_at": "2020-05-21T03:30:27Z"
}
]
}

$ curl -H "Authorization: token ${GITHUB_TOKEN}" -i "https://api.github.com/repos/${GITHUB_USER}/${REPO_NAME}/actions/secrets/testkey"
HTTP/1.1 200 OK
…略…
{
"name": "testkey",
"created_at": "2020-05-21T03:30:27Z",
"updated_at": "2020-05-21T03:30:27Z"
}

$ curl -H "Authorization: token ${GITHUB_TOKEN}" -X DELETE -i "https://api.github.com/repos/${GITHUB_USER}/${REPO_NAME}/actions/secrets/testkey"
HTTP/1.1 204 No Content
…略…

$ curl -H "Authorization: token ${GITHUB_TOKEN}" -i "https://api.github.com/repos/${GITHUB_USER}/${REPO_NAME}/actions/secrets/testkey"
HTTP/1.1 404 Not Found
…略…
{
"message": "Not Found",
"documentation_url": "https://developer.github.com/v3/actions/secrets/#get-a-secret"
}

$ curl -H "Authorization: token ${GITHUB_TOKEN}" -i "https://api.github.com/repos/${GITHUB_USER}/${REPO_NAME}/actions/secrets"
HTTP/1.1 200 OK
…略…
{
"total_count": 0,
"secrets": [

]
}

コメント・シェア

OneDriveが同期に失敗してクラッシュ

同期しようとして…クラッシュ。
何度再起動してもクラッシュするようになってしまった。

OneDrive width=320

1
2
3
4
5
6
7
8
9
10
11
障害が発生しているアプリケーション名: OneDrive.exe、バージョン: 20.52.311.11、タイム スタンプ: 0x95f7bd77
障害が発生しているモジュール名: SyncEngine.DLL、バージョン: 20.52.311.11、タイム スタンプ: 0x12301d0c
例外コード: 0xc0000005
障害オフセット: 0x0010080e
障害が発生しているプロセス ID: 0x1ee8
障害が発生しているアプリケーションの開始時刻: 0x01d62f0647ccdb4b
障害が発生しているアプリケーション パス: C:\Users\XXXX\AppData\Local\Microsoft\OneDrive\OneDrive.exe
障害が発生しているモジュール パス: C:\Users\XXXX\AppData\Local\Microsoft\OneDrive\20.052.0311.0011\SyncEngine.DLL
レポート ID: 56XXXXfd-XXXX-XXXX-a9c3-9360XXXXf3e7
障害が発生しているパッケージの完全な名前:
障害が発生しているパッケージに関連するアプリケーション ID:

状態をリセットする

コマンドプロンプトでOneDriveをリセットする。

1
C:\Users\ユーザ名\AppData\Local\Microsoft\OneDrive\OneDrive.exe /reset

Ctrl+Rのコマンド実行から%localappdata%を使用して省略実行。

1
%localappdata%\Microsoft\OneDrive\OneDrive.exe /reset

大量のファイルが再チェックされる。

OneDrive width=320

うまくマージできなかったファイルはコピーが残り、通知される。

OneDrive width=320

コメント・シェア

Windows Power Toys

 
カテゴリー Windows   タグ

Windows Power Toys v0.18

GitHubで公開されている。

PowerToys width=640

FancyZones

シフトキー押しながらWindowを移動すると、設定したレイアウトに配置できる。

PowerToys width=640

File Explorer Preview

エクスプローラーのプレビュー機能にSVGとMarkdownを追加。

PowerToys width=640

Image Resizer

画像ファイルリサイズ機能。

PowerToys width=640

Keyboard Manager

キーボードのショートカットリマッピング。

PowerToys width=640

PowerRename

正規表現を使ったファイルリネーム。

PowerToys width=640

PowerToys Run

ランチャー機能。

PowerToys width=640

Shortcut Guide

ショートカットガイド機能。

PowerToys width=640

コメント・シェア

GitHub API

 
カテゴリー CI/CD Git   タグ

GitHub API

GitHub APIを使えば、GitHUbのWeb UI上で行っていた操作を自動化することができる。

Personal access token

APIの操作では認証にアクセストークを使用するので、あらかじめ作成しておく。

GitHubユーザのSettings -> Developer settings -> Personal access tokensで生成

GitHub PersonalAccessToken width=640

GitHub PersonalAccessToken width=640

認証とレートリミット

Basic authentication

ベーシック認証。

1
curl -u "username" https://api.github.com

OAuth2 token (sent in a header)

OAuth2認証。GitHubはトークンを使った認証を推奨。

1
curl -H "Authorization: token OAUTH-TOKEN" https://api.github.com

レートリミット

For unauthenticated requests, the rate limit allows for up to 60 requests per hour. Unauthenticated requests are associated with the originating IP address, and not the user making requests.

未認証の場合、60req/hourのレートリミットがある。

For API requests using Basic Authentication or OAuth, you can make up to 5000 requests per hour. Authenticated requests are associated with the authenticated user, regardless of whether Basic Authentication or an OAuth token was used. This means that all OAuth applications authorized by a user share the same quota of 5000 requests per hour when they authenticate with different tokens owned by the same user.

認証した場合は、5000req/hourまで利用できる。

認証なしの場合

認証なしで実行した場合、X-RateLimit-Limit: 60となっている。

1
2
3
4
5
6
7
$curl -i https://api.github.com/users/octocat/orgs
HTTP/1.1 200 OK
…略…
X-Ratelimit-Limit: 60
X-Ratelimit-Remaining: 58
X-Ratelimit-Reset: 1589977195
…略…

認証ありの場合

認証ありで実行した場合、X-RateLimit-Limit: 5000となっている。

ベーシック認証の場合、curl -uでユーザ名を指定。

1
2
3
4
5
6
7
8
$curl -u ${GITHUB_USER} -i "https://api.github.com/users/${GITHUB_USER}/orgs"
Enter host password for user 'XXXXXX':
HTTP/1.1 200 OK
…略…
X-RateLimit-Limit: 5000
X-RateLimit-Remaining: 4998
X-RateLimit-Reset: 1589977514
…略…

アクセストークンを使う場合、Authorizationヘッダーでトークンを指定。
アクセストークン等は何度も使用するので、環境変数で設定する。

1
2
3
4
5
6
7
$curl -H "Authorization: token ${GITHUB_TOKEN}" -i "https://api.github.com/users/${GITHUB_USER}/orgs"
HTTP/1.1 200 OK
…略…
X-RateLimit-Limit: 5000
X-RateLimit-Remaining: 4999
X-RateLimit-Reset: 1590012456
…略…

リポジトリ操作

トークンの権限

アクセストークンの権限でrepoを許可しておく必要がある。

1
2
3
4
5
6
7
repo Full control of private repositories
repo:status Access commit status
repo_deployment Access deployment status
public_repo Access public repositories
repo:invite Access repository invitations
security_events Read and write security events
delete_repo Delete repositories

リポジトリ作成

リポジトリ作成ではJSON形式で設定を行い、https://api.github.com/user/reposにPOSTする。

1
2
3
4
5
6
7
8
9
10
11
12
13
14
15
16
17
18
19
20
21
22
23
24
25
26
27
$ curl -H "Authorization: token ${GITHUB_TOKEN}" \
-X POST -H "Content-type: application/json" \
-d "{
\"name\": \"${REPO_NAME}\",
\"description\": \"This is ${REPO_NAME}\",
\"homepage\": \"https://github.com\",
\"private\": false,
\"has_issues\": true,
\"has_wiki\": true,
\"has_downloads\": true
}" \
-i "https://api.github.com/user/repos"
HTTP/1.1 201 Created
…略…
X-Accepted-OAuth-Scopes: public_repo, repo
Location: https://api.github.com/repos/<GITHUBUSER>/test_repo
X-GitHub-Media-Type: github.v3; format=json
…略…

{
"id": 26XXXXX770,
"node_id": "MDEwOlXXXXXXXXXXXXjU2OTU3NzA=",
"name": "test_repo",
"full_name": "<GITHUBUSER>/test_repo",
"private": false,
…略…
}

エラーの場合

1
2
3
4
5
6
HTTP/1.1 400 Bad Request
…略…
{
"message": "Problems parsing JSON",
"documentation_url": "https://developer.github.com/v3/repos/#create"
}

リポジトリ情報取得

1
2
3
4
5
6
7
8
9
10
11
$ curl -H "Authorization: token ${GITHUB_TOKEN}" -i "https://api.github.com/repos/${GITHUB_USER}/test_repo"
HTTP/1.1 200 OK
…略…

{
"id": 26XXXXX770,
"node_id": "MDEXXXXXXXXXXXXXXOTU3NzA=",
"name": "test_repo",
"full_name": "<GITHUBUSER>/test_repo",
"private": false,
…略…

リポジトリ削除

アクセストークンの権限でdelete_repoを許可しておく必要がある。

1
2
3
$ curl -H "Authorization: token ${GITHUB_TOKEN}" -X DELETE -i "https://api.github.com/repos/${GITHUB_USER}/test_repo"
HTTP/1.1 204 No Content
…略…

権限がない場合は以下のエラーに。

1
2
3
4
5
6
7
8
9
$ curl -H "Authorization: token ${GITHUB_TOKEN}" -i "https://api.github.com/repos/${GITHUB_USER}/test_repo"
curl -H "Authorization: token ${GITHUB_TOKEN}" -X DELETE -i "https://api.github.com/repos/${GITHUB_USER}/test_repo"
HTTP/1.1 403 Forbidden
…略…

{
"message": "Must have admin rights to Repository.",
"documentation_url": "https://developer.github.com/v3/repos/#delete-a-repository"
}

コメント・シェア

self-hosted runner

Self-hosted runners:

  • Receive automatic updates for the self-hosted runner application only. You are responsible updating the operating system and all other software.
  • Can use cloud services or local machines that you already pay for.
  • Are customizable to your hardware, operating system, software, and security requirements.
  • Don’t need to have a clean instance for every job execution.
  • Are free to use with GitHub Actions, but you are responsible for the cost of maintaining your runner machines.
  • Self-hosted runnnerアプリのみ自動アップデート。OS等は自身でメンテナンス。
  • クラウドサービスやローカルマシン上で実行できる
  • OSやハードウェアを自由にカスタマイズ
  • ジョブ実行のたびにクリーンなインスタンスとする必要はない
  • GitHub Actionsと組み合わせて無料で利用できるが、Runnnerマシンのメンテナスは自分で行う

A self-hosted runner is automatically removed from GitHub if it has not connected to GitHub Actions for more than 30 days.

30日以上接続されない場合はGitHubから削除される。

The self-hosted runner application communicates with GitHub using the HTTPS protocol for inbound and outbound traffic. You must ensure that the machine has the appropriate network access to communicate with the GitHub URLs listed below.

1
2
3
github.com
api.github.com
*.actions.githubusercontent.com

GitHubとの通信はHTTPSで行われる。

RunnnerホストでLISTENするわけではないので、NAPTを介してもOK。

self-hosted runnerを登録する

Settings -> Actions -> Self-hosted runnesAdd Runnerをクリック

GitHub Actions Runner width=640

Runnerホスト上で実行するコマンドが表示されるので、順次実行する。

GitHub Actions Runner width=640

Runnerホストでコマンド実行する

表示されたコマンドを実行していく。./run.shを実行すると待機状態になる。

1
2
3
4
5
6
7
8
9
10
11
12
13
14
15
16
17
18
19
20
21
22
23
24
25
26
27
28
29
30
31
32
33
34
35
36
37
38
39
40
41
42
43
local-ubuntu:~$ mkdir actions-runner && cd actions-runner
local-ubuntu:~/actions-runner$ curl -O -L https://github.com/actions/runner/releases/download/v2.169.0/actions-runner-linux-x64-2.169.0.tar.gz
% Total % Received % Xferd Average Speed Time Time Time Current
Dload Upload Total Spent Left Speed
100 652 100 652 0 0 1684 0 --:--:-- --:--:-- --:--:-- 1684
100 72.0M 100 72.0M 0 0 3492k 0 0:00:21 0:00:21 --:--:-- 6134k
local-ubuntu:~/actions-runner$ tar xzf ./actions-runner-linux-x64-2.169.0.tar.gz
local-ubuntu:~/actions-runner$ ./config.sh --url https://github.com/XXXXXXX/XXXXXXX --token XXXXXXXXXXXXXXXXXXXXXX

--------------------------------------------------------------------------------
| ____ _ _ _ _ _ _ _ _ |
| / ___(_) |_| | | |_ _| |__ / \ ___| |_(_) ___ _ __ ___ |
| | | _| | __| |_| | | | | '_ \ / _ \ / __| __| |/ _ \| '_ \/ __| |
| | |_| | | |_| _ | |_| | |_) | / ___ \ (__| |_| | (_) | | | \__ \ |
| \____|_|\__|_| |_|\__,_|_.__/ /_/ \_\___|\__|_|\___/|_| |_|___/ |
| |
| Self-hosted runner registration |
| |
--------------------------------------------------------------------------------

# Authentication


√ Connected to GitHub

# Runner Registration

Enter the name of runner: [press Enter for local-ubuntu]

√ Runner successfully added
√ Runner connection is good

# Runner settings

Enter name of work folder: [press Enter for _work]

√ Settings Saved.

local-ubuntu:~/actions-runner$ ./run.sh

√ Connected to GitHub

2020-05-19 07:48:19Z: Listening for Jobs

登録された状態を確認する

登録されたホストが表示され、Idle状態となっている。

GitHub Actions Runner width=640

runs-on: self-hostedを設定し、ジョブを実行する。
この例ではdocker-composeが入っていないホストのためエラーになっているが、Runnerホストの作成した_workディレクトリ上で実行されていることを確認することができる。

GitHub Actions Runner width=640

Runnerホストを終了する

Runnerホスト側で.run.shを停止する。

1
2
3
4
2020-05-19 07:48:19Z: Listening for Jobs
2020-05-19 07:53:38Z: Running job: XXXXXXXXXXX
2020-05-19 07:53:52Z: Job XXXXXXXXXXX completed with result: Failed
^CExiting...

GitHub側ではOfflineとなる。

GitHub Actions Runner width=640

実行後のRunnerホストでは、_workに実行時の状態が残っている。

1
2
3
4
5
local-ubuntu:~/actions-runner$ ls
_diag _work actions-runner-linux-x64-2.169.0.tar.gz bin config.sh env.sh externals run.sh svc.sh
local-ubuntu:~/actions-runner$ cd _work
local-ubuntu:~/actions-runner/_work$ ls
_PipelineMapping _actions _temp _tool <XXXXXXXXXXX>

コメント・シェア

GitHub Actionsの実行結果を確認する

GitHubのWebUIで確認する

Actionsタブから実行結果を確認できる。
WebUIの画面で対象のワークフローを選択すると、過去の実行履歴が表示される。履歴を選択すると詳細を確認できる。

GitHub Actions Result width=640

バッジで確認する

バッジで最終実行結果の状態を見ることができる。
Markdownが表示されるのでREADME.mdに貼っておけば、リポジトリのトップページで確認できる。

GitHub Actions Result width=640

通常のログ

ワークフローのを選択すると詳細を確認できる。各ステップのログがそれぞれ表示され、ログの閲覧やダウンロードなどが可能。

生ログの閲覧。

GitHub Actions Log width=640

ログのダウンロード。

GitHub Actions Log width=640

GitHub Actionsのワークフローデバッグ

デバッグログを出力して実行の詳細を記録することができる。

Enabling debug logging

Runner diagnostic logging provides additional log files that contain information about how a runner is executing a job. Two extra log files are added to the log archive:

  • The runner process log, which includes information about coordinating and setting up runners to execute jobs.
  • The worker process log, which logs the execution of a job.
  1. To enable runner diagnostic logging, set the following secret in the repository that contains the workflow: ACTIONS_RUNNER_DEBUG to true.
  2. To download runner diagnostic logs, download the log archive of the workflow run. The runner diagnostic logs are contained in the runner-diagnostic-logs folder. For more information on downloading logs, see “Downloading logs.”
  1. secretでACTIONS_RUNNER_DEBUGtrueで設定する。
  2. 作成されたログはダウンロードしたZIPファイル内のrunner-diagnostic-logsにある。

runner-diagnostic-logs内にはBuild UnknownBuildNumber-<リポジトリ名>.zipのアーカイブがあり、以下のファイルがある。

1
2
3
4
5
Mode                LastWriteTime         Length Name
---- ------------- ------ ----
-a---- 2020/05/19 17:07 11424 Runner_20200519-170525-utc.log
-a---- 2020/05/19 17:05 1338 Worker_20200519-170519-utc.log
-a---- 2020/05/19 17:07 61565 Worker_20200519-170530-utc.log

Enabling step debug logging

Step debug logging increases the verbosity of a job’s logs during and after a job’s execution.

  1. To enable step debug logging, you must set the following secret in the repository that contains the workflow: ACTIONS_STEP_DEBUG to true.
  2. After setting the secret, more debug events are shown in the step logs. For more information, see “Viewing logs to diagnose failures”.
  1. secretでACTIONS_STEP_DEBUGtrueで設定する。
  2. 設定後ステップログでデバッグイベントが出力される。

ログに[debug]の付いた行が追加されている。画面上ではパープルでハイライトされ、より詳細なステップログになっている。

GitHub Actions Log width=640

1
2
3
4
5
6
7
8
9
10
11
12
13
##[debug]Starting: Complete job
Uploading runner diagnostic logs
##[debug]Starting diagnostic file upload.
##[debug]Setting up diagnostic log folders.
##[debug]Creating diagnostic log files folder.
##[debug]Copying 2 worker diagnostic logs.
##[debug]Copying 1 runner diagnostic logs.
##[debug]Zipping diagnostic files.
##[debug]Uploading diagnostic metadata file.
##[debug]Diagnostic file upload complete.
Completed runner diagnostic log upload
Cleaning up orphan processes
##[debug]Finishing: Complete job

コメント・シェア


nullpo

めも


募集中


Japan