Scrapyで処理を中断して例外をスローする

 
カテゴリー Lua Python   タグ

Scrapyを中断するには

Scrapyのクローリングは失敗があっても統計情報に記録しつつ最後まで実行する。ページの取得失敗やパイプラインでの処理失敗などで処理を中断したい場合は適切な例外をスローする必要がある。
例外はBuilt-in Exceptions referenceで示されている。

Spiderでの例外

典型的なサンプルがExceptionsのリファレンスに記載されている。response.bodyに帯域超過を示すメッセージがあれば、CloseSpiderをスローして終了するサンプル。

1
2
3
def parse_page(self, response):
if 'Bandwidth exceeded' in response.body:
raise CloseSpider('bandwidth_exceeded')

ItemPipelineでの例外

典型的なサンプルがItemPipelineのリファレンスに記載されている。Itemにpriceという項目が無ければDropItemをスローして終了するサンプル。

1
2
3
4
5
6
7
8
9
10
11
12
13
from scrapy.exceptions import DropItem

class PricePipeline:

vat_factor = 1.15

def process_item(self, item, spider):
if item.get('price'):
if item.get('price_excludes_vat'):
item['price'] = item['price'] * self.vat_factor
return item
else:
raise DropItem("Missing price in %s" % item)

例外を発生させたときの挙動

公式チュートリアルのQuotesSpiderをカスタマイズして、Spiderを中断する例外をスローする。
コールバックのparser()はただ中断される。

1
2
3
4
5
6
7
8
9
10
11
12
13
14
15
16
17
18
19
20
21
22
import scrapy
from scrapy.exceptions import CloseSpider

class QuotesSpider(scrapy.Spider):
name = "quotes"
start_urls = [
'http://quotes.toscrape.com/page/1/',
]

def parse(self, response):
raise CloseSpider("Force Close!!!!!!")
for quote in response.css('div.quote'):
yield {
'text': quote.css('span.text::text').get(),
'author': quote.css('small.author::text').get(),
'tags': quote.css('div.tags a.tag::text').getall(),
}

next_page = response.css('li.next a::attr(href)').get()
if next_page is not None:
next_page = response.urljoin(next_page)
yield scrapy.Request(next_page, callback=self.parse)

中断された場合、finish_reasonに指定したエラーメッセージが設定される。

1
2
3
4
5
6
7
8
9
10
11
12
13
14
15
16
17
18
19
20
21
22
23
24
25
26
27
28
29
30
31
2020-05-18 XX:XX:XX [scrapy.core.engine] INFO: Spider opened
2020-05-18 XX:XX:XX [scrapy.extensions.logstats] INFO: Crawled 0 pages (at 0 pages/min), scraped 0 items (at 0 items/min)
2020-05-18 XX:XX:XX [scrapy.extensions.telnet] INFO: Telnet console listening on 127.0.0.1:6023
2020-05-18 XX:XX:XX [scrapy.core.engine] DEBUG: Crawled (404) <GET http://quotes.toscrape.com/robots.txt> (referer: None)
2020-05-18 XX:XX:XX [scrapy.core.engine] DEBUG: Crawled (200) <GET http://quotes.toscrape.com/page/1/> (referer: None)
2020-05-18 XX:XX:XX [scrapy.core.engine] INFO: Closing spider (Force Close!!!!!!)
2020-05-18 XX:XX:XX [scrapy.statscollectors] INFO: Dumping Scrapy stats:
{'downloader/request_bytes': 455,
'downloader/request_count': 2,
'downloader/request_method_count/GET': 2,
'downloader/response_bytes': 2719,
'downloader/response_count': 2,
'downloader/response_status_count/200': 1,
'downloader/response_status_count/404': 1,
'elapsed_time_seconds': 1.21889,
'finish_reason': 'Force Close!!!!!!',
'finish_time': datetime.datetime(2020, 5, 18, xx, xx, xx, XXXXXX),
'log_count/DEBUG': 2,
'log_count/INFO': 10,
'memusage/max': 55631872,
'memusage/startup': 55631872,
'response_received_count': 2,
'robotstxt/request_count': 1,
'robotstxt/response_count': 1,
'robotstxt/response_status_count/404': 1,
'scheduler/dequeued': 1,
'scheduler/dequeued/memory': 1,
'scheduler/enqueued': 1,
'scheduler/enqueued/memory': 1,
'start_time': datetime.datetime(2020, 5, 18, xx, xx, xx, XXXXXX)}
2020-05-18 XX:XX:XX [scrapy.core.engine] INFO: Spider closed (Force Close!!!!!!)

Using errbacks to catch exceptions in request processing

Requestプロセスの中で発生した例外はerrbackでその挙動を定義することができる。
ネットワークに関する典型的な例外をトラップする例が記載されている。サンプルではログ出力のみだが、前述の例外をスローして中断する処理を記述することができる。

1
2
3
4
5
6
7
8
9
10
11
12
13
14
15
16
17
18
19
20
21
22
23
24
25
26
27
28
29
30
31
32
33
34
35
36
37
38
39
40
41
42
43
44
45
46
47
import scrapy

from scrapy.spidermiddlewares.httperror import HttpError
from twisted.internet.error import DNSLookupError
from twisted.internet.error import TimeoutError, TCPTimedOutError

class ErrbackSpider(scrapy.Spider):
name = "errback_example"
start_urls = [
"http://www.httpbin.org/", # HTTP 200 expected
"http://www.httpbin.org/status/404", # Not found error
"http://www.httpbin.org/status/500", # server issue
"http://www.httpbin.org:12345/", # non-responding host, timeout expected
"http://www.httphttpbinbin.org/", # DNS error expected
]

def start_requests(self):
for u in self.start_urls:
yield scrapy.Request(u, callback=self.parse_httpbin,
errback=self.errback_httpbin,
dont_filter=True)

def parse_httpbin(self, response):
self.logger.info('Got successful response from {}'.format(response.url))
# do something useful here...

def errback_httpbin(self, failure):
# log all failures
self.logger.error(repr(failure))

# in case you want to do something special for some errors,
# you may need the failure's type:

if failure.check(HttpError):
# these exceptions come from HttpError spider middleware
# you can get the non-200 response
response = failure.value.response
self.logger.error('HttpError on %s', response.url)

elif failure.check(DNSLookupError):
# this is the original request
request = failure.request
self.logger.error('DNSLookupError on %s', request.url)

elif failure.check(TimeoutError, TCPTimedOutError):
request = failure.request
self.logger.error('TimeoutError on %s', request.url)

SplashのLuaスクリプトの例外を処理する

SplashRequestから実行したLuaスクリプト内でerror()を使って強制的にエラーを発生させている。Luaスクリプト内のエラーはSplashからHTTPのエラーコード400による応答でScrapyへ返却される。

ScrapyはSplashRequestに設定したerrbackでこのエラーをトラップし、CloseSpider例外を発生させてSpiderを中断する。

1
2
3
4
5
6
7
8
9
10
11
12
13
14
15
16
17
18
19
20
21
22
23
24
25
26
27
28
29
30
31
32
33
34
35
36
37
38
39
40
41
42
43
44
45
46
47
48
49
50
51
52
53
54
55
56
57
58
# -*- coding: utf-8 -*-
import scrapy
from scrapy_splash import SplashRequest
from scrapy_splash_tutorial.items import QuoteItem
from scrapy.spidermiddlewares.httperror import HttpError
from scrapy.exceptions import CloseSpider

_login_script = """
function main(splash, args)
assert(splash:go(args.url))
assert(splash:wait(0.5))

-- 例外発生
error("Force Splash Error")

return {
url = splash:url(),
html = splash:html(),
}
end
"""

class QuotesjsSpider(scrapy.Spider):
name = 'quotesjs'
allowed_domains = ['quotes.toscrape.com']
start_urls = ['http://quotes.toscrape.com/js/']

def start_requests(self):
for url in self.start_urls:
yield SplashRequest(
url,
callback=self.parse,
errback=self.errback_httpbin,
endpoint='execute',
cache_args=['lua_source'],
args={ 'timeout': 60, 'wait': 5, 'lua_source': _login_script, },
)

def parse(self, response):
for q in response.css(".container .quote"):
quote = QuoteItem()
quote["author"] = q.css(".author::text").extract_first()
quote["quote"] = q.css(".text::text").extract_first()
yield quote

def errback_httpbin(self, failure):
# log all failures
self.logger.error(repr(failure))

# in case you want to do something special for some errors,
# you may need the failure's type:

if failure.check(HttpError):
# these exceptions come from HttpError spider middleware
# you can get the non-200 response
response = failure.value.response
self.logger.error('HttpError on %s', response.url)
raise CloseSpider("Force Close!!!!!!")

Splashで400 Bad request to Splashエラーなり、errbackCloseSpider例外を発生させ終了している。

1
2
3
4
5
6
7
8
9
10
11
12
13
14
15
16
17
18
19
20
21
22
23
24
25
26
27
28
29
30
31
32
33
34
35
36
37
2020-05-18 XX:XX:XX [scrapy.core.engine] DEBUG: Crawled (404) <GET http://quotes.toscrape.com/robots.txt> (referer: None)
2020-05-18 XX:XX:XX [scrapy.core.engine] DEBUG: Crawled (404) <GET http://splash:8050/robots.txt> (referer: None)
2020-05-18 XX:XX:XX [scrapy_splash.middleware] WARNING: Bad request to Splash: {'error': 400, 'type': 'ScriptError', 'description': 'Error happened while executing Lua script', 'info': {'source': '[string "..."]', 'line_number': 7, 'error': 'Force Splash Error', 'type': 'LUA_ERROR', 'message': 'Lua error: [string "..."]:7: Force Splash Error'}}
2020-05-18 XX:XX:XX [scrapy.core.engine] DEBUG: Crawled (400) <GET http://quotes.toscrape.com/js/ via http://splash:8050/execute> (referer: None)
2020-05-18 XX:XX:XX [quotesjs] ERROR: <twisted.python.failure.Failure scrapy.spidermiddlewares.httperror.HttpError: Ignoring non-200 response>
2020-05-18 XX:XX:XX [quotesjs] ERROR: HttpError on http://quotes.toscrape.com/js/
2020-05-18 XX:XX:XX [scrapy.core.engine] INFO: Closing spider (Force Close!!!!!!)
2020-05-18 XX:XX:XX [scrapy.statscollectors] INFO: Dumping Scrapy stats:
{'downloader/request_bytes': 1282,
'downloader/request_count': 3,
'downloader/request_method_count/GET': 2,
'downloader/request_method_count/POST': 1,
'downloader/response_bytes': 1134,
'downloader/response_count': 3,
'downloader/response_status_count/400': 1,
'downloader/response_status_count/404': 2,
'elapsed_time_seconds': 2.439215,
'finish_reason': 'Force Close!!!!!!',
'finish_time': datetime.datetime(2020, 5, 18, xx, xx, xx, XXXXXX),
'log_count/DEBUG': 3,
'log_count/ERROR': 2,
'log_count/INFO': 10,
'log_count/WARNING': 2,
'memusage/max': 56270848,
'memusage/startup': 56270848,
'response_received_count': 3,
'robotstxt/request_count': 2,
'robotstxt/response_count': 2,
'robotstxt/response_status_count/404': 2,
'scheduler/dequeued': 2,
'scheduler/dequeued/memory': 2,
'scheduler/enqueued': 2,
'scheduler/enqueued/memory': 2,
'splash/execute/request_count': 1,
'splash/execute/response_count/400': 1,
'start_time': datetime.datetime(2020, 5, 18, 6, 5, xx, xx, xx, XXXXXX)}
2020-05-18 XX:XX:XX [scrapy.core.engine] INFO: Spider closed (Force Close!!!!!!)

コメント・シェア

Scrapyのイベントドリブンで処理を実行する

 
カテゴリー Python   タグ

Signals

Scrapy uses signals extensively to notify when certain events occur. You can catch some of those signals in your Scrapy project (using an extension, for example) to perform additional tasks or extend Scrapy to add functionality not provided out of the box.

Scrapyはイベント発生時にシグナルを使って処理を拡張することができる。
リファレンスに示された以下のサンプルコードは、signals.spider_closedシグナルをキャッチしたときにspider_closed()メソッドを実行する例だ。

1
2
3
4
5
6
7
8
9
10
11
12
13
14
15
16
17
18
19
20
21
22
23
24
25
26
from scrapy import signals
from scrapy import Spider


class DmozSpider(Spider):
name = "dmoz"
allowed_domains = ["dmoz.org"]
start_urls = [
"http://www.dmoz.org/Computers/Programming/Languages/Python/Books/",
"http://www.dmoz.org/Computers/Programming/Languages/Python/Resources/",
]


@classmethod
def from_crawler(cls, crawler, *args, **kwargs):
spider = super(DmozSpider, cls).from_crawler(crawler, *args, **kwargs)
crawler.signals.connect(spider.spider_closed, signal=signals.spider_closed)
return spider


def spider_closed(self, spider):
spider.logger.info('Spider closed: %s', spider.name)


def parse(self, response):
pass

クロール終了時に統計情報を通知する

公式チュートリアルのQuotesSpiderをカスタマイズして、クロール終了時に統計情報へアクセスする例。
signals.spider_closedシグナルをキャッチしたときに統計情報を通知するなどの処理を実装することができる。

1
2
3
4
5
6
7
8
9
10
11
12
13
14
15
16
17
18
19
20
21
22
23
24
25
26
27
28
29
30
31
import scrapy
from scrapy import signals

class QuotesSpider(scrapy.Spider):
name = "quotes"
start_urls = [
'http://quotes.toscrape.com/page/1/',
]

@classmethod
def from_crawler(cls, crawler, *args, **kwargs):
spider = super(QuotesSpider, cls).from_crawler(crawler, *args, **kwargs)
crawler.signals.connect(spider.spider_closed, signal=signals.spider_closed)
return spider

def spider_closed(self, spider):
spider.logger.info('Spider closed!!!!!!!!!: %s', spider.name)
spider.logger.info(spider.crawler.stats.get_stats())

def parse(self, response):
for quote in response.css('div.quote'):
yield {
'text': quote.css('span.text::text').get(),
'author': quote.css('small.author::text').get(),
'tags': quote.css('div.tags a.tag::text').getall(),
}

next_page = response.css('li.next a::attr(href)').get()
if next_page is not None:
next_page = response.urljoin(next_page)
yield scrapy.Request(next_page, callback=self.parse)

シグナル処理によって出力された結果は以下。

1
2
3
4
5
6
7
8
9
10
11
12
2020-05-18 XX:XX:XX [scrapy.core.engine] INFO: Closing spider (finished)
2020-05-18 XX:XX:XX [scrapy.extensions.feedexport] INFO: Stored json feed (100 items) in: quotes.json
2020-05-18 XX:XX:XX [quotes] INFO: Spider closed!!!!!!!!!: quotes
2020-05-18 XX:XX:XX [quotes] INFO: {'log_count/INFO': 13, 'start_time': datetime.datetime(2020, 5, 18, xx, xx, xx, xxxxxx), 'memusage/startup': 55676928, 'memusage/max': 55676928, 'scheduler/enqueued/memory': 10, 'scheduler/enqueued': 10, 'scheduler/dequeued/memory': 10, 'scheduler/dequeued': 10, 'downloader/request_count': 11, 'downloader/request_method_count/GET': 11, 'downloader/request_bytes': 2895, 'robotstxt/request_count': 1, 'downloader/response_count': 11, 'downloader/response_status_count/404': 1, 'downloader/response_bytes': 24911, 'log_count/DEBUG': 111, 'response_received_count': 11, 'robotstxt/response_count': 1, 'robotstxt/response_status_count/404': 1, 'downloader/response_status_count/200': 10, 'item_scraped_count': 100, 'request_depth_max': 9, 'elapsed_time_seconds': 8.22286, 'finish_time': datetime.datetime(2020, 5, 18, xx, xx, xx, xxxxxx), 'finish_reason': 'finished'}
2020-05-18 XX:XX:XX [scrapy.statscollectors] INFO: Dumping Scrapy stats:
{'downloader/request_bytes': 2895,
'downloader/request_count': 11,
'downloader/request_method_count/GET': 11,
'downloader/response_bytes': 24911,
'downloader/response_count': 11,
'downloader/response_status_count/200': 10,
'downloader/response_status_count/404': 1,

コメント・シェア

Scrapyで統計情報を記録する

 
カテゴリー Python   タグ

Stats Collection

Scrapy provides a convenient facility for collecting stats in the form of key/values, where values are often counters. The facility is called the Stats Collector, and can be accessed through the stats attribute of the Crawler API, as illustrated by the examples in the Common Stats Collector uses section below.

統計情報は常に有効なので、Crawler APIの属性値を介してstatsにアクセスすることができる。

Spiderの中で統計情報を使う

公式チュートリアルのQuotesSpiderをカスタマイズして、統計情報を設定する。
SpiderはCrawlerを属性値として持つのでself.crawler.statsでStats Collectionにアクセスできる。

操作はStats Collector APIで行う。

1
2
3
4
5
6
7
8
9
10
11
12
13
14
15
16
17
18
19
20
21
22
23
import scrapy

class QuotesSpider(scrapy.Spider):
name = "quotes"
start_urls = [
'http://quotes.toscrape.com/page/1/',
]

def parse(self, response):
#print(self.crawler.stats.get_stats())
self.crawler.stats.inc_value('crawled_pages')
for quote in response.css('div.quote'):
self.crawler.stats.inc_value('crawled_items')
yield {
'text': quote.css('span.text::text').get(),
'author': quote.css('small.author::text').get(),
'tags': quote.css('div.tags a.tag::text').getall(),
}

next_page = response.css('li.next a::attr(href)').get()
if next_page is not None:
next_page = response.urljoin(next_page)
yield scrapy.Request(next_page, callback=self.parse)

実行終了時に標準の統計情報の結果と共にSpiderの中で設定したcrawled_pagescrawled_itemsが表示されている。

1
2
3
4
5
6
7
8
9
10
11
12
13
14
15
16
17
18
19
20
21
22
23
24
25
26
27
28
29
30
31
2020-05-18 XX:XX:XX [scrapy.core.engine] INFO: Closing spider (finished)
2020-05-18 XX:XX:XX [scrapy.extensions.feedexport] INFO: Stored json feed (100 items) in: quotes.json
2020-05-18 XX:XX:XX [scrapy.statscollectors] INFO: Dumping Scrapy stats:
{'crawled_items': 100,
'crawled_pages': 10,
'downloader/request_bytes': 2895,
'downloader/request_count': 11,
'downloader/request_method_count/GET': 11,
'downloader/response_bytes': 24911,
'downloader/response_count': 11,
'downloader/response_status_count/200': 10,
'downloader/response_status_count/404': 1,
'elapsed_time_seconds': 7.113748,
'finish_reason': 'finished',
'finish_time': datetime.datetime(2020, 5, 18, xx, xx, xx, XXXXXX),
'item_scraped_count': 100,
'log_count/DEBUG': 111,
'log_count/INFO': 11,
'memusage/max': 55717888,
'memusage/startup': 55717888,
'request_depth_max': 9,
'response_received_count': 11,
'robotstxt/request_count': 1,
'robotstxt/response_count': 1,
'robotstxt/response_status_count/404': 1,
'scheduler/dequeued': 10,
'scheduler/dequeued/memory': 10,
'scheduler/enqueued': 10,
'scheduler/enqueued/memory': 10,
'start_time': datetime.datetime(2020, 5, 18, xx, xx, xx, XXXXXX)}
2020-05-18 XX:XX:XX [scrapy.core.engine] INFO: Spider closed (finished)

コメント・シェア

Boto3でDynamoDBにまとめてアイテム登録

 
カテゴリー AWS Python   タグ

Boto3

Boto3でDynamoDBに登録する

dbインスタンスでAWSのアクセスキーを指定して初期化。

1
2
3
4
5
6
7
db = boto3.resource(
'dynamodb',
aws_access_key_id=os.environ['AWS_ACCESS_KEY_ID'],
aws_secret_access_key=os.environ['AWS_SECRET_ACCESS_KEY'],
region_name=os.environ['AWS_DEFAULT_REGION'],
)
table = db.Table(table_name)

itemに格納するデータをハッシュで入れていた場合、JSON形式にして格納すればいい。

1
table.put_item({k: v for k, v in item.items()})

Creates a new item, or replaces an old item with a new item. If an item that has the same primary key as the new item already exists in the specified table, the new item completely replaces the existing item. You can perform a conditional put operation (add a new item if one with the specified primary key doesn’t exist), or replace an existing item if it has certain attribute values. You can return the item’s attribute values in the same operation, using the ReturnValues parameter.

存在しない場合は追加され、既存のレコードがある場合はレコードが置き換えられる。置き換えたくない場合は条件付き操作で制御する。

batch_writer

複数のレコードを効率的に書き込むbatch_writer()がある。batch_writer()を使用すると、バッファリングと再送を自動的に行うことができる。エラーの場合に適宜待ち時間を挟んでリトライする。

1
2
3
4
def batch_put_table(table, records):
with table.batch_writer() as batch:
for record in records:
batch.put_item({k: v for k, v in record.items()})

Create a batch writer object.

This method creates a context manager for writing objects to Amazon DynamoDB in batch.

The batch writer will automatically handle buffering and sending items in batches. In addition, the batch writer will also automatically handle any unprocessed items and resend them as needed. All you need to do is call put_item for any items you want to add, and delete_item for any items you want to delete.

バッチライターは未処理のアイテムも自動的に再送を行う。追加の場合put_item()、削除の場合delete_item()を呼べばよい。

キャパシティを超えた時の動作

DynamoDBにput_item()で書き込んだ場合に、キャパシティユニットの上限値を超えるとHTTPステータスコード400のThrottlingException (Message: Rate of requests exceeds the allowed throughput.)を発生させる。

batch_writerを使用している場合、一時的な超過であればリトライによってリカバリーされるが、書き込み量に対してキャパシティユニットが知さすぎる場合は、リトライアウトしてしまい、書き込みエラーとなる。

DynamoDBのCloudWatchによる統計情報

  • 中央より左側が書き込み量の調整をせずbatch_writer()によって大量投入した場合の動作
  • 中央より右側が書き込むレコード数を適当な数毎に区切ってbatch_writer()に渡して処理した場合の動作

書き込みキャパシティーをみると、左側は割り当てた1を大きく超えて消費していることがわかる。
右側では統計情報上は1を超えているが、ThrottlingExceptionは発生しなかった。

AWS DynamoDB Statistics width=640

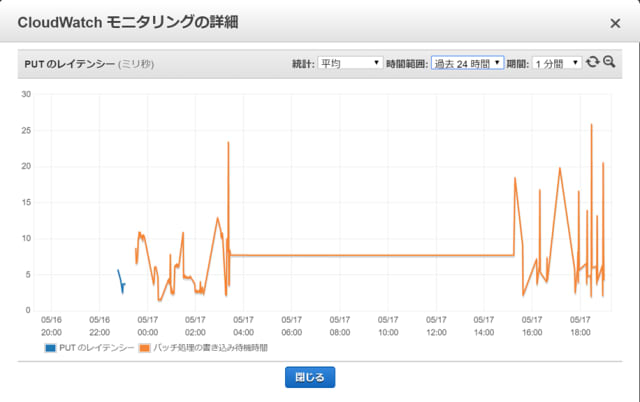
PUTのレイテンシーは平均値としてはばらつきが大きいが、似たような値である。

AWS DynamoDB Statistics width=640

合計値はリトライが減ったことにより右側が少なくなっている。

AWS DynamoDB Statistics width=640

スロットル書き込みはThrottlingExceptionが発生している状態である。左側は多発していることがわかる。

AWS DynamoDB Statistics width=640

AWS DynamoDB Statistics width=640

コメント・シェア

ItemPipeline

After an item has been scraped by a spider, it is sent to the Item Pipeline which processes it through several components that are executed sequentially.

Each item pipeline component (sometimes referred as just “Item Pipeline”) is a Python class that implements a simple method. They receive an item and perform an action over it, also deciding if the item should continue through the pipeline or be dropped and no longer processed.

SpiderでItemがスクレイプされた後、ItemPipelineに送られ、処理される。

Typical uses of item pipelines are:

  • cleansing HTML data
  • validating scraped data (checking that the items contain certain fields)
  • checking for duplicates (and dropping them)
  • storing the scraped item in a database

典型的なItemPipelineの例は

  • HTMLのクレンジング
  • バリデーション
  • 重複チェック
  • データベースへの保存

取得したデータの保存に限らず、クレンジング/バリデーション/重複チェックといったデータのチェック整形もパイプラインが担う。

Activating an Item Pipeline component

To activate an Item Pipeline component you must add its class to the ITEM_PIPELINES setting, like in the following example:

1
2
3
4
>ITEM_PIPELINES = {
'myproject.pipelines.PricePipeline': 300,
'myproject.pipelines.JsonWriterPipeline': 800,
>.}

The integer values you assign to classes in this setting determine the order in which they run: items go through from lower valued to higher valued classes. It’s customary to define these numbers in the 0-1000 range.

settings.pyのITEM_PIPELINESで有効化。0~1000の値で実行順序を制御している。

MongoDBの例

公式サイトのpymongoを使いMongoDBへ追加するサンプル

__init__from_crawler()はパイプライン自体を生成し、DBに関する設定値を読み取っている。
crawler.settingsからsettings.pyで設定したパラメーターを取得することができる。

open_spider()close_spider()はDBへの接続/切断処理を行い、process_item()で生成されたitemを追加していく。

1
2
3
4
5
6
7
8
9
10
11
12
13
14
15
16
17
18
19
20
21
22
23
24
25
26
27
import pymongo

class MongoPipeline:

collection_name = 'scrapy_items'

def __init__(self, mongo_uri, mongo_db):
self.mongo_uri = mongo_uri
self.mongo_db = mongo_db

@classmethod
def from_crawler(cls, crawler):
return cls(
mongo_uri=crawler.settings.get('MONGO_URI'),
mongo_db=crawler.settings.get('MONGO_DATABASE', 'items')
)

def open_spider(self, spider):
self.client = pymongo.MongoClient(self.mongo_uri)
self.db = self.client[self.mongo_db]

def close_spider(self, spider):
self.client.close()

def process_item(self, item, spider):
self.db[self.collection_name].insert_one(dict(item))
return item

DynamoDBの例

Scrapy公式ではないが、GitHubでscrapy-dynamodbというScrapy向けのItemPipelineが公開されている。
基本的な記述は公式のMongoDBの例と同じだが、余剰なコードが多い。

1
2
3
4
5
6
7
8
9
10
11
12
13
14
15
16
17
18
19
20
21
22
23
24
25
26
27
28
29
30
31
32
33
34
35
36
37
38
39
40
41
42
43
44
45
46
47
48
49
50
51
52
53
54
55
56
57
import datetime
import boto3


def default_encoder(value):
if isinstance(value, datetime.datetime):
return value.strftime('%Y-%m-%d %H:%M:%S')
elif isinstance(value, datetime.date):
return value.strftime('%Y-%m-%d')
elif isinstance(value, datetime.time):
return value.strftime('%H:%M:%S')
else:
return value


class DynamoDbPipeline(object):

def __init__(self, aws_access_key_id, aws_secret_access_key, region_name,
table_name, encoder=default_encoder):
self.aws_access_key_id = aws_access_key_id
self.aws_secret_access_key = aws_secret_access_key
self.region_name = region_name
self.table_name = table_name
self.encoder = encoder
self.table = None

@classmethod
def from_crawler(cls, crawler):
aws_access_key_id = crawler.settings['AWS_ACCESS_KEY_ID']
aws_secret_access_key = crawler.settings['AWS_SECRET_ACCESS_KEY']
region_name = crawler.settings['DYNAMODB_PIPELINE_REGION_NAME']
table_name = crawler.settings['DYNAMODB_PIPELINE_TABLE_NAME']
return cls(
aws_access_key_id=aws_access_key_id,
aws_secret_access_key=aws_secret_access_key,
region_name=region_name,
table_name=table_name
)

def open_spider(self, spider):
db = boto3.resource(
'dynamodb',
aws_access_key_id=self.aws_access_key_id,
aws_secret_access_key=self.aws_secret_access_key,
region_name=self.region_name,
)
self.table = db.Table(self.table_name) # pylint: disable=no-member

def close_spider(self, spider):
self.table = None

def process_item(self, item, spider):
self.table.put_item(
TableName=self.table_name,
Item={k: self.encoder(v) for k, v in item.items()},
)
return item

コメント・シェア

DynamoDBでテーブルを作る

 
カテゴリー AWS Database   タグ

テーブル(暗黙的なインデックス)

PrimaryKey

DynamoDBのプライマリキーはパーティションキーのみのものとソートキーを組み合わせた複合キーがある。

PartitionKey (HashKey)

Amazon DynamoDB はデータをパーティションに保存します。パーティションは、ソリッドステートドライブ (SSD) によってバックアップされ、AWS リージョン内の複数のアベイラビリティーゾーン間で自動的にレプリケートされる、テーブル用のストレージの割り当てです。
一般的に言えば、テーブルとそのセカンダリインデックスの論理的なすべてのパーティションキー全体でアクティビティが均一になるようにアプリケーションを設計する必要があります。

パーティションキーのみのプライマリキーの場合、プライマリキーで一意にレコードを特定する。

SortKey (RangeKey)

Amazon DynamoDB テーブルで、テーブルの各項目を一意に識別する主キーは、パーティションキーだけでなくソートキーから構成されている場合があります。

設計が優れたソートキーには、2 つの主な利点があります。

関連情報を 1 つの場所にまとめて、効率的にクエリを実行することができます。ソートキーを慎重に設計することで、begins_with、between、>、< などの演算子による範囲のクエリを使用して、一般的に必要な関連項目のグループを検索することができます。

複合ソートキーを作成すれば、データの階層的 (1 対多) な関係を定義して、任意の階層レベルでクエリを実行することができます。

パーティションキー+ソートキーのプライマリキーの場合、この組合せで一意にレコードを特定する。
また、ソートキーにより範囲検索が可能になる。

インデックス

LocalSecondaryIndexes (LSI)

local secondary index は特定のパーティションキー値の代替ソートキーを維持します。また local secondary index には、ベーステーブルの一部またはすべての属性のコピーが含まれます。テーブルを作成する際に、local secondary index に射影する属性を指定します。local secondary indexのデータは、ベーステーブルと同じパーティションキーと、異なるソートキーで構成されます。これにより、この異なるディメンションにわたってデータ項目に効率的にアクセスできます。クエリまたはスキャンの柔軟性を向上するために、テーブルごとに最大 5 つのlocal secondary indexを作成できます。

テーブルとは異なるソートキーを持つインデックス。最大5個まで作成できる。

local secondary index は、すべて次の条件を満たす必要があります。
パーティションキーはそのベーステーブルのパーティションキーと同じである。
ソートキーは完全に 1 つのスカラー属性で構成されている。
ベーステーブルのソートキーがインデックスに射影され、非キー属性として機能する。

パーティションキーは同じで、テーブルのソートキーは非キー属性として機能する。

ローカルセカンダリインデックスがあるテーブルには、パーティションキーの値ごとに 10 GB のサイズ制限があります。ローカルセカンダリインデックスがあるテーブルには、1 つのパーティションキー値の合計サイズが 10 GB を超えない限り、任意の数の項目を格納できます。

GlobalSecondaryIndexes (GSI)

非キー属性に対するクエリの速度を上げるために、グローバルセカンダリインデックス を作成できます。グローバルセカンダリインデックスには、ベーステーブルからの属性の一部が格納されますが、テーブルのプライマリキーとは異なるプライマリキーによって構成されます。インデックスキーは、テーブルからのキー属性を持つ必要がありません。また、テーブルと同じキースキーマを使用する必要もありません。

テーブルとは異なるパーティションキーを持つインデックス。

すべてのグローバルセカンダリインデックスには、パーティションキーが必要で、オプションのソートキーを指定できます。インデックスキースキーマは、テーブルスキーマとは異なるものにすることができます。

テーブルスキーマと異なるパーティションキーとソートキーを利用することができる。

DynamoDB テーブルでは、各キー値は一意である必要があります。ただし、グローバルセカンダリインデックス のキー値は一意である必要はありません。

グローバルセカンダリーインデックスのキーは一意でなくていい。

簡単なテーブルを作成する

dynamodb.yml

1
2
3
4
5
6
7
8
9
10
11
12
13
14
15
16
17
18
19
20
21
22
23
24
25
26
27
28
29
30
31
32
33
34
35
36
37
38
39
40
41
42
43
44
45
46
47
48
49
50
51
52
53
54
55
56
57
58
59
60
61
62
63
64
65
66
67
68
69
70
AWSTemplateFormatVersion: "2010-09-09"
Description: DynamoDB

Metadata:
# ------------------------------------------------------------ #
# Input Parameters
# ------------------------------------------------------------ #
"AWS::CloudFormation::Interface":
ParameterGroups:
- Label:
default: "Dynamo DB"
Parameters:
- TableName

ParameterLabels:
TableName:
default: "myTable"

Parameters:
TableName:
Type: String

Resources:
# ------------------------------------------------------------ #
# DynamoDB
# ------------------------------------------------------------ #
Resources:
DDBTable:
Type: AWS::DynamoDB::Table
Properties:
TableName: !Ref TableName
AttributeDefinitions:
-
AttributeName: "ArtistId"
AttributeType: "S"
-
AttributeName: "Concert"
AttributeType: "S"
-
AttributeName: "TicketSales"
AttributeType: "S"
KeySchema:
-
AttributeName: "ArtistId"
KeyType: "HASH"
-
AttributeName: "Concert"
KeyType: "RANGE"
GlobalSecondaryIndexes:
-
IndexName: "GSI"
KeySchema:
-
AttributeName: "TicketSales"
KeyType: "HASH"
Projection:
ProjectionType: "KEYS_ONLY"
ProvisionedThroughput:
ReadCapacityUnits: 5
WriteCapacityUnits: 5
ProvisionedThroughput:
ReadCapacityUnits: 5
WriteCapacityUnits: 5

# ------------------------------------------------------------ #
# Output Parameters
# ------------------------------------------------------------ #
Outputs:
DynamoDBTable:
Value: !Ref DDBTable

parameters.json

ホストするドメイン名

1
2
3
4
5
6
[
{
"ParameterKey": "TableName",
"ParameterValue": "mytesttable"
}
]

CloudFormationでテーブルを作成する

1
2
3
4
$ aws cloudformation create-stack --stack-name tutorial-dynamodb --template-body "file://./dynamodb.yml" --parameters "file://./parameters.json"
{
"StackId": "arn:aws:cloudformation:ap-northeast-1:XXXXXXXXXXX:stack/tutorial-dynamodb/XXXXXXXXXXX-XXXX-XXXX-XXXX-XXXXXXXXXXXX"
}

作成されたテーブル

AWS Consoleのダッシュボードでキャパシティを確認できる。
今回の例ではテーブルとインデックスで、読み込み書き込みそれぞれ5ユニット指定しているため、10になっている。

DynamoDB Table width=640

テーブルには作成されたテーブルが表示されている。

DynamoDB Table width=640

項目でテーブルの内容を確認できる。今回の例ではインデックス以外の属性が見えている。

DynamoDB Table width=640

キャパシティータブでは設定したキャパシティの内訳を見ることができる。

DynamoDB Table width=640

作成したインデックス。

DynamoDB Table width=640

Table

AttributeDefinitions

AttributeType
属性のデータ型。
S - 属性は文字列型
N - 属性は数値型
B - 属性はバイナリ型

KeySchema

KeyType
キー属性が担うロール:
HASH - パーティションキー
RANGE - ソートキー

LocalSecondaryIndex / GlobalSecondaryIndex

コメント・シェア

DynamoDBのキャパシティモード

 
カテゴリー AWS Database   タグ

キャパシティモード

Amazon DynamoDB には、テーブルで読み込みおよび書き込みを処理するための読み込み/書き込みキャパシティーモードが 2 つあります。

  • オンデマンド
  • プロビジョニング済み (デフォルト、無料利用枠の対象)

無料枠

25 GB のストレージ
25 個のプロビジョニングされた書き込みキャパシティーユニット (WCU)
25 個のプロビジョニングされた読み込みキャパシティーユニット (RCU)
1 か月あたり最大 2 億リクエストの処理が十分に可能。

料金

DynamoDB では、DynamoDB テーブル内のデータの読み取り、書き込み、保存に加え、お客様が有効化したオプション機能が課金の対象となります。DynamoDB には「オンデマンド」と「プロビジョニング済み」という 2 種類のキャパシティーモードがあり、それぞれのモードにおけるテーブルの読み書き処理について別個の請求オプションがあります。

オンデマンド(on-demand capacity mode)とプロビジョニング済(provisioned capacity mode)で料金が異なる。

オンデマンドキャパシティーモードを利用している場合、料金は、アプリケーションがテーブルにおいて実行したデータの読み込み/書き込みリクエストに対して発生します。ワークロードの拡大や縮小は DynamoDB によってその場で対応されるため、お客様はアプリケーションの読み込み/書き込みスループットの予測を指定する必要がありません。

オンデマンドは従量課金でリクエストに対する課金。

プロビジョニングされたキャパシティーのモードでは、アプリケーションに必要な 1 秒あたりのデータ読み込みと書き込みの回数を指定します。Auto Scaling を使用すれば、指定した利用率に応じてテーブルのキャパシティーが自動的に調整されるので、アプリケーションのパフォーマンスを確保しつつコストを削減できます。

プロビジョニングは事前にキャパシティユニットとしてリソースを定義する。

on-demand capacity mod

DynamoDB テーブルにオンデマンドキャパシティーモードを選択している場合、アプリケーションが実行する読み込みと書き込みに対してのみ課金されます。テーブルのスループット容量を管理することなく、必要に応じて API コールを実行できます。DynamoDB では、ワークロードで一貫性と低レイテンシーを実現できるよう、ハードウェアリソースが自動的に管理されます。書き込み (1 KB まで) については、1 回につき書き込みリクエストが 1 単位発生し、トランザクション書き込みでは 1 回につき書き込みリクエストが 2 単位発生します。読み込みについては、強力な整合性のある読み込み (4 KB まで) 1 回につき 1 単位、トランザクション読み込み 1 回につき 2 単位、結果整合性のある読み込み 1 回につき 0.5 単位の読み込みリクエストが発生します。

要求単位(request)で料金が決まる。

  • 標準(standard)
    • 1KB * 1回 / 1単位
  • トランザクション(transactional)
    • 1KB * 1回 / 2単位

読み込みの場合は、整合性によって料金が異なる。

  • 強力な整合性(strongly consistent)
    • 4KB*1回 = 1単位
  • 結果整合性(eventually consistent)
    • 4KB*1回 = 0.5単位
  • トランザクション(transactional)
    • 4KB*1回 = 2単位

リージョン:
料金タイプ 料金
書き込み要求単位 書き込み要求ユニット 100 万あたり 1.4269USD
読み出し要求単位 書き込み要求ユニット 100 万あたり 0.285USD

書き込み要求は高い。2020年5月13日時点で、AWSのサイトの日本語表記が間違っているが、読み出し要求単位の行は書き込みではなく読み込み(英語表示はreadになっている)。

provisioned capacity mode

読み込みキャパシティーユニット (RCU): テーブルからデータを読み込むための各 API コールを読み込み要求といいます。読み込み要求は、強力な整合性のある読み込み、結果整合性のある読み込み、またはトランザクション読み込みとなります。項目のサイズが 4 KB までなら、RCU 1 個で、強力な整合性のある読み込み要求を 1 秒あたり 1 回実行できます。項目が 4 KB より大きい場合、追加の RCU が必要です。項目のサイズが 4 KB までなら、RCU 1 個で、結果整合性のある読み込み要求を 1 秒あたり 2 回実行できます。トランザクション読み込み要求では、4 KB までの項目を 1 秒あたり 1 回読み込むのに RCU 2 個が必要です。例えば、8 KB の項目であれば、強力な整合性のある読み込みには RCU 2 個、結果整合性のある読み込みには RCU 1 個、トランザクション読み込みには RCU 4 個がそれぞれ必要になります。

  • 強力な整合性(strongly consistent)
    • 4KB*1回/1sec = 1RCU
  • 結果整合性(eventually consistent)
    • 4KB*2回/1sec = 1RCU
  • トランザクション(transactional)
    • 4KB*1回/1sec = 2RCU

書き込みキャパシティーユニット (WCU): テーブルにデータを書き込むための各 API コールを書き込み要求といいます。項目のサイズが 1 KB までなら、WCU 1 個で、標準の書き込み要求を 1 秒あたり 1 回実行できます。項目が 1 KB より大きい場合、追加の WCU が必要です。トランザクション書き込み要求では、1 KB までの項目を 1 秒あたり 1 回書き込むのに WCU 2 個が必要です。たとえば、1 KB の項目の標準書き込み要求には WCU 1 個、3 KB の項目の標準書き込み要求には WCU 3 個、3 KB の項目のトランザクション書き込み要求には WCU 6 個が必要になります。

  • 標準(standard)
    • 1KB*1回/1sec = 1WCU
  • トランザクション(transactional)
    • 1KB*1回/1sec = 2WCU

リージョン:
プロビジョニングするスループットタイプ 時間あたりの料金
書き込みキャパシティーユニット (WCU) 0.000742USD/WCU
読み込みキャパシティーユニット (RCU) 0.0001484USD/RCU

割当てたキャパシティユニットを越えた場合

ProvisionedThroughputExceededException
メッセージ : 1 つのテーブルまたは 1 つ以上のグローバルセカンダリインデックスのプロビジョンドスループットが許容されている最大値を超えました。プロビジョンドスループットと消費スループットのパフォーマンスメトリクスを表示するには、Amazon CloudWatch コンソールを参照してください。

ProvisionedThroughputExceededExceptionがスローされる。

コメント・シェア

cron構文を使用したワークフローの実行

POSIX クーロン構文を使用して、特定の UTC 時間にワークフローを実行できるようスケジュール設定できます。 スケジュールしたワークフローは、デフォルトまたはベースブランチの直近のコミットで実行されます。 スケジュールされたワークフローを実行できる最短のインターバルは5分ごとです。

1
2
3
4
on:
schedule:
# * はYAMLに置ける特殊文字なので、この文字列は引用符で囲まなければならない
- cron: '*/15 * * * *'

よくあるcron設定。

1
2
3
4
5
6
7
8
9
┌───────────── 分 (0 - 59)
│ ┌───────────── 時間 (0 - 23)
│ │ ┌───────────── 日 (1 - 31)
│ │ │ ┌───────────── 月 (1 - 12 または JAN-DEC)
│ │ │ │ ┌───────────── 曜日 (0 - 6 または SUN-SAT)
│ │ │ │ │
│ │ │ │ │
│ │ │ │ │
* * * * *

注釈: GitHub Actions は、非標準的構文 (@yearly、@monthly、@weekly、@daily、@hourly、@reboot) をサポートしていません。

深夜2時にワークフローを実行する例

ワークフロー例

1
2
3
4
5
6
7
8
9
10
11
12
on:
schedule:
# At 02:00.(JST) → At 17:00.(UTC)
- cron: '0 17 * * *'

# A workflow run is made up of one or more jobs that can run sequentially or in parallel
jobs:
# This workflow contains a single job called "build"
build:
# The type of runner that the job will run on
runs-on: ubuntu-latest
timeout-minutes: 10

UTC時間に注意

GitHub ActionsでScheduleに使用できるcronはUTC時間で実行されるので、JST(+9:00)との差を考慮して設定が必要。

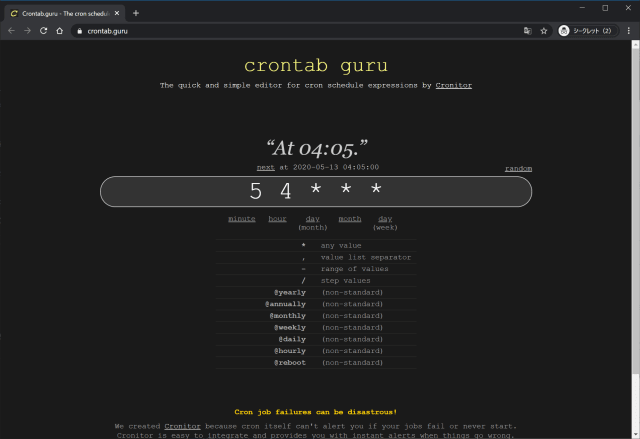
crontab guru を使うと、クーロン構文の生成および実行時間の確認に役立ちます。 また、クーロン構文の生成を支援するため、crontab guru のサンプルリストもあります。

GitHubのリファレンスで紹介されているcrontab.guruが使いやすい。

crontabguru width=640

実行時のタイムアウトを設定する

GitHub Actionsのプライベートリポジトリでの制限時間枠を浪費しないため、深夜に起動したジョブが終了しない場合のタイムアウトを設定する。

jobs..steps.timeout-minutes
プロセスがkillされるまでにステップが実行できる最大の分数。

jobs..timeout-minutes
GitHubで自動的にキャンセルされるまでジョブを実行する最長時間 (分)。 デフォルト: 360

デフォルトではjob全体でのtimeout-minutesは360分が設定されている。

Jobの実行結果をもとに適当な値を設定する。

GithubActions width=640

タイムアウトするとジョブはキャンセルされる

GithubActions width=640

コメント・シェア

GitHub Actionsとdocker-compose

GitHub Actionsではdockerhubのイメージを使ったワークフローが組めるが、docker-composeも使える。ローカル開発時はdocker-composeで制御することが多いので、そのまま活用できるのはシンプルで強力。

ワークフローの書き方

1
2
3
4
5
6
7
8
9
10
11
12
13
14
15
16
17
18
19
20
21
22
23
24
25
26
27
28
29
30
31
# This is a basic workflow to help you get started with Actions
name: docker-compose

# Controls when the action will run. Triggers the workflow on push or pull request
# events but only for the master branch
on:
push:
branches:
- master

# A workflow run is made up of one or more jobs that can run sequentially or in parallel
jobs:
# This workflow contains a single job called "build"
build:
# The type of runner that the job will run on
runs-on: ubuntu-latest

# Steps represent a sequence of tasks that will be executed as part of the job
steps:
# Checks-out your repository under $GITHUB_WORKSPACE, so your job can access it
- uses: actions/checkout@v2

# Runs a single command using the runners shell
- name: compose-run
shell: bash
env:
ENVENV1: ${{ secrets.ENVENV1 }}
ENVENV2: ${{ secrets.ENVENV2 }}
run: |
docker-compose up -d
docker-compose exec -T app bash xxxxxxxx.sh

環境変数とシークレット

docker-composeのパラメーター定義

Dockerに渡すパラメーターは環境変数としてdocker-compose.ymlで次の定義をする。

1
2
3
4
environment:
PYTHONDONTWRITEBYTECODE: 1
ENVENV1: ${ENVENV1}
ENVENV2: ${ENVENV2}

ローカル開発中のパラメーター

docker-compose.ymlはGitリポジトリに含めるため、公開すべきでないパラメーターは.envファイルに記述する。
.envファイルは.gitignoreで管理対象外として定義しておく。

1
2
ENVENV1=xxxxxxxxxxxxxx
ENVENV2=yyyyyyyyyyyyyy

GitHub Actionsでのパラメーター

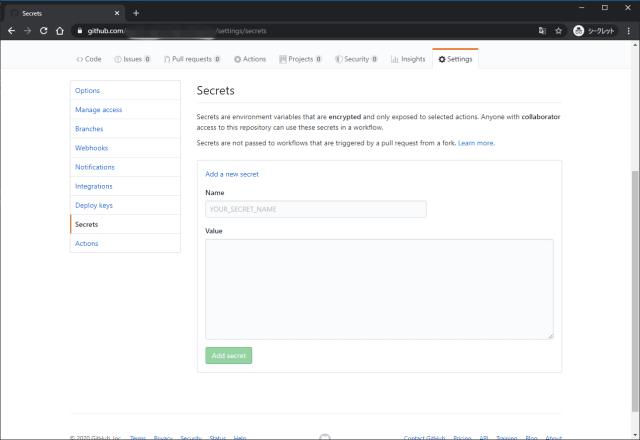
GitHub Actionsでは.envのかわりに、リポジトリの設定でSecretsを使用して定義する。
たとえばSecretsに定義したパラメーターをGitHub Actionsで参照するのは以下の定義になる。

1
2
3
env:
ENVENV1: ${{ secrets.ENVENV1 }}
ENVENV2: ${{ secrets.ENVENV2 }}

GitHub Secrets width=640

ワークフローでdocker-composeを使う

docker-composeの起動方法

そのままdocker-composeコマンドが使用できる。

docker-compose内で定義されたDBなどの依存するサービスはdocker-compose up -dで起動し、docker-compose exec -T app bash xxxxxx.shでメインのコードを実行する。

  • docker-compose up -dはサービスを起動して、コマンド自体は終了
  • docker-compose execでバックグラウンド起動したサービスにAttachし目的のコマンドを実行

the input device is not a TTY

docker-compose exec -T app bash xxxxxxxx.shの実行でエラーになった。

1
2
the input device is not a TTY
##[error]Process completed with exit code 1.

解決方法は2つある

  1. 環境変数COMPOSE_INTERACTIVE_NO_CLI=1を使用する
  2. docker-compose exec -Tで起動する

コメント・シェア


nullpo

めも


募集中


Japan