ポリシーを定義する

Inline Policy (AWS::IAM::Policy)

設定した対象のみに適用。User, Group, Roleに対して設定することができる。
複数のGroupに同じ内容をコピペが必要など面倒だった。

Managed Policy (AWS::IAM::ManagedPolicy)

複数に適用できる。独立したポリシーとして定義して参照することができる。
AWS既定のAWS Managed Policy、ユーザによって作成可能なCustomer Managed Policyがある。

Customer Managed Policyを定義する

たとえばDynamoDBの特定のテーブル(mytable************)をRead、Write可能とするポリシーの例。

1
2
3
4
5
6
7
8
9
10
11
12
13
14
15
16
17
18
19
20
21
22
23
24
25
Resources:
MyGroupPolicy:
Type: "AWS::IAM::ManagedPolicy"
Properties:
Description: "can read mytable only"
PolicyDocument:
Version: "2012-10-17"
Statement:
- Sid: "AllowReadDynamoDBMyTables"
Effect: "Allow"
Action:
- "dynamodb:DescribeTable"
# Read
- "dynamodb:BatchGet*"
- "dynamodb:Get*"
- "dynamodb:Query"
- "dynamodb:Scan"
# Write
- "dynamodb:BatchWrite*"
- "dynamodb:Update*"
- "dynamodb:PutItem"
- "dynamodb:Delete*"
Resource:
- !Sub arn:aws:dynamodb:*:*:table/${TableName}*
- !Sub arn:aws:dynamodb:*:*:table/${TableName}*/index/*

ポリシーを適用したIAMユーザを作成する

グループを定義してポリシーをアタッチする

1
2
3
4
5
6
MyIamGroup:
Type: AWS::IAM::Group
Properties:
GroupName: !Ref MyIamGroupName
ManagedPolicyArns:
- !Ref MyGroupPolicy

ユーザを定義してポリシーをアタッチする

1
2
3
4
5
6
7
8
Resources:
MyIamUser:
Type: AWS::IAM::User
Properties:
Groups:
- !Ref MyIamGroup
UserName:
!Ref MyIamUserName

アクセスキーを作る

1
2
3
4
5
Resources:
MyIamAccessKey:
Type: AWS::IAM::AccessKey
Properties:
UserName: !Ref MyIamUser

作成したアクセスキーのSecretは!GetAtt MyIamAccessKey.SecretAccessKeyで参照できる。

上記を統合したCloudFormation定義

1
2
3
4
5
6
7
8
9
10
11
12
13
14
15
16
17
18
19
20
21
22
23
24
25
26
27
28
29
30
31
32
33
34
35
36
37
38
39
40
41
42
43
44
45
46
47
48
49
50
51
52
53
54
55
56
57
58
59
60
61
62
63
64
65
66
67
68
69
70
71
72
73
74
75
76
77
78
79
80
81
82
83
84
85
86
87
88
89
90
91
92
93
94
95
96
97
98
99
100
101
102
103
104
105
106
107
108
109
110
AWSTemplateFormatVersion: "2010-09-09"
Description: "Read Only Users for DynamoDB MyTables"

Metadata:
# ------------------------------------------------------------ #
# Input Parameters
# ------------------------------------------------------------ #
"AWS::CloudFormation::Interface":
ParameterGroups:
- Label:
default: "mytable"
Parameters:
- TableName
- Label:
default: "mygroup"
Parameters:
- MyIamGroupName
- Label:
default: "myuser"
Parameters:
- MyIamUserName

ParameterLabels:
TableName:
default: "mytable"
MyIamGroupName:
default: "mygroup"
MyIamUserName:
default: "myuser"

Parameters:
TableName:
Type: String
MyIamGroupName:
Type: String
MyIamUserName:
Type: String

Resources:
# ------------------------------------------------------------ #
# ManagedPolicy
# ------------------------------------------------------------ #
MyGroupPolicy:
Type: "AWS::IAM::ManagedPolicy"
Properties:
Description: "can read mytable only"
PolicyDocument:
Version: "2012-10-17"
Statement:
- Sid: "AllowReadDynamoDBMyTables"
Effect: "Allow"
Action:
- "dynamodb:DescribeTable"
# Read
- "dynamodb:BatchGet*"
- "dynamodb:Get*"
- "dynamodb:Query"
- "dynamodb:Scan"
# Write
- "dynamodb:BatchWrite*"
- "dynamodb:Update*"
- "dynamodb:PutItem"
- "dynamodb:Delete*"
Resource:
- !Sub arn:aws:dynamodb:*:*:table/${TableName}*
- !Sub arn:aws:dynamodb:*:*:table/${TableName}*/index/*

# ------------------------------------------------------------ #
# Group
# ------------------------------------------------------------ #
MyIamGroup:
Type: AWS::IAM::Group
Properties:
GroupName: !Ref MyIamGroupName
ManagedPolicyArns:
- !Ref MyGroupPolicy

# ------------------------------------------------------------ #
# User
# ------------------------------------------------------------ #
MyIamUser:
Type: AWS::IAM::User
Properties:
Groups:
- !Ref MyIamGroup
UserName:
!Ref MyIamUserName

# ------------------------------------------------------------ #
# AccessKey
# ------------------------------------------------------------ #
MyIamAccessKey:
Type: AWS::IAM::AccessKey
Properties:
UserName: !Ref MyIamUser

# ------------------------------------------------------------ #
# Output Parameters
# ------------------------------------------------------------ #
Outputs:
CreatedKey:
Value: !Ref MyIamAccessKey
CreatedSecret:
Value: !GetAtt MyIamAccessKey.SecretAccessKey
CreatedUser:
Value: !Ref MyIamUser
CreatedGroup:
Value: !Ref MyIamGroup
CreatedManagedPolicy:
Value: !Ref MyGroupPolicy

参考

1
2
3
4
5
6
7
8
9
10
11
12
13
14
15
16
17
18
19
20
21
22
23
24
25
26
27
28
29
30
31
32
33
34
{
"Version": "2012-10-17",
"Statement": [
{
"Sid": "ListAndDescribe",
"Effect": "Allow",
"Action": [
"dynamodb:List*",
"dynamodb:DescribeReservedCapacity*",
"dynamodb:DescribeLimits",
"dynamodb:DescribeTimeToLive"
],
"Resource": "*"
},
{
"Sid": "SpecificTable",
"Effect": "Allow",
"Action": [
"dynamodb:BatchGet*",
"dynamodb:DescribeStream",
"dynamodb:DescribeTable",
"dynamodb:Get*",
"dynamodb:Query",
"dynamodb:Scan",
"dynamodb:BatchWrite*",
"dynamodb:CreateTable",
"dynamodb:Delete*",
"dynamodb:Update*",
"dynamodb:PutItem"
],
"Resource": "arn:aws:dynamodb:*:*:table/MyTable"
}
]
}

コメント・シェア

Scrapyのクロール結果をJSONLで出力する

 
カテゴリー Python   タグ

JSONL(JSON Line)で出力する方法

FEEDを使って設定する

settings.pyに以下の設定を追記するのみ。

1
2
3
4
5
6
# FEED
FEED_EXPORTERS = {
'jsonlines': 'scrapy.exporters.JsonLinesItemExporter',
}
FEED_FORMAT = 'jsonlines'
FEED_URI = "ファイル名.jsonl"

クローラー実行中にファイル名を参照する

クローラー中で前回の実行結果を参照したい場合self.settings['FEED_URI']でファイル名を取得できる

1
2
3
4
5
6
7
import json

...略...

with open(self.settings['FEED_URI'], "r") as f:
for readline in f.readlines():
item = json.loads(readline)

設定パラメーターが古い

期待通りの動作をするが、以下の警告が表示される

1
WARNING: /usr/local/lib/python3.8/site-packages/scrapy/extensions/feedexport.py:210: ScrapyDeprecationWarning: The `FEED_URI` and `FEED_FORMAT` settings have been deprecated in favor of the `FEEDS` setting. Please see the `FEEDS` setting docs for more details

FEED_URIFEED_FORMATはすでにDeprecatedのようだ。

新しい設定としてFEEDSで、dict型で設定を行う(FEEDS)。

1
2
3
4
5
6
7
8
9
10
11
12
13
14
15
16
17
18
19
20
21
22
FEEDS = {
'items.json': {
'format': 'json',
'encoding': 'utf8',
'store_empty': False,
'fields': None,
'indent': 4,
'item_export_kwargs': {
'export_empty_fields': True,
},
},
'/home/user/documents/items.xml': {
'format': 'xml',
'fields': ['name', 'price'],
'encoding': 'latin1',
'indent': 8,
},
pathlib.Path('items.csv'): {
'format': 'csv',
'fields': ['price', 'name'],
},
}

JSONL形式の設定を新しいFEEDSパラメーターで定義すると

1
2
3
4
5
6
7
8
9
10
11
12
13
14
15
16
17
# FEED
FEED_EXPORTERS = {
'jsonlines': 'scrapy.exporters.JsonLinesItemExporter',
}

FEEDS = {
'ファイル名.jsonl': {
'format': 'jsonlines',
'encoding': 'utf8',
'store_empty': False,
'fields': None,
'indent': 4,
'item_export_kwargs': {
'export_empty_fields': True,
},
},
}

コメント・シェア

Alexaアカウントリンクチュートリアル

チュートリアル

Alexa Skills公式チュートリアルで作成した応答メッセージを返すだけのSkillをカスタマイズして、アカウントリンクによって、対象ユーザの情報を返すスキルにする。

Auth0設定

a. ApplicationはApplication TypeをMachine to Machine Applicationsとして作成

AccountLink Auth0 width=640

AccountLink Auth0 width=640

b. Token Endpoint Authentication Method(Settings)をBasicにする

AccountLink Auth0 width=640

c. JsonWebTokenSignatureAlgorithmd(Settings -> Advanced Settings -> OAuth)をHS256にする

AccountLink Auth0 width=640

d. Allowed Callback URLsはAlexa指定のURLを設定 (ACCOUNT LINKING -> Alexa Redirect URLs)

AccountLink Auth0 width=640

e. Grant Type(Settings -> Advanced Settings -> Grant Types)としてAuthorization Codeを有効化

AccountLink Auth0 width=640

f. OAuthのエンドポイントの情報(Settings -> Advanced Settings -> Endpoints)を確認

AccountLink Auth0 width=640

Alexa Skill設定

a. 対象のスキルのBuildにあるACCOUNT LINKINGを開く

AccountLink Alexa width=640

AccountLink Alexa width=640

b. Do you allow users to create an account or link to an existing account with you? を有効化

c. Allow users to enable skill without account linking (Recommended). を有効化

AccountLink Alexa width=640

d. Select an authorization grant typeでAuth Code Grantを選択

e. Auth0に関する以下の設定を実施

  • Your Web Authorization URI: auth0のOAuth Authorization URL(Settings -> Advanced Settings -> Endpoints)
  • Access Token URI: auth0のOAuth Token URL(Settings -> Advanced Settings -> Endpoints)
  • Your Client ID: auth0のClient ID(Settings)
  • Your Secret: auth0のClient Secret(Settings -> Client Secret)
  • Your Authentication Scheme: HTTP Basic (Recommended)
  • Scope: openid, offline_access, profile, email
  • Domain List: cdn.auth0.com

AccountLink Alexa width=640

AccountLink Alexa width=640

Alexa Skillのカスタマイズ

a. LambdaでHTTPクライアントaxiosを実行するためにpackage.jsonへ追加する

1
2
3
4
5
6
7
8
9
10
11
12
13
14
15
16
17
{
"name": "hello-world",
"version": "1.2.0",
"description": "alexa utility for quickly building skills",
"main": "index.js",
"scripts": {
"test": "echo \"Error: no test specified\" && exit 1"
},
"author": "Amazon Alexa",
"license": "Apache License",
"dependencies": {
"ask-sdk-core": "^2.7.0",
"ask-sdk-model": "^1.19.0",
"aws-sdk": "^2.326.0",
"axios": "^0.18.0"
}
}

AccountLink Alexa width=640

b. Alexa Skillでアクセストークンを受け取り、/userinfoエンドポイントから取得したユーザ名を含んだ文を応答するコードに修正

最低限動かすポイントは2つ。

  1. handlerInput.requestEnvelope.context.System.user.accessTokenを介してアクセストークンを受け取る
  2. アクセエストークンを使って/userinfoエンドポイントを呼ぶ(Authorization: Bearer アクセストークン付きで/userinfoへリクエスト)
1
2
3
4
5
6
7
8
9
10
11
12
13
14
15
16
17
18
19
20
21
22
23
24
25
26
27
28
29
30
31
32
33
34
35
36
37
38
39
40
41
42
/* *
* This sample demonstrates handling intents from an Alexa skill using the Alexa Skills Kit SDK (v2).
* Please visit https://alexa.design/cookbook for additional examples on implementing slots, dialog management,
* session persistence, api calls, and more.
* */
const Alexa = require('ask-sdk-core');
const axios = require('axios');
const auth0_userinfo = 'https://{auth0のドメイン}/userinfo';

const LaunchRequestHandler = {

canHandle(handlerInput) {
return Alexa.getRequestType(handlerInput.requestEnvelope) === 'LaunchRequest';
},
async handle(handlerInput) {
let speakOutput = '';
const { accessToken } = handlerInput.requestEnvelope.context.System.user;
if (!accessToken) {
// アカウントリンクできていないとアクセストークンが取得できない
speakOutput = 'アカウントをリンクしてください';
return handlerInput.responseBuilder.speak(speakOutput).getResponse();
} else {
// アクセストークンを使って/userinfoエンドポイントから情報を取得
let userInfoOptions = {
headers: {
authorization: 'Bearer ' + accessToken
}
};
const userInfoResponse = await axios.get(auth0_userinfo, userInfoOptions);
const userName = userInfoResponse.data.name;
speakOutput = `こんにちはけーくたいむへようこそ ${userName}さん`;

//const speakOutput = 'Welcome, you can say Hello or Help. Which would you like to try?';
//const speakOutput = 'こんにちはけーくたいむへようこそ';

return handlerInput.responseBuilder
.speak(speakOutput)
//.reprompt(speakOutput)
.getResponse();
}
}
};

AccountLink Alexa width=640

c. TestにあるAlexa Simulatorを使い、応答を確認

AccountLink Alexa width=640

コメント・シェア

Amazon AlexaでAuth0でアカウントリンクする

 
カテゴリー Amazon SaaS   タグ

Alexaアカウントリンク

アカウントリンクとは

アカウントリンクを使うことで、Amazon IDを他のアカウントとリンクさせる仕組み。

たとえば、ウェブベースでユーザーがタクシーを手配できる「タクシー予約」サービスがあるとします。それを元にして「アレクサ、タクシー予約でタクシーを頼んで」とユーザーがリクエストするカスタムスキルを作成できます。 このリクエストを完了するには、スキルがタクシー予約のユーザーとしてタクシー予約サービスにアクセスし、プロファイル情報と支払い情報を取得する必要があります。つまり、Alexa搭載デバイスで使うAmazonアカウントと、ユーザーのタクシー予約アカウントとのリンクが必要ということです。

認証方式

OAuth2.0

Alexa Skills Kitでは、AlexaユーザーのAmazonアカウントとサービスの既存アカウントのリンク作成に、OAuth 2.0認証フレームワークを使用します。

認証フロー

AlexaAccountLink TokenFlow width=640

  • Resource Owner: Alexa Skillの利用者
  • Resource Server: 利用者のデータを持つサーバ(例:タクシー予約サービス)
  • Client: Alexa Skill
  • Authorization Server: OAuth2.0対応の認可サーバ(主にAuthorization code grantを使用)

認証画面のURI(Authorization URL)

アカウントリンクを開始すると認証画面のURI(Authorization URL)に移動。
認可サーバにアクセスするためのエントリーポイント。

アクセストークンのURI(Access Token URI)

認証画面のURI(Authorization URL)で認可コードを取得したら、アクセストークンのURI(Access Token URI)でアクセストークンと交換する。

Authorization ServerとしてAuth0を使う

Auth0との連携

具体的な例がInteraction-Based Authentication for Alexa Skills with Auth0にあるので参考に設定していく。

Auth0設定

  • ApplicationはApplication TypeをMachine to Machine Applicationsとして作成
  • Token Endpoint Authentication MethodをBasicにする
  • JsonWebTokenSignatureAlgorithmをHS256にする
  • Allowed Callback URLsはAlexa指定のURLを設定 (ACCOUNT LINKING -> Alexa Redirect URLs)
  • Grant TypeとしてAuthorization Codeを有効化

Alexa Skill設定

Alexaの開発コンソールのACCOUNT LINKING (Build -> ACCOUNT LINKING)で以下を設定。

  • **Do you allow users to create an account or link to an existing account with you?**を有効化
  • **Allow users to enable skill without account linking (Recommended).**を有効化
  • Select an authorization grant typeでAuth Code Grantを選択
  • Your Web Authorization URI: auth0のOAuth Authorization URL(Settings -> Advanced Settings -> Endpoints)
  • Access Token URI: auth0のOAuth Token URL(Settings -> Advanced Settings -> Endpoints)
  • Your Client ID: auth0のClient ID(Settings)
  • Your Secret: auth0のClient Secret(Settings -> Client Secret)
  • Your Authentication Scheme: HTTP Basic (Recommended)
  • Scope: openid, offline_access, profile, email
  • Domain List: cdn.auth0.com

コメント・シェア

Amazon Alexa Skillsチュートリアル

 
カテゴリー Amazon SaaS Tutorial   タグ

Alexa Skills Kitでスキル開発

Alexa Skills Kitでスキル開発にスキル開発の説明がある。

開発には**Amazon Developerアカウントが必要。

Alexaスキル公式チュートリアル(5分でスキルを作ってみよう)

チュートリアル

5分でスキルを作ってみよう

Step 1: ログイン

AmazonAlexaSkill width=640

Alexa開発者コンソールにログイン。

Step 2: スキルを作成する

a. コンソールの右側にあるスキルの作成をクリックします。新しいページが表示されます。

Create Skillをクリック

AmazonAlexaSkill width=640

b. スキル名フィールドにCake Timeと入力します。

c. デフォルトの言語を日本語に設定します。

AmazonAlexaSkill width=640

d. これはカスタムスキルなので、スキルに追加するモデルを選択でカスタムを選択します。

AmazonAlexaSkill width=640

e. スキルのバックエンドリソースをホスティングする方法を選択で、Alexaがホストを選択します。

となっているがAlexa Hostedは2つある。Node.jsを選択。

AmazonAlexaSkill width=640

f. ページ上部にあるスキルを作成をクリックします。

Start from Scratchを使用して、Continue with templateをクリック

AmazonAlexaSkill width=640

AmazonAlexaSkill width=640

g.ビルドが完了したら、左パネルの呼び出し名をクリックします。

H.スキルの呼び出し名「ケークウォーク」を日本語で入力します。スキルの呼び出し名は必ず日本語で入力してください。

左パネルのInvocationで、Skill Invocation Nameを「ケークウォーク」にする

AmazonAlexaSkill width=640

Step 3: ユーザーにあいさつする

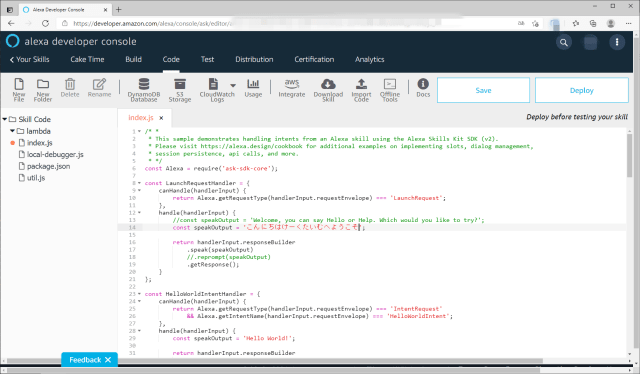
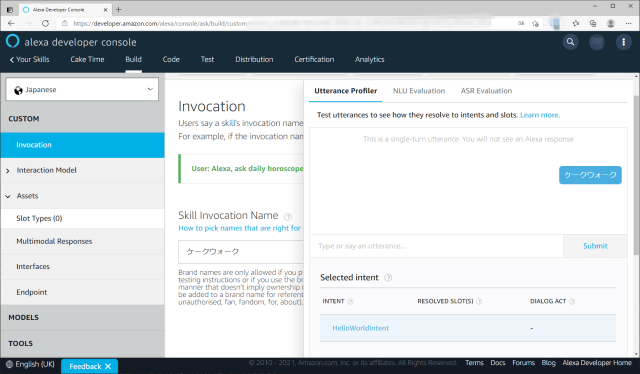
a. Alexa開発者コンソールでCake Timeスキルを開きます。コードエディタタブをクリックします。コードエディタでindex.jsファイルが開きます。

AmazonAlexaSkill width=640

b. LaunchRequestHandlerオブジェクトのhandle() 関数で、const speechTextで始まる行を探します。この行を以下の内容に置き換えます:

c. LaunchRequestHandlerのhandle() 関数で、.reprompt()で始まる行を探します。行の先頭にスラッシュを2つ(//)追加します。これはコメント行を意味します。つまり、コードを実行してもこの行は無視されます。

d. 次に、LaunchRequestHandlerの、今コメントアウトした行のすぐ下にある.getResponse()関数を探します。この関数は、responseBuilder’sが作成した内容をスキルが返す応答に変換します。returnで始まる行があったのを覚えているでしょうか。 この行は、送信ボタンを押すようなイメージで、応答を送信します。

修正は以下の2点

  • speakOutputを独自のメッセージにカスタマイズ
  • .reprompt(speakOutput)をコメントアウト

AmazonAlexaSkill width=640

e. 保存をクリックします。

f. デプロイをクリックします

Saveをクリックしたのちに、Deploy

AmazonAlexaSkill width=640

InvocationSave Modelをクリック

AmazonAlexaSkill width=640

Build Modelをクリック

AmazonAlexaSkill width=640

そして、Evalute Modelをクリック

AmazonAlexaSkill width=640

Utterance profilerが起動するので、「ケークウォーク」でテスト。

AmazonAlexaSkill width=640

AmazonAlexaSkill width=640

Step 4: スキルをテストする

a. テスト タブをクリックします。テストシミュレーターが開きます。

b. ページ左上部のドロップダウンメニューで、開発中を選択します。

AmazonAlexaSkill width=640

c. スキルをテストします。左上のボックスにケークウォークを開いて

ケークウォークだけでも反応する

AmazonAlexaSkill width=640

設定した応答メッセージが表示された。

AmazonAlexaSkill width=640

コメント・シェア

Wacom Intuos 4をWindows10で使う

 
カテゴリー Device PC Windows   タグ

Wacom Intuos 4 Largeを入手

Wacom Intuos 4 Largeという板タブレットを購入。中古で6,590円だった。

Intuos4 width=480

スペック スペック値
型番 Intuos4 PTK-840/K0
筆圧レベル 2048レベル
入力範囲(幅x奥行) 325.1x203.2 mm
幅x高さx奥行 474x14x320 mm
重量 1800 g

ペン先がないと注意書きがあったが、ペンに装着されていたものは劣化しているが、ペン立て内臓の替えペン先はそのままだった。

Intuos4 width=480

板タブレットでUSB接続だが、当時の評価は極めて高い。

Intuos4 width=640

Windows 10で使えるか?

使える。
ドライバーをWacomのドライバーダウンロードページから探すがドライバーがない。
旧製品は旧タブレット製品へのリンクがあるのでそちらからダウンロードするようだ。

Intuos4 width=640

Intuos4 PTK-XXXがある。

Intuos4 width=640

見つけにくいがダウンロードボタンから。

Intuos4 width=640

Intuos4 width=640

タブレットの設定

インストールして再起動。タブレットの小さい液晶メニューが表示された。給電しただけでは表示されていなかった。

スタートメニューにワコムタブレットのプロパティが追加されている。

Intuos4 width=480

タブレットについてで状態をみると、バージョン6.3.30-6でデバイスドライバーが認識されている。

Intuos4 width=320

ペンのメニューが表示されていなかったが、タブレットに近づけて操作していると、追加されていた。
ここで感圧などを調整できる。

Intuos4 width=480

コメント・シェア

強制的にブルースクリーンにする

 
カテゴリー Windows   タグ

キーボード操作で強制的にクラッシュさせる

キーボードからのシステム クラッシュの強制実行の操作でクラッシュを起こすことができる。

キーボードの種類によって設定先のキーは異なるが、CrashOnCtrlScrollという名前でREG_DWORD値0x01を作成する。

  • PS2キーボードは\HKEY_LOCAL_MACHINE\SYSTEM\CurrentControlSet\Services\i8042prt\Parameters
  • USBキーボードは\HKEY_LOCAL_MACHINE\SYSTEM\CurrentControlSet\Services\kbdhid\Parameters
  • Hyper-Vキーボードは\HKEY_LOCAL_MACHINE\SYSTEM\CurrentControlSet\Services\hyperkbd\Parameters

これを設定した状態で右Ctrlキーを押しながらScrollLockキーを2回押すとMANUALLY_INITIATED_CRASHでブルースクリーンとなる

クラッシュ操作のキーを変更する

こまったことにScrollKeyがないキーボードは多い。そのため、別のキーを割り当てなければならないことも多い。
これには、上記とおなじくキーボードの種類によって異なるが、crashdumpというキーを作成し、Dump1KeysDump2Keyでキーの組み合わせを設定する。

  • PS2キーボードは\HKEY_LOCAL_MACHINE\SYSTEM\CurrentControlSet\Services\i8042prt\crashdump
  • USBキーボードは\HKEY_LOCAL_MACHINE\SYSTEM\CurrentControlSet\Services\kbdhid\crashdump
  • Hyper-Vキーボードは\HKEY_LOCAL_MACHINE\SYSTEM\CurrentControlSet\Services\hyperkbd\crashdump

注意点

注意点が3点(うまく動かなくてハマった)

  • CrashOnCtrlScrollの値を0x00にすること
  • スペルに注意(crushdumpではなくてcrashdump
  • Dump1keys(複数形)とDump2Key(単数形)に注意

Dump1Keys

Dump1Keysという名前でREG_DWORDの値を以下で設定する。
これが複数系なのはたとえば0x11で左右のShiftキーのような設定が可能なため。

キーボードショートカットシーケンスで使用される最初のキー
0x01 右Shiftキー
0x02 右Ctrlキー
0x04 右Altキー
0x10 左Shiftキー
0x20 左Ctrlキー
0x40 左Altキー

Dump2Key

Dump2Keyこのコンピューターのキーボードレイアウト用のscancodeテーブルのインデックスとある。
scancodeで検索すれば各種キーボードの情報があるが、1つ挙げるとDeleteキーは0x4cだ。

設定例

たとえば右ShiftーDeleteキー(2回)でクラッシュとする場合は以下のレジストリ設定。

1
2
3
4
5
6
7
8
Windows Registry Editor Version 5.00

[HKEY_LOCAL_MACHINE\SYSTEM\CurrentControlSet\Services\kbdhid\Parameters]
"CrashOnCtrlScroll"=dword:00000000

[HKEY_LOCAL_MACHINE\SYSTEM\CurrentControlSet\Services\kbdhid\crashdump]
"Dump1Keys"=dword:00000002
"Dump2Key"=dword:0000004c

コメント・シェア

Windowsのクラッシュダンプの違い

 
カテゴリー Windows   タグ

クラッシュダンプで取得できるもの

Windowsはクラッシュ時にメモリダンプするが、設定によって取得できる領域が異なる。

取得モード 取得できる内容
最小メモリダンプ(256KB) 例外が発生したプロセス情報や呼び出しスタック
カーネルメモリダンプ カーネルモードのメモリ情報
完全メモリダンプ すべて

これに加えて、Windows 10では以下のモードを利用することができる。デフォルトでは自動メモリダンプが選択されている。

取得モード 取得できる内容
自動メモリダンプ カーネルメモリダンプと同じ
アクティブメモリダンプ 完全メモリダンプからトラブルシューティングに関連しないページを除外

レジストリでは\HKEY_LOCAL_MACHINE\SYSTEM\CurrentControlSet\Control\CrashControlに設定が保存されてている。

設定はシステムの詳細設定起動と回復 -> 設定で確認できる。

WindowsCrushdump width=320

WindowsCrushdump width=320

カーネルメモリダンプに含まれないものは?

カーネルメモリダンプには未割当メモリやユーザモードアプリケーションに割り当てられたメモリは含まない。

ミニダンプに含まれるものは?

含まれているものは以下。

  • Stopメッセージとそのパラメーターとその他のデータ
  • 読み込まれたドライバーの一覧
  • 停止したプロセッサのプロセッサ コンテキスト (PRCB)
  • 停止したプロセスのプロセス情報とカーネル コンテキスト (EPROCESS)
  • 停止したスレッドのプロセス情報とカーネル コンテキスト (ETHREAD)
  • 停止したスレッドのカーネル モード呼び出し履歴

自動メモリダンプとカーネルメモリダンプの違いは?

2つの相違点は、ダンプファイル自体には含まれませんが、システムのページングファイルのサイズはWindowsによって設定されます。

違いはページングファイルのサイズを設定している場合に、自動的にページングファイルのサイズを大きくして取得するという点だ。
HKEY_LOCAL_MACHINE\SYSTEM\CurrentControlSet\Control\CrashControl\LastCrashTimeにそのイベントが記録され、ページングファイルサイズのサイズ増加は4週間保持される。

現在のページサイズはシステムの詳細設定パフォーマンス -> 設定で確認できる。

WindowsCrushdump width=320

アクティブダンプで除外されるものは?

以下が除外される。役に立たないその他さまざまな種類とは……

  • 空きおよびゼロのリスト
  • ファイルキャッシュ、ゲストVMのページ
  • デバッグ中には役に立たないその他のさまざまな種類のメモリ上のページ

コメント・シェア

pingで明示的にIPv4を指定する

 
カテゴリー Windows   タグ

IPv6で通信できる機器はIPv6が優先される

IPv6で通信できる場合は、IPv6が優先されIPv6応答になる。

1
2
3
4
5
6
C:\Users\USER>ping TARGETHOST

TARGETHOST.local [fe80::208:9bXX:feXX:XX98%8]に ping を送信しています 32 バイトのデータ:
fe80::208:9bXX:feXX:XX98%8 からの応答: 時間 <1ms

IPv4で疎通を確認するには

IPv4のPingを実行するには-4オプションをつけて実行する。
-6オプションをつければIPv6で実行できる。

1
2
3
4
5
6
7
C:\Users\USER>ping -4 TARGETHOST

TARGETHOST [192.168.xxx.xxx]に ping を送信しています 32 バイトのデータ:
192.168.xxx.xxx からの応答: バイト数 =32 時間 <1ms TTL=64

コメント・シェア

HexoでMermaidを使ってダイアグラムを描く

 
カテゴリー SSG   タグ

HexoのMermaidプラグイン

hexo-filter-mermaid-diagramsのインストール

hexo-filter-mermaid-diagramsのインストール。

1
npm install hexo-filter-mermaid-diagrams --save

Tranquilpeakの設定

themes/tranquilpeak/_config.ymlにmermaidの設定を追加。

1
2
3
4
5
6
# Mermaid
mermaid:
enable: true
version: "7.1.2"
# Available themes: default | dark | forest | neutral
theme: default

Mermaidの読み込み

themes/tranquilpeak/layout/_partial/script.ejsに以下を追加。

1
2
3
4
5
6
7
8
<% if (theme.mermaid.enable) { %>
<script src='https://unpkg.com/mermaid@<%= theme.mermaid.version %>/dist/mermaid.min.js'></script>
<script>
if (window.mermaid) {
mermaid.initialize({theme: 'forest'});
}
</script>
<% } %>

ダイアグラムを描く

書き方

コードブロックでmermaidのコードであることを示して記述する。
コードブロックで書くことがサンプルで表現されていないので注意。

フローチャート

1
2
3
4
5
graph TD;
A-->B;
A-->C;
B-->D;
C-->D;
graph TD;
    A-->B;
    A-->C;
    B-->D;
    C-->D;

Sequence diagram

1
2
3
4
5
6
7
8
9
10
11
sequenceDiagram
participant Alice
participant Bob
Alice->>John: Hello John, how are you?
loop Healthcheck
John->>John: Fight against hypochondria
end
Note right of John: Rational thoughts <br/>prevail...
John-->>Alice: Great!
John->>Bob: How about you?
Bob-->>John: Jolly good!
sequenceDiagram
    participant Alice
    participant Bob
    Alice->>John: Hello John, how are you?
    loop Healthcheck
        John->>John: Fight against hypochondria
    end
    Note right of John: Rational thoughts 
prevail... John-->>Alice: Great! John->>Bob: How about you? Bob-->>John: Jolly good!

Gantt diagram

1
2
3
4
5
6
7
8
9
gantt
dateFormat YYYY-MM-DD
title Adding GANTT diagram to mermaid

section A section
Completed task :done, des1, 2014-01-06,2014-01-08
Active task :active, des2, 2014-01-09, 3d
Future task : des3, after des2, 5d
Future task2 : des4, after des3, 5d
gantt
dateFormat  YYYY-MM-DD
title Adding GANTT diagram to mermaid

section A section
Completed task            :done,    des1, 2014-01-06,2014-01-08
Active task               :active,  des2, 2014-01-09, 3d
Future task               :         des3, after des2, 5d
Future task2               :         des4, after des3, 5d

Class diagram

1
2
3
4
5
6
7
8
9
10
11
12
13
14
classDiagram
Class01 <|-- AveryLongClass : Cool
Class03 *-- Class04
Class05 o-- Class06
Class07 .. Class08
Class09 --> C2 : Where am i?
Class09 --* C3
Class09 --|> Class07
Class07 : equals()
Class07 : Object[] elementData
Class01 : size()
Class01 : int chimp
Class01 : int gorilla
Class08 <--> C2: Cool label
classDiagram
Class01 <|-- averylongclass : cool class03 *-- class04 class05 o-- class06 class07 .. class08 class09 --> C2 : Where am i?
Class09 --* C3
Class09 --|> Class07
Class07 : equals()
Class07 : Object[] elementData
Class01 : size()
Class01 : int chimp
Class01 : int gorilla
Class08 <--> C2: Cool label

Git graph

1
2
3
4
5
6
7
8
9
10
11
12
13
14
15
16
gitGraph:
options
{
"nodeSpacing": 150,
"nodeRadius": 10
}
end
commit
branch newbranch
checkout newbranch
commit
commit
checkout master
commit
commit
merge newbranch
gitGraph:
options
{
    "nodeSpacing": 150,
    "nodeRadius": 10
}
end
commit
branch newbranch
checkout newbranch
commit
commit
checkout master
commit
commit
merge newbranch

コメント・シェア


nullpo

めも


募集中


Japan