Alexaアカウントリンクチュートリアル

チュートリアル

Alexa Skills公式チュートリアルで作成した応答メッセージを返すだけのSkillをカスタマイズして、アカウントリンクによって、対象ユーザの情報を返すスキルにする。

Auth0設定

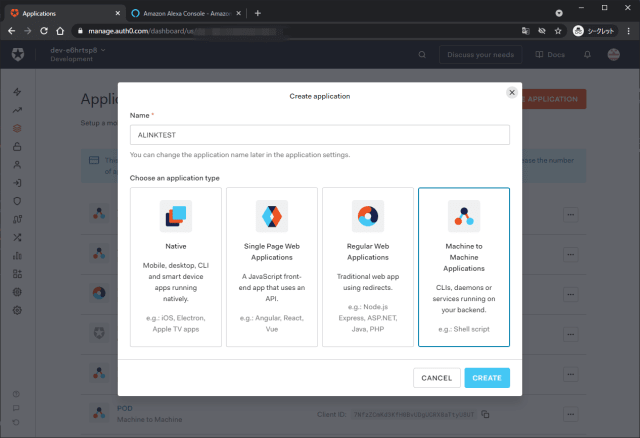
a. ApplicationはApplication TypeをMachine to Machine Applicationsとして作成

AccountLink Auth0 width=640

AccountLink Auth0 width=640

b. Token Endpoint Authentication Method(Settings)をBasicにする

AccountLink Auth0 width=640

c. JsonWebTokenSignatureAlgorithmd(Settings -> Advanced Settings -> OAuth)をHS256にする

AccountLink Auth0 width=640

d. Allowed Callback URLsはAlexa指定のURLを設定 (ACCOUNT LINKING -> Alexa Redirect URLs)

AccountLink Auth0 width=640

e. Grant Type(Settings -> Advanced Settings -> Grant Types)としてAuthorization Codeを有効化

AccountLink Auth0 width=640

f. OAuthのエンドポイントの情報(Settings -> Advanced Settings -> Endpoints)を確認

AccountLink Auth0 width=640

Alexa Skill設定

a. 対象のスキルのBuildにあるACCOUNT LINKINGを開く

AccountLink Alexa width=640

AccountLink Alexa width=640

b. Do you allow users to create an account or link to an existing account with you? を有効化

c. Allow users to enable skill without account linking (Recommended). を有効化

AccountLink Alexa width=640

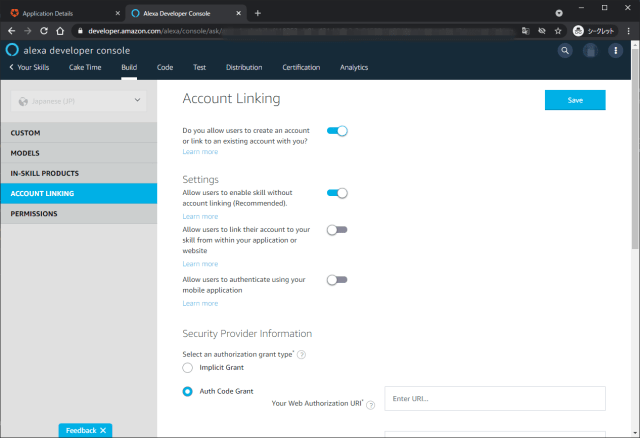
d. Select an authorization grant typeでAuth Code Grantを選択

e. Auth0に関する以下の設定を実施

  • Your Web Authorization URI: auth0のOAuth Authorization URL(Settings -> Advanced Settings -> Endpoints)
  • Access Token URI: auth0のOAuth Token URL(Settings -> Advanced Settings -> Endpoints)
  • Your Client ID: auth0のClient ID(Settings)
  • Your Secret: auth0のClient Secret(Settings -> Client Secret)
  • Your Authentication Scheme: HTTP Basic (Recommended)
  • Scope: openid, offline_access, profile, email
  • Domain List: cdn.auth0.com

AccountLink Alexa width=640

AccountLink Alexa width=640

Alexa Skillのカスタマイズ

a. LambdaでHTTPクライアントaxiosを実行するためにpackage.jsonへ追加する

1
2
3
4
5
6
7
8
9
10
11
12
13
14
15
16
17
{
"name": "hello-world",
"version": "1.2.0",
"description": "alexa utility for quickly building skills",
"main": "index.js",
"scripts": {
"test": "echo \"Error: no test specified\" && exit 1"
},
"author": "Amazon Alexa",
"license": "Apache License",
"dependencies": {
"ask-sdk-core": "^2.7.0",
"ask-sdk-model": "^1.19.0",
"aws-sdk": "^2.326.0",
"axios": "^0.18.0"
}
}

AccountLink Alexa width=640

b. Alexa Skillでアクセストークンを受け取り、/userinfoエンドポイントから取得したユーザ名を含んだ文を応答するコードに修正

最低限動かすポイントは2つ。

  1. handlerInput.requestEnvelope.context.System.user.accessTokenを介してアクセストークンを受け取る
  2. アクセエストークンを使って/userinfoエンドポイントを呼ぶ(Authorization: Bearer アクセストークン付きで/userinfoへリクエスト)
1
2
3
4
5
6
7
8
9
10
11
12
13
14
15
16
17
18
19
20
21
22
23
24
25
26
27
28
29
30
31
32
33
34
35
36
37
38
39
40
41
42
/* *
* This sample demonstrates handling intents from an Alexa skill using the Alexa Skills Kit SDK (v2).
* Please visit https://alexa.design/cookbook for additional examples on implementing slots, dialog management,
* session persistence, api calls, and more.
* */
const Alexa = require('ask-sdk-core');
const axios = require('axios');
const auth0_userinfo = 'https://{auth0のドメイン}/userinfo';

const LaunchRequestHandler = {

canHandle(handlerInput) {
return Alexa.getRequestType(handlerInput.requestEnvelope) === 'LaunchRequest';
},
async handle(handlerInput) {
let speakOutput = '';
const { accessToken } = handlerInput.requestEnvelope.context.System.user;
if (!accessToken) {
// アカウントリンクできていないとアクセストークンが取得できない
speakOutput = 'アカウントをリンクしてください';
return handlerInput.responseBuilder.speak(speakOutput).getResponse();
} else {
// アクセストークンを使って/userinfoエンドポイントから情報を取得
let userInfoOptions = {
headers: {
authorization: 'Bearer ' + accessToken
}
};
const userInfoResponse = await axios.get(auth0_userinfo, userInfoOptions);
const userName = userInfoResponse.data.name;
speakOutput = `こんにちはけーくたいむへようこそ ${userName}さん`;

//const speakOutput = 'Welcome, you can say Hello or Help. Which would you like to try?';
//const speakOutput = 'こんにちはけーくたいむへようこそ';

return handlerInput.responseBuilder
.speak(speakOutput)
//.reprompt(speakOutput)
.getResponse();
}
}
};

AccountLink Alexa width=640

c. TestにあるAlexa Simulatorを使い、応答を確認

AccountLink Alexa width=640