Google Search Console

Search Consoleにサイトを登録する

今すぐ開始。

google-search-console width=640

URLプレフィックスを選択し、対象のサイトのURLを入力。

google-search-console width=640

対象サイトに設定したGoogleAnalysticsで所有者の確認が行われる。

google-search-console width=640

Search Consoleへのログイン。

google-search-console width=640

開始直後ではまだ収集されていない。

google-search-console width=640

sitemap.xmlを登録する

サイトマップでsitemap.xmlを指定する。

google-search-console width=640

google-search-console width=640

google-search-console width=640

google-search-console width=640

データ収集状況(収集中…)

google-search-console width=640

google-search-console width=640

カバレッジが表示されるまで4日かかかった…

google-search-console width=640

google-search-console width=640

Page speed insights

Search Console内にPage speed insightsへのリンクがある。

google-search-console width=640

本サイトの測定結果(PC)。

google-search-console width=640

本サイトの測定結果(モバイル)。

google-search-console width=640

コメント・シェア

HexoのFront-matterの設定

 
カテゴリー SSG   タグ

Front-matter

Hexo記事の先頭にYAMLかJSON形式のブロックとして記述する。

Front-matter is a block of YAML or JSON at the beginning of the file that is used to configure settings for your writings. Front-matter is terminated by three dashes when written in YAML or three semicolons when written in JSON.

テンプレ

Hexo記事の典型的なFront-matter。カテゴリやタグを複数記述するためには以下の形式で記述する(カテゴリは[]で囲まないと階層カテゴリになる)。

1
2
3
4
5
6
7
8
9
10
11
---
title: タイトル
categories:
- [カテゴリ]
- [カテゴリ]
tags:
- タグ
- タグ
date: yyyy-mm-dd hh:mm:ss
+updated: yyyy-mm-dd hh:mm:ss
---

階層カテゴリの表記(1)

1
2
3
4
5
6
7
categories:
- Sports
- Baseball
tags:
- Injury
- Fight
- Shocking

この場合、以下のカテゴリになる。

  • Sports -> Baseball

階層カテゴリの表記(2)

1
2
3
4
5
categories:
- [Sports, Baseball]
- [MLB, American League, Boston Red Sox]
- [MLB, American League, New York Yankees]
- Rivalries

この場合、以下のカテゴリになる。

  • Sports -> Baseball
  • MLB -> American League -> Boston Red Sox
  • MLB -> American League -> New York Yankees
  • Rivalries

コメント・シェア

Error saving credentialsでログインできない

Docker outside of Dockerで、Container内でdockerコマンドによりDuckerHubへログインしようとするとError saving credentials: error storing credentialsに…

1
2
3
4
5
$docker login
Login with your Docker ID to push and pull images from Docker Hub. If you don't have a Docker ID, head over to https://hub.docker.com to create one.
Username: <Username>
Password: <Password>
Error saving credentials: error storing credentials - err: exit status 1, out: `Cannot autolaunch D-Bus without X11 $DISPLAY`

gnupg2とpassが必要

Cannot login to Docker account

You only need to install the gnupg2 and pass packages:
sudo apt install gnupg2 pass

インストール後にログインすると

1
2
3
4
5
6
WARNING! Using --password via the CLI is insecure. Use --password-stdin.
WARNING! Your password will be stored unencrypted in /root/.docker/config.json.
Configure a credential helper to remove this warning. See
https://docs.docker.com/engine/reference/commandline/login/#credentials-store

Login Succeeded

コメント・シェア

Seleniumのインストール(python:3-slimベース)

ChromiumとWebDriverをインストールする

インストールするChromiumとChromeDriverのバージョンは極力近いものをインストールする必要がある。
ChromeDriverのインストールはPythonのchromedriver-binaryモジュールを使う。

1
2
3
4
5
RUN apt-get update -y && \
apt-get install -y --no-install-recommends chromium && \
pip install --upgrade pip setuptools wheel && \
# webdriverはなるべく近いバージョンをダウンロード
pip install chromedriver-binary~=$(chromium --version | perl -pe 's/([^0-9]+)([0-9]+\.[0-9]+).+/$2/g')

Chromeのインストールパスの問題

Chromeのインストールパスはwebdriver.Chrome()で指定する必要がある。
指定していない、下記のコードではエラーとなる。

1
2
3
4
5
6
7
8
9
10
11
12
13
14
from selenium import webdriver

def test_access(driver):
driver.get('https://www.google.com')
driver.save_screenshot('test.png')
print(driver.title)
driver.quit()

if __name__ == '__main__':
options = webdriver.ChromeOptions()
options.add_argument("--headless")
options.add_argument("--no-sandbox")
driver = webdriver.Chrome(options=options)
test_access(driver)

実行結果

1
2
3
4
5
6
7
8
9
10
11
12
13
14
15
16
17
18
19
20
$python sample_test.py
Traceback (most recent call last):
File "/usr/local/lib/python3.8/site-packages/selenium/webdriver/common/service.py", line 72, in start
self.process = subprocess.Popen(cmd, env=self.env,
File "/usr/local/lib/python3.8/subprocess.py", line 854, in __init__
self._execute_child(args, executable, preexec_fn, close_fds,
File "/usr/local/lib/python3.8/subprocess.py", line 1702, in _execute_child
raise child_exception_type(errno_num, err_msg, err_filename)
FileNotFoundError: [Errno 2] No such file or directory: 'chromedriver'

During handling of the above exception, another exception occurred:

Traceback (most recent call last):
File "sample_test.py", line 13, in <module>
driver = webdriver.Chrome(options=options)
File "/usr/local/lib/python3.8/site-packages/selenium/webdriver/chrome/webdriver.py", line 73, in __init__
self.service.start()
File "/usr/local/lib/python3.8/site-packages/selenium/webdriver/common/service.py", line 81, in start
raise WebDriverException(
selenium.common.exceptions.WebDriverException: Message: 'chromedriver' executable needs to be in PATH. Please see https://sites.google.com/a/chromium.org/chromedriver/home

chromedriver_binaryでインストールしている場合、import chromedriver_binaryを追加すれば、でChromiumのインストールパスが解決される。

日本語フォントの問題

実行結果の画面キャプチャは文字化けしている

Selenium width=640

localeの設定と日本語フォントのインストールすれば文字化けは解消する

1
2
3
4
5
6
7
ENV LANGUAGE ja_JP.UTF-8
ENV LANG ja_JP.UTF-8
RUN apt-get install -y --no-install-recommends locales && \
locale-gen ja_JP.UTF-8 && \
# 日本語フォントをインストール
apt-get install -y --no-install-recommends fonts-ipafont && \
echo "*** INSTALLED: ja_JP locale & font ***"

Selenium Container(python:3-slimベース)のコンテナイメージ例

Dockerfile

python:3-slimベースのSelenium/Chromium環境

1
2
3
4
5
6
7
8
9
10
11
12
13
14
15
16
FROM python:3-slim
# Chrome & Webdriver
RUN apt-get update -y && \
apt-get install -y --no-install-recommends chromium && \
pip install --upgrade pip setuptools wheel && \
pip install selenium && \
# webdriverはなるべく近いバージョンをダウンロード
pip install chromedriver-binary~=$(chromium --version | perl -pe 's/([^0-9]+)([0-9]+\.[0-9]+).+/$2/g')

# 日本語環境
ENV LANGUAGE ja_JP.UTF-8
ENV LANG ja_JP.UTF-8
RUN apt-get install -y --no-install-recommends locales && \
locale-gen ja_JP.UTF-8 && \
# 日本語フォントをインストール
apt-get install -y --no-install-recommends fonts-ipafont

テストコード

1
2
3
4
5
6
7
8
9
10
11
12
13
14
15
16
from selenium import webdriver
import chromedriver_binary

def test_access(driver):
driver.get('https://www.google.com')
driver.save_screenshot('test.png')
print(driver.title)
driver.quit()

if __name__ == '__main__':
options = webdriver.ChromeOptions()
options.add_argument("--headless")
options.add_argument("--no-sandbox")
options.add_argument("--window-size=1224,844")
driver = webdriver.Chrome(options=options)
test_access(driver)

実行結果

1
2
3
4
PS > docker-compose run selenium-dispshell bash
root@8dc58c2f02c2:/# cd /app
root@8dc58c2f02c2:/app# python sample_test.py
Google

Selenium width=640

コメント・シェア

DevOpsトレンド2019

 
カテゴリー CI/CD DevOps   タグ

DevOps Trend

DevOps and Cloud 2019 Q1 Graph

Late Majority

CIやIaC、Containerなど主要なものはすでにLate Majority扱いになっている。

  • Generals DevOps
  • Containers
  • Infrastructure as Code
  • Continuous Integration tooling

Early Majority

Immutable infrastructureを基にしたContainer orchestration、Continous Delivery、Deploymentキーワードが挙げられている。

  • Continuous Delivery (CD)
  • CD for mobile
  • Immutable infrastructure
  • Feature flags & blue/green-deployments
  • Centralized log aggregation
  • Container orchestration
  • Enterprise DevOps toolchain

Early Adapters

CI/CDをより高度にしたキーワードが挙げられている。

  • Continuous Testing
  • Chaos engineering practices
  • Cloud: FaaS, BaaS
  • ChatOps
  • GitOps/DiffOps

Service meshes

クラウドを抽象化したアプリ実行基盤としてKubernetesがデファクトになりつつあるが、PaaSとしては不十分なため、効果的なCI/CDのためService meshesが注目されている。

Kubernetes has well and truly cornered the domain of container orchestration, and is arguably becoming the default cloud-agnostic compute abstraction. However, Kubernetes is not a complete Platform-as-a-Service (PaaS), which is arguably what most organisations require for effective deployment and operation of software, and so the next “hot topics” in this space appear to be “service meshes” for managing interservice communication and release control, and developer experience and workflow tooling to allow engineers to implement effective dev-test-deploy-observe cycles.

Chaos engineering

Netflixの事例やO’REILLYの書籍によってカオスエンジニアリングも勢いがある。

We believe that the topic of chaos engineering has moved into early adopter, largely due to the increased promotion by the Netflix team and the O’Reilly Chaos Engineering book authors, and tooling such as the Chaos Toolkit and Gremlin’s as-a-service offerings. Based on discussions with John Allspaw, Casey Rosenthal, Nora Jones and other members of the community, we have separated out the topic of “resilience engineering”, which we have previously conflated with chaos engineering, and placed this within the innovator category.

DevOps Tool Chain

XebiaLabsのPERIODIC TABLE OF DEVOPS TOOLS

元素周期表のデザインでDevOpsのTool Chainを表現している。

DevOpsのTool Chainとしている領域は以下

  • Source Control Management
  • Database Automation
  • Continuous Integration
  • Testing
  • Configuration
  • Deployment
  • Containers
  • Release Orchestration
  • Cloud
  • AIOps
  • Analystics
  • Monitoring
  • Security
  • Collaborations

SANS Secure DevOps Toolchain and SWAT Checklist

DevSecOps関連のTool Chain。

コメント・シェア

CI/CDワークフローTestOps

 
カテゴリー CI/CD   タグ

Shift-Left & Shift-Rightアプローチ

Shift-LeftとShift-Right

Shift-Leftはソフトウェアのデリバリーチェイン(端的に言えばCI/CDパイプライン)の早い段階(より左)で特定のプロセスを実行すること。多くの文脈でテストやセキュリティの事を指しているが、どんなプロセスでも適用できる。

Put simply, shift left refers to the concept of performing a given process earlier in the software delivery chain.
When you hear people talking about the shift-left concept today, they’re usually discussing either software testing or IT security.
However, the shift-left idea can be applied to any type of process that occurs within the delivery chain. Data management, software monitoring and even software marketing could be moved to the left, too.

Shift-Rightはソフトウェアのデリバリーチェインの遅い段階(より右)で特定プロセスを実行すること。アプリケーションのリリース前にリリース後の問題を把握するために行う。

As you might imagine, shifting processes to the right means performing them later in the delivery pipeline. In many cases, this specifically means taking processes that typically happen before application release and moving them into production, to help you catch post-release issues before end users notice them.

テストやセキュリティなどのコアソフトウェア配信プロセスを継続実施することが重要。

Shift-left and shift-right are both valuable concepts, but DevOps teams should not embrace them in isolation. Instead, think of shift-left and shift-right as steps that you can take to make core software delivery processes like testing and security continuous across your pipeline. Continuity is the real goal.

Shift-Left Testing

テストにおけるShift-Leftという単語は適切でないという指摘。

I think the first time I heard the term was in a talk by Paul Gerrard – perhaps a webinar for EuroStar in 2014. In the notes I made at the time, I have this sentence “
Shift Left ??? – redistributing test activities … same thing we have been saying … why is he calling it shift left? I don’t understand this at all.”

Shift-Leftという単語は開発プロセスが直線的なプロセスの様に感じらるので、コンセプトが誤解されるのではないか?コンセプトに合うのは継続的/全体的テスト(Continuously/Holistic testing)*

What I fear may happen using the term ‘shift-left’, is that some people will misunderstand the concept and go back to big upfront requirements that need to be tested before coding is even started. Shift-left also doesn’t include the idea of DevOps, so people have started saying shift-right, or shift-outwards.
I personally think better terms are testing continuously or holistic testing, taking into account whatever your context may be.
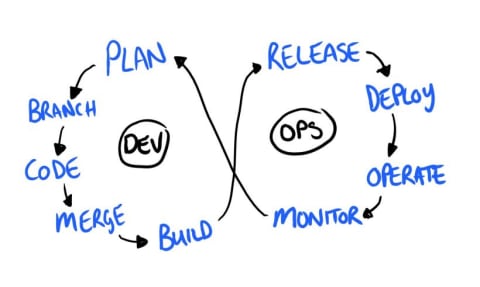
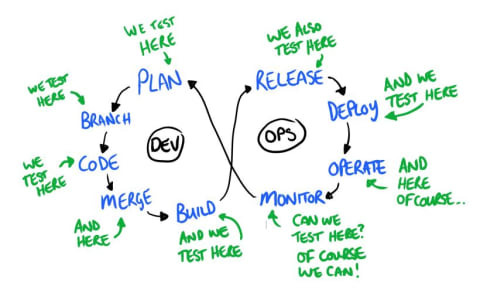
Continuous Testing

DevOpsのあらゆる場所でテストはあるという指摘。

devops width=480
devops width=480

Shift-Right Testing

リリース前だけでなくリリース後の本番環境でのテストも含めてShift-Rightであり、以下の項目が例として挙げられている。

  • release validation(リリースの検証)

  • destructive/chaos testing(破壊的テスト、カオステスト)

  • A/B and canary testing(A/Bテスト、カナリアテスト)

  • CX-based testing(カスタマーエkスペリエンステスト)

  • crowd testing(クラウドソーシングテスト)

  • production monitoring(本番モニタリング)

  • extraction of test insights from production data(本番データからのテスト項目の抽出)

  • Shift-Right Testing: The Emergence of TestOps

Shift-right entails doing more testing in the immediate pre-release and post-release phases (i.e. testing in production) of the application lifecycle. These include practices such as: release validation, destructive/chaos testing, A/B and canary testing, CX-based testing (e.g. correlating user behavior with test requirements), crowd testing, production monitoring, extraction of test insights from production data, etc.
Shift-right not only introduces such new testing techniques, but also requires testers to acquire new skills, make aggressive use of production data to drive testing strategies and collaborate with new stakeholders, such as site reliability engineers (SRE) and operations engineers.

CXは、カスタマーエフォートスコア(CES)、ネットプロモータースコア(NPS)、カスタマー満足度スコア(CSAT)などのさまざまなメトリックを使用して測定する。これらはある程度Shift-Leftも可能だが、ほとんどは本番稼働中のシステムからの測定になる。

Unlike classic testing, this takes into account real-world users and their experiences. An application with perfect traditional quality scores (such as FURPS) may still suffer from poor CX if it fails to delight the customer. CX is measured using various metrics such as Customer Effort Score (CES), Net Promoter Score (NPS), Customer Satisfaction Score (CSAT), etc. While it is possible to shift-left some of these measurements to some degree, most CX measurements are deduced from systems in production (or close to production).

TestOps

The Emergence of TestOps

TestOpsは単純にShift-Rightの事をではなく、可能なものはShift-Leftした継続的なテストを指す。

Though the term TestOps (like all the X-Ops sub-disciplines within DevOps) implies the collaboration between testing and operations, it isn’t simply about shift-right. Why? Because with DevOps, operational disciplines themselves have shifted left (such as shift-left of monitoring, configuration management, SRE, etc.). Hence TestOps—true to the principle of continuous testing—refers to better collaboration with operations disciplines across the DevOps lifecycle.

TestOps Shift-Left

アーキテクチャや構成リソースなど本番環境を使ったテストに近い内容もShift-Leftされる。

  • Architecture quality(アーキテクチャの品質)
    • Scalability analysis(スケーラビリティの静的分析)
    • Performance/stress testing(パフォーマンステスト)
    • Reliability testing & analysis(信頼性テストと分析)
    • Maintainability(メンテナンス性)
  • Configuration quality(構成リソースの品質)
    • Configs “as-code”(コード化された構成リソース)
    • Unit test configurations(構成リソースのユニットテスト)
    • Equivalence testing(同等性テスト)
    • Rollback testing(ロールバックのテスト)
  • Early Monitoring(早期の監視)
    • Unit test monitoring configs(監視リソースのテスト)
    • Monitoring in test(テストの監視)

TestOps Shift-Right

よりユーザ利用に近い領域がShift-Rightの対象になっている。

  • Chaos Engineering(カオスエンジニアリング)
    • Contolled failure simulation(制御された障害シナリオの挿入によるシステムの信頼性のテスト)
    • Reliability analysis(信頼性分析)
  • A/B and Canary Tests & Synthetic Transactions(A/Bテスト、カナリアテスト、Synthetic Transactions)
    • Testing in prod(本番環境でのテスト)
    • Rollback testing(ロールバックテスト)
    • User simulations(トランザクションのエミュレーション)
    • Tests as monitoring probes(監視プローブによるテスト)
  • Predictive Ops Insight(ユーザの行動予測)
    • Extract test intelligence from prod data(本番データからのテスト知見の抽出)
    • CX analystics(カスタマーエクスペリエンスの分析)

コメント・シェア

ドラッグ&ドロップで引数を渡してプログラムを実行するバッチファイル

実行したいプログラムのあるフォルダーに以下の様なバッチファイルを作成し、そのショートカットをデスクトップに作成。

1
2
3
4
cd /d %~dp0
実行したいプログラム %*
cd
pause

引数に渡すファイルをショートカットにドロップすることで、対象のプログラムに引数を渡して実行できる。

バッチパラメーター

バッチファイルのパラメーター処理は call /? で確認することができる。

1
2
3
4
5
6
7
8
9
10
11
12
13
14
15
16
17
18
19
20
21
22
23
24
25
26
27
28
29
30
31
32
33
34
35
36
37
38
39
40
41
42
43
44
45
46
47
48
49
50
51
52
53
54
55
56
57
58
59
C:\Users\<user>>call /?
バッチ プログラムを別のバッチ プログラムから呼び出します。

CALL [ドライブ:][パス]ファイル名 [バッチパラメーター]

バッチパラメーター バッチ プログラムで必要なコマンド ライン情報を指定します。

コマンド拡張機能を有効にすると、CALL は次のように変更されます:

CALL コマンドは、CALL のターゲットとしてラベルを受け付けるようになります。
構文は、次のとおりです:

CALL :ラベル 引数

指定された引数で新しいバッチ ファイル コンテキストが作成され、指定
されたラベルの次の文に制御が渡されます。バッチ スクリプト ファイルの
最後に 2 回到達することによって、2 回 "終了" する必要があります。
1 回目に最後に到達したときには、制御は CALL 文の次の行に返されます。
2 回目に、バッチ スクリプトが終了します。バッチ スクリプトから "戻る"
ための GOTO :EOF 拡張機能の説明については、GOTO /? と入力してください。

また、バッチ スクリプトの引数参照 (%0、%1 など) の展開は、次のように
変更されました:


%* バッチ スクリプト内では、すべての引数 (%1、%2、%3、%4、
%5 など) を参照します。

バッチ パラメーター (%n) の置換は拡張されました。次のオプション構文
を使うことができます:

%~1 - すべての引用句 (") を削除して、%1 を展開します。
%~f1 - %1 を完全修飾パス名に展開します。
%~d1 - %1 をドライブ文字だけに展開します。
%~p1 - %1 をパスだけに展開します。
%~n1 - %1 をファイル名だけに展開します。
%~x1 - %1 をファイル拡張子だけに展開します。
%~s1 - 展開されたパスは、短い名前だけを含みます。
%~a1 - %1 をファイル属性に展開します。
%~t1 - %1 をファイルの日付/時刻に展開します。
%~z1 - %1 をファイルのサイズに展開します。
%~$PATH:1 - PATH 環境変数に指定されているディレクトリを検索し、
最初に見つかった完全修飾名に %1 を展開します。
環境変数名が定義されていない場合、または
検索してもファイルが見つからなかった場合は、
この修飾子を指定すると空の文字列に展開されます。

修飾子を組み合わせて、複合結果を得ることもできます:

%~dp1 - %1 をドライブ文字とパスだけに展開します。
%~nx1 - %1 をファイル名と拡張子だけに展開します。
%~dp$PATH:1 - PATH 環境変数に指定されているディレクトリを
検索して %1 を探し、最初に見つかったファイル
のドライブ文字とパスだけに展開します。
%~ftza1 - %1 を DIR の出力行のように展開します。

上の例の %1 と PATH は、他の有効な値で置き換えることができ
ます。%~ 構文は有効な引数の数によって区切られます。%~ 修飾子
は %* と同時には使用できません。

バッチファイルの挙動

ドラッグ元とドロップ先のパスを展開する

%0 にはドロップされるバッチファイルのフルパス、%1 にはドロップするファイルのフルパスが入る。
%~dp0 にはバッチファイルの存在するフォルダーのフルパス、%~dp1 はドロップするファイルのフルパスが入る。

1
2
3
4
5
echo %0
echo %~dp0
echo %1
echo %~dp1
pause
1
2
3
4
5
6
7
8
9
10
11
12
13
14
C:\Users\<USER>\Desktop>echo "C:\Users\<USER>\Desktop\test.bat"
"C:\Users\<USER>\Desktop\test.bat"

C:\Users\<USER>\Desktop>echo C:\Users\<USER>\Desktop\
C:\Users\<USER>\Desktop\

C:\Users\<USER>\Desktop>echo C:\Users\<USER>\Desktop\test.txt
C:\Users\<USER>\Desktop\test.txt

C:\Users\<USER>\Desktop>echo C:\Users\<USER>\Desktop\
C:\Users\<USER>\Desktop\

C:\Users\<USER>\Desktop>pause
続行するには何かキーを押してください . . .

ドロップ先のパスに移動してから実行する

%~dp0 でドロップ先のフォルダーに移動する。
%*%1 以降のパラメーターを示している。

1
2
3
4
cd /d %~dp0
echo %*
cd
pause
1
2
3
4
5
6
7
8
9
10
C:\Users\<USER>\Desktop>cd /d C:\Users\<USER>\Desktop\

C:\Users\<USER>\Desktop>echo C:\Users\<USER>\Desktop\test.txt
C:\Users\<USER>\Desktop\test.txt

C:\Users\<USER>\Desktop>cd
C:\Users\<USER>\Desktop

C:\Users\<USER>\Desktop>pause
続行するには何かキーを押してください . . .

バッチファイルのショートカットにドロップした場合

バッチファイルがC:\workにあり、デスクトップ上に作成したショートカットへドロップした場合。
%0 はバッチファイルの場所を指す。

1
2
3
4
5
6
7
8
9
10
C:\work>cd /d C:\work\

C:\work>echo C:\Users\<USER>\Desktop\test.txt
C:\Users\<USER>\Desktop\test.txt

C:\work>cd
C:\work

C:\work>pause
続行するには何かキーを押してください . . .

コメント・シェア

Works on My Machine

 
カテゴリー Joke   タグ

The “Works on My Machine” Certification Program

Works on My machine width=120

さぁ、あなたもこれで”Works on My Machine”認証をとろう

  1. Compile your application code. Getting the latest version of any recent code changes from other developers is purely optional and not a requirement for certification.
  2. Launch the application or website that has just been compiled.
  3. Cause one code path in the code you’re checking in to be executed. The preferred way to do this is with ad-hoc manual testing of the simplest possible case for the feature in question. Omit this step if the code change was less than five lines, or if, in the developer’s professional opinion, the code change could not possibly result in an error.
  4. Check the code changes into your version control system.

認定Developerの声

そりゃ動かないことだってあるさ でも俺のマシンでは動いたんだ

動かないことだってあります

Works on My machine width=480

“俺のマシンでは動いた”なんて簡単には言わないよ

言いたいことも言えない……

Works on My machine width=480

私のマシンでは動いたのよ、顧客の問題ね

そう顧客の問題

Works on My machine width=480

Devでは快適だったわ、Opsの問題ね

そりゃ運用が悪いに決まっています

Works on My machine width=480

私のマシンでは動いた!さぁ本番に行こうか

決断の時

Works on My machine width=480

ありえない!僕のマシンでは動いたんだ

ありえないなんて事はありえない

Works on My machine width=480

・・・ああ我々が君のマシンで動かすよ ―Dockerの誕生である

キミのためにDockerは生まれた

Works on My machine width=480

ぼくのコンテナーでは動いたんだ

美しいDevOpsの世界

Works on My machine width=480

turnoff.us

もう一度言ってみろ・・・

言えるものならな!

Works on My machine width=480

Pulp Fiction (1994) “Say what again! I dare you, I double dare you”

コメント・シェア

クラウドトレンド2019

 
カテゴリー AWS Azure Cloud GCP   タグ

Magic Quadrant for Cloud IaaS

WorldWide

MagicQuadrant IaaS World width=480

Japan

MagicQuadrant IaaS Japan width=480

マーケットシェア

AWS、Azure、GCPへの集約が進んでいる。

Cloud service Provider 2019 market share 2018 market share
AWS 32.3 % 32.7 %
Azure 16.9 % 14.2 %
Google Cloud 5.8 % 4.2 %
Alibaba Cloud 4.9 % 4.1 %
Others 40.1 % 44.8 %

主要プロバイダーに集約が進む

CloudMarketshareTrend width=640

過去10年間のエンタープライズ系の支出

データセンターは停滞しているが、クラウドの伸びが顕著。

CloudMarketshareTrend width=640

過去10年間のエンタープライズ系のSaaSマーケット

SaaSの成長も著しいが、まだソフトウェアマーケットの23%程度。

CloudMarketshareTrend width=640

コラボレーションツール

コラボレーションツールもオンプレミスは停滞~減少方向で、クラウドの利用が増加。

CloudMarketshareTrend width=640

コメント・シェア

さまざまなGit Branching Strageyをみる

 
カテゴリー CI/CD Git   タグ

Centralized Workflow

Subversionの使い方を踏襲する。
中央リポジトリを使用して、プロジェクトへの変更の単一エントリーポイントとして使用する戦略。小規模プロジェクト向け。

  • 開発者は中央リポジトリのメインブランチ(たとえばorigin/master)のみ使う

Feature Branch Workflow

すべての機能開発をメインブランチではなく専用のブランチで行う戦略。
このカプセル化により、複数の開発者がメインのコードベースに影響を与えることなく特定の機能開発を行うことができる。
これはプルリクエストの活用にもつながっている。

  • 開発者は機能ブランチ(たとえばorigin/issue-xxxxx)をつかう
  • 機能(feature)ブランチをメインブランチ(たとえばorigin/master)へpushする

Gitflow Workflow

Feature Branch Workflowを基に厳密なプロジェクトリリースを中心に設計された厳密な分岐モデルを定義したもの。大規模プロジェクト向け。
メインブランチ(master)と開発(develop)を中心にサポートブランチとして機能(feature/topic)ブランチ、リリース(release)ブランチ、メンテナンス(hotfix)ブランチを使う。

  • 公式リリース用のmasterブランチ(公式リリース履歴を格納)
  • 開発用のdevelopブランチを(機能の統合ブランチ)
  • 機能(feature)ブランチはdevelopを親ブランチとして分岐する
  • developブランチを公開する場合releaseブランチを作成する(リリース履歴としてmasterにバージョン番号タグで記録)
  • リリースが完了したらreleaseブランチはmasterブランチとdevelopブランチにマージさせる
  • releaseブランチは機能追加を行わずメンテナンスのみを行うブランチになる
  • バグ修正はhotfixブランチとしてmasterから分岐して行い、masterとdevelopにマージする

Forking Workflow

開発者が独自のリポジトリを持つ戦略。パブリックオープンソースプロジェクト向け。
開発者は独自のリポジトリにpushし、プロジェクトの公式リポジトリはメンテナーのみがpushできる。
公式リポジトリへのマージはプルリクエストを使う。

GitHub flow

定期的なデプロイが必要なプロジェクト向けの軽量のブランチベースのワークフロー。
Feature Branch Workflowと基本的には変わらないが、メインブランチへのマージはプルリクエストを使う。

  • 開発者は機能ブランチ(たとえばorigin/issue-xxxxx)をつかう
  • 機能(feature)ブランチをメインブランチ(たとえばorigin/master)へpushするためにプルリクエスト

GitLab flow

Issue Tracking Systemを統合した仕組み。
GitLab flowは機能(feature)ブランチをマージするたびに本番環境へデプロイすることを想定しているが、環境によってはリリース時間はコントロールできない。
そこで、デプロイしたコードを反映させたproductionブランチを使用する。

  • コード変更は必ずIssueとして登録して機能ブランチとリンクする
  • GitHub flowのように機能ブランチをつかい開発する
  • メインブランチ(master)は開発環境(srtage)へデプロイする
  • プリプロダクション環境へのデプロイはメインブランチからpreproductionブランチへのプルリクエストで行う
  • プロダクション環境へのデプロイはpreproductionブランチからproductionブランチへのプルリクエストで行う

gitworkflows

Git本家推奨のワークフロー。

  • 変更は小さな論理的ステップに分割する(git-blameやgit-bisectで調査・解析を容易にする)
  • メンテナンスリリース用のmaintブランチ
  • 機能リリース用のmasterブランチ
  • 機能リリースに向けたトピック安定化のためのテスト用のnextブランチ
  • 含めるには時期尚早なコミット用の統合用のpu(proposed updates)ブランチ
  • maint -> master -> next -> puの親子関係
  • 機能リリースはmasterブランチからトピックブランチを作成する(pu -> next -> masterでマージ)
  • メンテナンスリリースはmaintブランチからトピックブランチを作成する(next -> maintでマージ)
  • masterブランチはmaintブランチのスーパーセットでなければならない(maint -> masterでマージ)
  • 機能リリース統合後、統合用のnextブランチやpuブランチはmasterの先端へと巻き戻し(reset)もとのnext上に生き残っていたトピックブランチを使って再構成(historyがきれいになる)
  • 巻き戻しと再構成はnextブランチに関しては関する公式アナウンスをすべき(puブランチは使い捨て)

Trunk Based Development (TBD)

各機能を個別のブランチで開発し、安定した後にのみマージするFeature Branchingとは異なりトランクで開発し、リリースごとに分岐を保持するRelease Branchingの戦略。
小規模で頻繁なマージを行うことで、マージの複雑さを軽減し、コードを最新の状態に保つ。

  • 各開発者は自分の作業を数時間で終わる程度の小さなバッチに分割
  • メインブランチであるトランク(メインライン)にマージは少なくとも1日に1回(場合によっては数回)の頻度で行う
  • リリースブランチで行われたバグ修正などはできるだけ早くトランクへマージする
  • 小規模で頻繁なマージを行うことで、イベントのマージの複雑さを軽減し、コードを最新の状態に保つ

コメント・シェア


nullpo

めも


募集中


Japan