docker上でsshの秘密鍵を使ってsshしたいときのハードル

まず、ContainerImageに埋め込むのは除き、実行時に動的に渡す方法として、以下。

  • volumesでホストのファイルを共有する
  • secretsでホストのファイルを共有する

共有した場合の問題点としてはハードルになる。

  • 共有したファイルパーミッションが755になりsshクライアントでエラーとなる
1
2
3
4
5
6
7
8
Warning: Permanently added 'XXXXXXXXXXXXXXXXXXXXX' (RSA) to the list of known hosts.
@@@@@@@@@@@@@@@@@@@@@@@@@@@@@@@@@@@@@@@@@@@@@@@@@@@@@@@@@@@
@ WARNING: UNPROTECTED PRIVATE KEY FILE! @
@@@@@@@@@@@@@@@@@@@@@@@@@@@@@@@@@@@@@@@@@@@@@@@@@@@@@@@@@@@
Permissions 0755 for '/root/.ssh/id_rsa' are too open.
It is required that your private key files are NOT accessible by others.
This private key will be ignored.
Load key "/root/.ssh/id_rsa": bad permissions

そして、Immutableであることによるハードルとして、以下がある。

  • UserKnownHostsファイルの追記のための対話型操作
1
Are you sure you want to continue connecting (yes/no)?

docker-composeでsecretsを使って秘密鍵を渡す

versionは3.1以降とする必要がある。

1
2
3
4
5
6
7
8
9
10
11
12
13
14
15
16
17
18
19
version: '3.1'
services:
xxxxx:
image: python:3-slim
tty: true
volumes:
- ./entrypoint.sh:/work/entrypoint.sh:ro
working_dir: /work/
entrypoint: ./entrypoint.sh
command: /bin/bash
environment:
PYTHONDONTWRITEBYTECODE: 1
GIT_SSH_COMMAND: 'ssh -o UserKnownHostsFile=/dev/null -o StrictHostKeyChecking=no'
secrets:
- host_ssh_key

secrets:
host_ssh_key:
file: ${SSH_KEY_PATH}

entrypoint.shでコピーしてパーミッションを修正する

secretsによって共有された内容は/run/secrets/でReadOnlyアクセスが可能だが、パーミッションは755のため、sshコマンドでエラーになってしまう。そのため、ENTRYPOINTで、コピーしてパーミッションを設定している。

1
2
3
4
5
6
7
8
9
#!/bin/bash

mkdir -p ~/.ssh
chown -R root:root ~/.ssh
chmod -R 0700 ~/.ssh
cp -ip /run/secrets/host_ssh_key ~/.ssh/id_rsa
chmod -R 0600 ~/.ssh

exec "$@"

GIT_SSH_COMMANDでGitが実行するsshコマンドオプションを設定する

環境変数GIT_SSH_COMMANDはGitが実行するsshコマンドを指定することができる。
UserKnownHostsFile=/dev/nullでKnownHostsファイルを生成しないようにし、StrictHostKeyChecking=noで対話型の要求を抑制する。

docker-composeのsecret対応状況

version: '3'で実行した場合

ERROR: The Compose file ‘.\docker-compose.yml’ is invalid because:
Invalid top-level property “secrets”. Valid top-level sections for this Compose file are: version, services, networks, volumes, and extensions starting with “x-“.

You might be seeing this error because you’re using the wrong Compose file version. Either specify a supported version (e.g “2.2” or “3.3”) and place your service definitions under the services key, or omit the version key and place your service definitions at the root of the file to use version 1.
For more on the Compose file format versions, see https://docs.docker.com/compose/compose-file/

secretsでパーミッションを指定できない

パーミッション指定に対応しているように見えるが、docker-compose version 1.25.4, build 8d51620aでは利用できなかった。

mode: サービスのタスクコンテナーにおいて /run/secrets/ にマウントされるファイルのパーミッション。 8 進数表記。 たとえば 0444 であればすべて読み込み可。 Docker 1.13.1 におけるデフォルトは 0000 でしたが、それ以降では 0444 となりました。 secrets はテンポラリなファイルシステム上にマウントされるため、書き込み可能にはできません。 したがって書き込みビットを設定しても無視されます。 実行ビットは設定できます。

1
2
3
4
5
6
secrets:
- source: host_ssh_key
target: host_ssh_key
uid: '103'
gid: '103'
mode: 0600

実行するとサポート対象外のメッセージ。

1
WARNING: Service "xxxxx" uses secret "host_ssh_key" with uid, gid, or mode. These fields are not supported by this implementation of the Compose file

docker-composeの定義ファイルのバージョン

version '3.8の記述がみられるが、docker-compose version 1.25.4, build 8d51620aでは3.3までしか対応していない。

1
2
ERROR: Version in ".\docker-compose.yml" is unsupported. You might be seeing this error because you're using the wrong Compose file version. Either specify a supported version (e.g "2.2" or "3.3") and place your service definitions under the `services` key, or omit the `version` key and place your service definitions at the root of the file to use version 1.
For more on the Compose file format versions, see https://docs.docker.com/compose/compose-file/

コメント・シェア

Windows10の裏技Godモード

 
カテゴリー Windows   タグ

Godモード

Windowsのコントロールパネルのアイテムなどを一覧からアクセスできるアイコン。

Godモードのフォルダーを作成

以下の名前でフォルダーを作成

1
GodMode.{ED7BA470-8E54-465E-825C-99712043E01C}

Windows 10ではアイコンの名前が見えない状態になっている。

God mode icon width=100

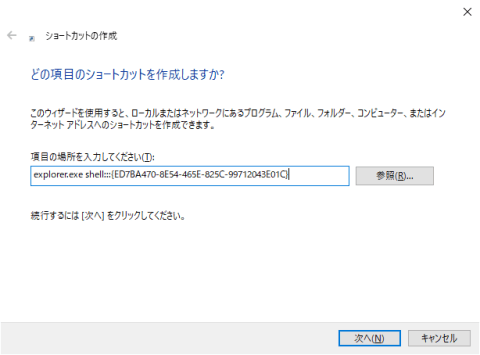
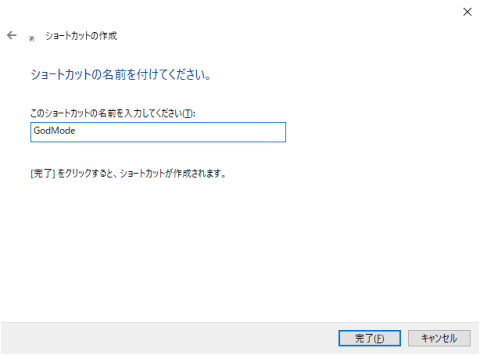
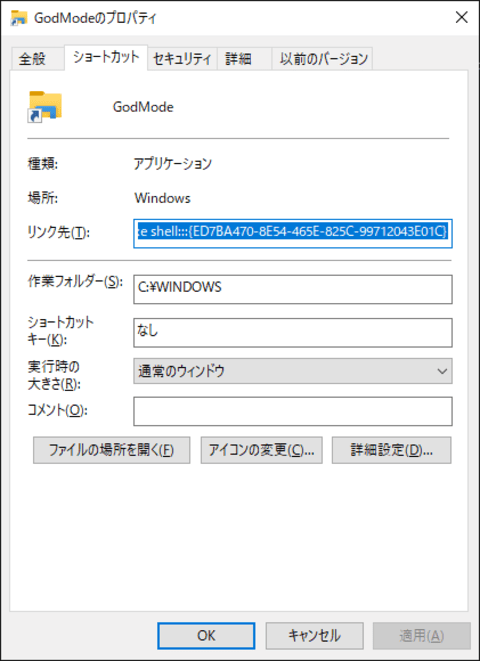
Godモードのショートカットを作成する

以下の内容のショートカットを作成

1
explorer shell:::{ED7BA470-8E54-465E-825C-99712043E01C}

God mode shortcut width=480

God mode shortcut width=480

God mode icon width=100

アイコンの画像をフォルダーとして作成した場合と同じ物に変更

God mode shortcut width=480

God mode shortcut width=480

さまざまなアイテム

Godモード以外にも同じようにコントロールパネルのアイテムを作成することができる。
以下の内容をバッチファイルとして実行すれば各項目が作成される。

1
2
3
4
5
6
7
8
9
10
11
12
mkdir ワイヤレスネットワークの管理.{1FA9085F-25A2-489B-85D4-86326EEDCD87}
mkdir ネットワーク (WORKGROUP).{208D2C60-3AEA-1069-A2D7-08002B30309D}
mkdir このコンピューター.{20D04FE0-3AEA-1069-A2D8-08002B30309D}
mkdir RemoteAppとデスクトップ接続.{241D7C96-F8BF-4F85-B01F-E2B043341A4B}
mkdir Windowsファイアウォール.{4026492F-2F69-46B8-B9BF-5654FC07E423}
mkdir アセンブリキャッシュビューア.{1D2680C9-0E2A-469d-B787-065558BC7D43}
mkdir デバイスとプリンター(プリンタとFAX).{2227A280-3AEA-1069-A2DE-08002B30309D}
mkdir プログラムと機能.{15eae92e-f17a-4431-9f28-805e482dafd4}
mkdir 既定のプログラム.{17cd9488-1228-4b2f-88ce-4298e93e0966}
mkdir 資格情報マネージャー.{1206F5F1-0569-412C-8FEC-3204630DFB70}
mkdir 通知領域アイコン.{05d7b0f4-2121-4eff-bf6b-ed3f69b894d9}
mkdir 電源オプション.{025A5937-A6BE-4686-A844-36FE4BEC8B6D}

コメント・シェア

やりたいこと

  • Pythonモジュールをパッケージ化
  • モジュールのテストのために、pytestのディレクトリ構成(src、test)を使用
  • モジュールを使った、コマンドラインツールをインストール

作成するファイル一覧

1
2
3
4
5
6
7
8
9
10
11
12
13
├── LICENSE
├── MANIFEST.in
├── Makefile
├── README.md
├── setup.cfg
├── setup.py
└── src
├── __init__.py
└── packagedata
├── __init__.py
├── config
│ └── test.ini
└── getpackagedata.py

setup.py

setup.pysetup()を呼ぶだけの内容。

1
2
3
from setuptools import setup

setup()

setup.cfg

setup.cfgはパッケージに関する情報を記述する。
[metadata]は自身の内容を記述する。通常gitリポジトリで作成するLICENSEREADME.mdは流用する形にしている。

1
2
3
4
5
6
7
8
9
10
11
12
13
14
15
16
17
18
19
20
21
22
23
24
25
[metadata]
name = package_with_data
version = attr: src.packagedata.__version__
url = https://xxxxxxxxxxxxxxxxxxxxx
author = XXXXXXXXXX
author_email = xxxxxxx@xxxxxxxxxxxx
license_file = LICENSE
description = package with data
long_description = file: README.md
long_description_content_type = text/markdown

[options]
zip_safe = False
package_dir=
=src
packages = find:
include_package_data=True
install_requires =

[options.packages.find]
where=src

[options.entry_points]
console_scripts =
getdata = packagedata.getpackagedata:main

パッケージにpythonファイル以外のデータを含める

どのファイルを含めるかはMANIFEST.inを使用する

1
include_package_data=True

MANIFEST.in

パッケージに含むもの含まないものを定義する。

1
2
include src/*/config/*.ini
global-exclude *.py[cod] __pycache__ *.so

例えば外部ファイルVERSIONでバージョン番号を決めて、version = file: VERSIONで読み込みたい場合、MANIFEST.inVERSIONを加える必要がある。

サンプルコード(src/packagedata/getpackagedata.py)

1
2
3
4
5
6
7
8
import pkg_resources

def main():
print(pkg_resources.resource_filename('packagedata', 'config'))
print(pkg_resources.resource_string('packagedata', 'config/test.ini').decode())

if __name__ == '__main__':
main()

サンプルコード(src/packagedata/config/test.ini)

1
test=OK

パッケージ作成と実行例

パッケージの作成

python setup.py sdistでパッケージ化する。

1
2
3
4
5
6
7
8
9
10
11
12
13
14
15
16
17
18
19
20
21
22
23
24
25
26
27
28
29
30
31
32
33
34
35
36
37
38
39
40
$ python setup.py sdist
running sdist
running egg_info
creating src/package_with_data.egg-info
writing src/package_with_data.egg-info/PKG-INFO
writing dependency_links to src/package_with_data.egg-info/dependency_links.txt
writing entry points to src/package_with_data.egg-info/entry_points.txt
writing top-level names to src/package_with_data.egg-info/top_level.txt
writing manifest file 'src/package_with_data.egg-info/SOURCES.txt'
reading manifest file 'src/package_with_data.egg-info/SOURCES.txt'
reading manifest template 'MANIFEST.in'
warning: no previously-included files matching '*.py[cod]' found anywhere in distribution
warning: no previously-included files matching '__pycache__' found anywhere in distribution
warning: no previously-included files matching '*.so' found anywhere in distribution
writing manifest file 'src/package_with_data.egg-info/SOURCES.txt'
running check
creating package_with_data-0.0.1
creating package_with_data-0.0.1/src
creating package_with_data-0.0.1/src/package_with_data.egg-info
creating package_with_data-0.0.1/src/packagedata
creating package_with_data-0.0.1/src/packagedata/config
copying files to package_with_data-0.0.1...
copying LICENSE -> package_with_data-0.0.1
copying MANIFEST.in -> package_with_data-0.0.1
copying README.md -> package_with_data-0.0.1
copying setup.cfg -> package_with_data-0.0.1
copying setup.py -> package_with_data-0.0.1
copying src/package_with_data.egg-info/PKG-INFO -> package_with_data-0.0.1/src/package_with_data.egg-info
copying src/package_with_data.egg-info/SOURCES.txt -> package_with_data-0.0.1/src/package_with_data.egg-info
copying src/package_with_data.egg-info/dependency_links.txt -> package_with_data-0.0.1/src/package_with_data.egg-info
copying src/package_with_data.egg-info/entry_points.txt -> package_with_data-0.0.1/src/package_with_data.egg-info
copying src/package_with_data.egg-info/not-zip-safe -> package_with_data-0.0.1/src/package_with_data.egg-info
copying src/package_with_data.egg-info/top_level.txt -> package_with_data-0.0.1/src/package_with_data.egg-info
copying src/packagedata/__init__.py -> package_with_data-0.0.1/src/packagedata
copying src/packagedata/getpackagedata.py -> package_with_data-0.0.1/src/packagedata
copying src/packagedata/config/test.ini -> package_with_data-0.0.1/src/packagedata/config
Writing package_with_data-0.0.1/setup.cfg
creating dist
Creating tar archive
removing 'package_with_data-0.0.1' (and everything under it)

パッケージのインストール

pipコマンドでインストール。

1
2
3
4
5
6
7
8
9
10
11
$ cd dist
console_scripts-0.0.1.tar.gz
$ pip install package_with_data-0.0.1.tar.gz
Processing ./package_with_data-0.0.1.tar.gz
Building wheels for collected packages: package-with-data
Building wheel for package-with-data (setup.py) ... done
Created wheel for package-with-data: filename=package_with_data-0.0.1-py3-none-any.whl size=2338 sha256=6f907b30a1c7b26650c8bec598858ceb917410ffc97c4dde3348c3e24702612a
Stored in directory: /root/.cache/pip/wheels/05/c8/a8/fef26a83f0af30cd5c9aece9b54869e169ca26b4d3d5bf7a00
Successfully built package-with-data
Installing collected packages: package-with-data
Successfully installed package-with-data-0.0.1

パッケージに含めたデータの参照

1
2
3
$ getdata
/usr/local/lib/python3.8/site-packages/packagedata/config
test=OK

コメント・シェア

やりたいこと

  • Pythonモジュールをパッケージ化
  • モジュールのテストのために、pytestのディレクトリ構成(src、test)を使用
  • モジュールを使った、コマンドラインツールをインストール

作成するファイル一覧

1
2
3
4
5
6
7
8
9
10
11
12
13
14
├── LICENSE
├── Makefile
├── README.md
├── setup.cfg
├── setup.py
├── src
│ ├── consoleapp
│ │ ├── __init__.py
│ │ └── cli.py
│ └── mypackage
│ ├── __init__.py
│ └── mymodule.py
└── test
└── test_mypackage.py

setup.py

setup.pysetup()を呼ぶだけの内容。

1
2
3
from setuptools import setup

setup()

setup.cfg

setup.cfgはパッケージに関する情報を記述する。
[metadata]は自身の内容を記述する。通常gitリポジトリで作成するLICENSEREADME.mdは流用する形にしている。

1
2
3
4
5
6
7
8
9
10
11
12
13
14
15
16
17
18
19
20
21
22
23
24
25
26
27
28
[metadata]
name = console_scripts
version = attr: consoleapp.__version__
url = https://xxxxxxxxxxxxxxxxxxxxx
author = XXXXXXXXXX
author_email = xxxxxxx@xxxxxxxxxxxx
license_file = LICENSE
description = console scripts
long_description = file: README.md
long_description_content_type = text/markdown

[options]
zip_safe = False
package_dir=
=src
packages = find:
install_requires =

[options.extras_require]
dev =
pytest

[options.packages.find]
where=src

[options.entry_points]
console_scripts =
consapp = consoleapp.cli:main

srcディレクトリ以下にソースコードを置くための記述

package_dirsrcディレクトリを指定する。
パッケージを探索もsrcディレクトリを参照する。

1
2
3
4
5
6
7
[options]
package_dir=
=src
packages = find:

[options.packages.find]
where=src

pytestでテストするために開発時はpytestパッケージをインストールする

[options.extras_require]で指定したオプションを使って開発時のインストールでpytestパッケージを要求パッケージにする。

1
2
3
[options.extras_require]
dev =
pytest

開発時は以下のコマンドで、指定した要求パッケージをインストールすることができる。

1
pip install -e .[dev]

コマンドラインツールをインストールする

[options.entry_points]でコマンドラインツールとしてインストールする。
下の設定例ではconsappというコマンド名で/usr/local/binにインストールされる。
consoleapp:mainconsoleapp.pyにあるmainを実行する。

1
2
3
[options.entry_points]
console_scripts =
consapp = consoleapp.cli:main

バージョン情報を参照する

バージョン情報を__init__.pyに記述。

1
__version__ = '0.0.1'

記述したバージョン情報はattrで参照できる。

1
version = attr: consoleapp.__version__

サンプルコード(src/mypackage/mymodule.py)

mypackage/mymodule.pyとして以下の内容を作成。

1
2
def add(x, y):
return x + y

サンプルコード(src/consoleapp/cli.py)

cli.pymypackage/mymodule.pyを使って結果を表示するmain()が定義している。

1
2
3
4
5
6
7
8
9
10
11
12
13
14
import random
import mypackage.mymodule

def main():
x = random.random()
y = random.random()

print("X={}".format(x))
print("Y={}".format(y))

print("X+Y={}".format(mypackage.mymodule.add(x, y)))

if __name__ == '__main__':
main()

サンプルテストコード(test/test_mypackage.py)

test/test_mypackage.pyにテストコードを置く。
pytestはファイル名にtestを含むものを処理していく。

1
2
3
4
import mypackage.mymodule

def test_mypackage():
assert mypackage.mymodule.add(1,1) == 2

パッケージ作成と実行例

dev指定でインストールしてpytestを実行する

[dev]オプション付きでインストールすると、指定したpytestパッケージもインストールされる。

1
2
3
4
5
6
7
8
9
10
11
12
13
14
15
16
17
18
19
20
21
22
23
24
25
26
$ pip install -e .[dev]
Obtaining file:///work/setuptools/min_package
Collecting pytest
Downloading pytest-5.4.1-py3-none-any.whl (246 kB)
|████████████████████████████████| 246 kB 3.2 MB/s
Collecting more-itertools>=4.0.0
Downloading more_itertools-8.2.0-py3-none-any.whl (43 kB)
|████████████████████████████████| 43 kB 2.1 MB/s
Collecting wcwidth
Downloading wcwidth-0.1.9-py2.py3-none-any.whl (19 kB)
Collecting pluggy<1.0,>=0.12
Downloading pluggy-0.13.1-py2.py3-none-any.whl (18 kB)
Collecting attrs>=17.4.0
Downloading attrs-19.3.0-py2.py3-none-any.whl (39 kB)
Collecting py>=1.5.0
Downloading py-1.8.1-py2.py3-none-any.whl (83 kB)
|████████████████████████████████| 83 kB 2.2 MB/s
Collecting packaging
Downloading packaging-20.3-py2.py3-none-any.whl (37 kB)
Requirement already satisfied: six in /usr/local/lib/python3.8/site-packages (from packaging->pytest->console-scripts==0.0.1) (1.14.0)
Collecting pyparsing>=2.0.2
Downloading pyparsing-2.4.7-py2.py3-none-any.whl (67 kB)
|████████████████████████████████| 67 kB 5.1 MB/s
Installing collected packages: more-itertools, wcwidth, pluggy, attrs, py, pyparsing, packaging, pytest, console-scripts
Running setup.py develop for console-scripts
Successfully installed attrs-19.3.0 console-scripts more-itertools-8.2.0 packaging-20.3 pluggy-0.13.1 py-1.8.1 pyparsing-2.4.7 pytest-5.4.1 wcwidth-0.1.9

pytestでテスト実行。以下はキャッシュを残さないオプション付きで実行している。

1
2
3
4
5
6
7
8
9
$ pytest -p no:cacheprovider
================================ test session starts ================================
platform linux -- Python 3.8.2, pytest-5.4.1, py-1.8.1, pluggy-0.13.1
rootdir: /work/setuptools/min_package
collected 1 item

test/test_mypackage.py [100%]

================================= 1 passed in 0.07s =================================

インストールしてコマンドラインツールを実行する

インストールすると作成したPythonパッケージとconsappコマンドがインストールされる。

1
2
3
4
5
$ pip install -e .
Obtaining file:///work/setuptools/min_package
Installing collected packages: console-scripts
Running setup.py develop for console-scripts
Successfully installed console-scripts

/usr/local/bin/にインストールされパスも通った状態になっている。

1
2
3
4
$ consapp
X=0.8166454250641093
Y=0.9771692906142968
X+Y=1.7938147156784061

GitHubからインストールする

HTTPでインストールする場合

1
pip install git+https://github.com/xxxxxxxxxxx/xxxxxx.git

SSHでインストールする場合

1
pip install git+ssh://git@github.com/xxxxxxxxxxx/xxxxxx.git

参考

コメント・シェア

AlgoliaのSearch APIを使って検索する

 
カテゴリー Python SaaS   タグ

algolia API

algolia APIのインストール

1
2
pip install --upgrade 'algoliasearch>=2.0,<3.0'
pip install 'asyncio>=3.4,<4.0' 'aiohttp>=2.0,<4.0' 'async_timeout>=2.0,<4.0'

requirements.txt

1
2
3
4
algoliasearch>=2.0,<3.0
asyncio>=3.4,<4.0
aiohttp>=2.0,<4.0
async_timeout>=2.0,<4.0

Search API

リファレンスで示されているコード。

1
2
3
4
from algoliasearch.search_client import SearchClient

client = SearchClient.create('L1PH10DG5X', '••••••••••••••••••••')
index = client.init_index('your_index_name')
1
2
3
4
5
6
7
8
9
10
index = client.init_index('contacts')

res = index.search('query string')
res = index.search('query string', {
'attributesToRetrieve': [
'firstname',
'lastname'
],
'hitsPerPage': 20
})

Response

リファレンスで示されているレスポンスのJSONフォーマット。

1
2
3
4
5
6
7
8
9
10
11
12
13
14
15
16
17
18
19
20
21
22
23
24
25
26
27
28
29
30
{
"hits": [
{
"firstname": "Jimmie",
"lastname": "Barninger",
"objectID": "433",
"_highlightResult": {
"firstname": {
"value": "&lt;em&gt;Jimmie&lt;/em&gt;",
"matchLevel": "partial"
},
"lastname": {
"value": "Barninger",
"matchLevel": "none"
},
"company": {
"value": "California &lt;em&gt;Paint&lt;/em&gt; & Wlpaper Str",
"matchLevel": "partial"
}
}
}
],
"page": 0,
"nbHits": 1,
"nbPages": 1,
"hitsPerPage": 20,
"processingTimeMS": 1,
"query": "jimmie paint",
"params": "query=jimmie+paint&attributesToRetrieve=firstname,lastname&hitsPerPage=50"
}

Search APIを使った検索

algoliatest.py

本サイトのインデックスを使ってpythonをキーに検索するコードと実行結果。
APIキー等は環境変数で渡して実行している。

1
2
3
4
5
6
7
8
9
import os
from algoliasearch.search_client import SearchClient

client = SearchClient.create(os.environ['ALGOLIA_APP_ID'], os.environ['ALGOLIA_API_KEY'])
index = client.init_index(os.environ['ALGOLIA_INDEX_NAME'])

res = index.search('python')
for item in res['hits']:
print(item['title'])

テストコードの実行結果

1
2
3
4
5
6
7
8
9
10
11
12
13
14
15
16
17
18
19
20
21
22
23
24
25
26
27
28
29
30
31
32
33
34
35
36
37
38
39
40
41
42
43
44
45
46
47
$pip install -r requirements.txt
Collecting algoliasearch<3.0,>=2.0
Downloading algoliasearch-2.2.0-py2.py3-none-any.whl (30 kB)
Collecting asyncio<4.0,>=3.4
Downloading asyncio-3.4.3-py3-none-any.whl (101 kB)
|████████████████████████████████| 101 kB 4.4 MB/s
Collecting aiohttp<4.0,>=2.0
Downloading aiohttp-3.6.2-py3-none-any.whl (441 kB)
|████████████████████████████████| 441 kB 13.9 MB/s
Collecting async_timeout<4.0,>=2.0
Downloading async_timeout-3.0.1-py3-none-any.whl (8.2 kB)
Collecting requests<3.0,>=2.21
Downloading requests-2.23.0-py2.py3-none-any.whl (58 kB)
|████████████████████████████████| 58 kB 3.5 MB/s
Collecting yarl<2.0,>=1.0
Downloading yarl-1.4.2-cp38-cp38-manylinux1_x86_64.whl (253 kB)
|████████████████████████████████| 253 kB 11.0 MB/s
Collecting attrs>=17.3.0
Downloading attrs-19.3.0-py2.py3-none-any.whl (39 kB)
Collecting multidict<5.0,>=4.5
Downloading multidict-4.7.5-cp38-cp38-manylinux1_x86_64.whl (162 kB)
|████████████████████████████████| 162 kB 11.4 MB/s
Collecting chardet<4.0,>=2.0
Downloading chardet-3.0.4-py2.py3-none-any.whl (133 kB)
|████████████████████████████████| 133 kB 10.8 MB/s
Collecting certifi>=2017.4.17
Downloading certifi-2020.4.5.1-py2.py3-none-any.whl (157 kB)
|████████████████████████████████| 157 kB 10.6 MB/s
Collecting idna<3,>=2.5
Downloading idna-2.9-py2.py3-none-any.whl (58 kB)
|████████████████████████████████| 58 kB 5.9 MB/s
Collecting urllib3!=1.25.0,!=1.25.1,<1.26,>=1.21.1
Downloading urllib3-1.25.9-py2.py3-none-any.whl (126 kB)
|████████████████████████████████| 126 kB 11.0 MB/s
Installing collected packages: certifi, chardet, idna, urllib3, requests, algoliasearch, asyncio, multidict, yarl, async-timeout, attrs, aiohttp
Successfully installed aiohttp-3.6.2 algoliasearch-2.2.0 async-timeout-3.0.1 asynci

$python algoliatest.py
PythonでGmailを使ったメール送信
Python loggingによるログ操作
SMTPHandlerでログ出力をメール通知する
SlackのIncoming WebHooksを使う
KeyringでOSのパスワード管理機構を利用する
DockerでSeleniumのContainerImageを作成する
docker-seleniumによるSelenium standalone server環境
docker-seleniumによるSelenium Grid環境
CloudinaryをWebAPIで操作する

コメント・シェア

HexoのTranquilpeakでAlgolia検索

 
カテゴリー SSG SaaS   タグ

Tranquilpeakでhexo-algoliasearchを使う

hexo-algoliasearchのインストール

npm install hexo-algoliasearch --saveでインストール。

hexo-algoliasearchの設定

appIdやapiKeyは設定できるが、環境変数で渡して設定では記述しないことが可能(後述の問題あり)。
ALGOLIA_APP_IDALGOLIA_API_KEYALGOLIA_ADMIN_API_KEYALGOLIA_INDEX_NAMEが利用できる。

1
2
3
4
5
6
7
8
9
10
11
12
13
14
15
algolia:
appId: "Z7A3XW4R2I"
apiKey: "12db1ad54372045549ef465881c17e743"
adminApiKey: "40321c7c207e7f73b63a19aa24c4761b"
chunkSize: 5000
indexName: "my-hexo-blog"
fields:
- content:strip:truncate,0,500
- excerpt:strip
- gallery
- permalink
- photos
- slug
- tags
- title

Tranquilpeakでhexo-algoliasearchを使用する

tranquilpeakのドキュメントで以下のfieldsとするように記述がある

  1. Create an account on Algolia
  2. Install and configure hexo-algoliasearch plugin
  3. Index your posts before deploying your blog. Here are the required fields:
1
2
3
4
5
6
7
8
fields:
- title
- tags
- date
- categories
- excerpt
- permalink
- thumbnailImageUrl

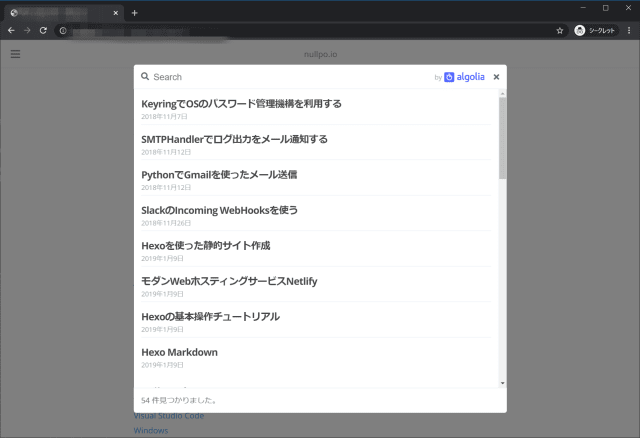
TranquilpeakでAlgoliaの検索を有効化する

IDやキーはすべて環境変数で渡すことができる。Indexの作成はこれで動作するが、tranquilpeakの検索が動かない。

1
2
3
4
ALGOLIA_APP_ID=XXXXXXXXXXXXXXXXXXXX
ALGOLIA_API_KEY=XXXXXXXXXXXXXXXXXXX
ALGOLIA_ADMIN_API_KEY=XXXXXXXXXXXXXXXXXXX
ALGOLIA_INDEX_NAME=XXXXXXXXXXXXXXXXXXX

appIdapiKeyindexName_config.ymlで指定する必要がある。

1
2
3
4
5
6
7
8
9
10
11
12
13
algolia:
appId: "XXXXXXXXXX"
apiKey: "XXXXXXXXXXXXXXXXXXXX"
indexName: "XXXXXXXXXX"
chunkSize: 5000
fields:
- title
- tags
- date
- categories
- excerpt
- permalink
- thumbnailImageUrl

algoliaのインデックスを設定する

インデックス作成

hexo algoliaの実行でインデックスのレコードを登録することができる。

1
2
3
4
stage      | INFO  Clearing index on Algolia...
stage | INFO Index cleared.
stage | INFO Indexing posts on Algolia...
stage | INFO 54 posts indexed.

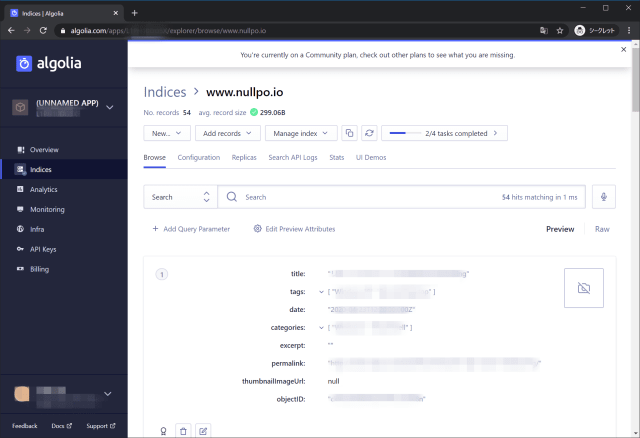
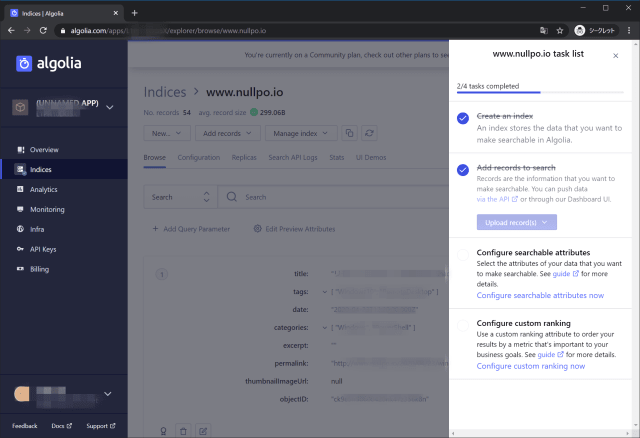
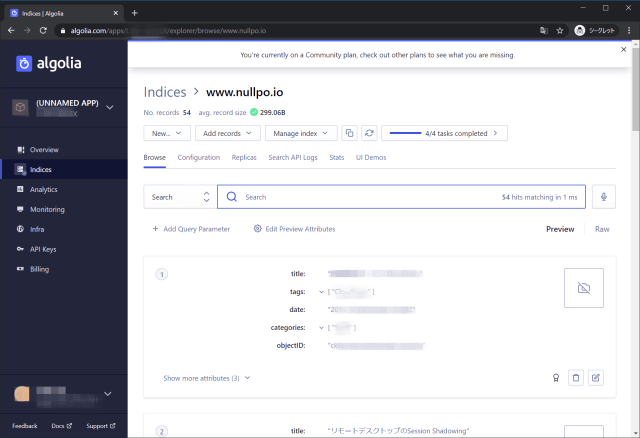
algoliaの管理画面で登録されたレコードを確認。

AlgoliaIndex width=640

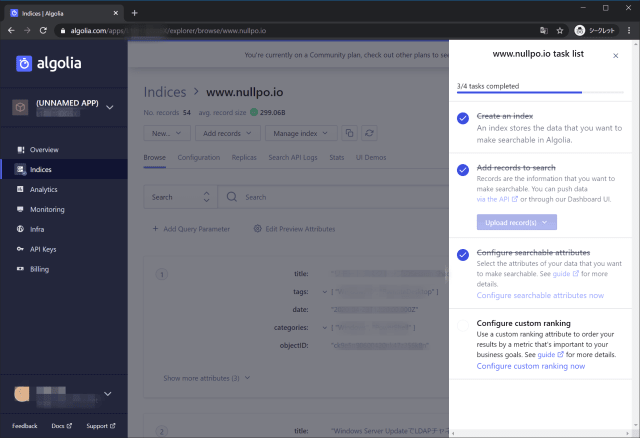
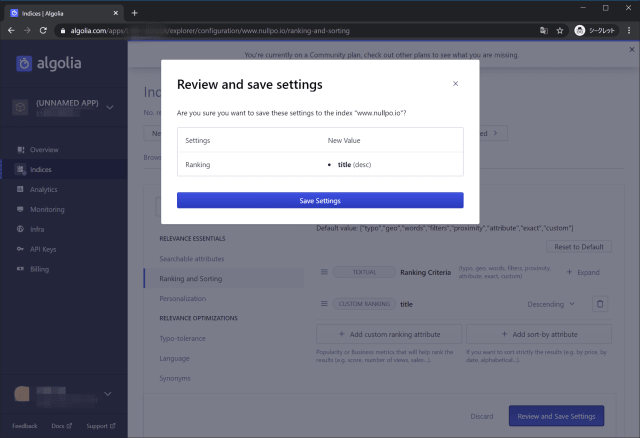
インデックスのカスタマイズ。

AlgoliaIndex width=640

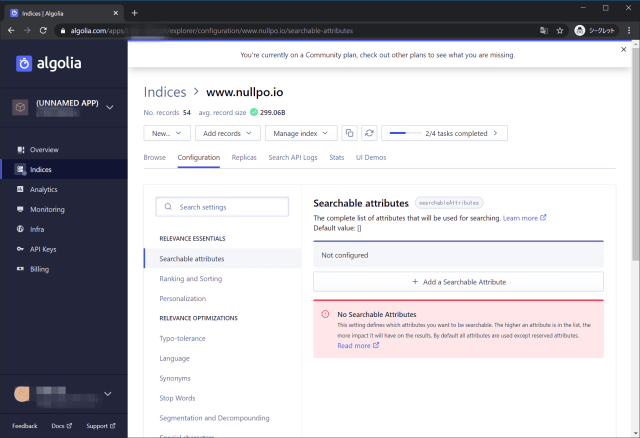
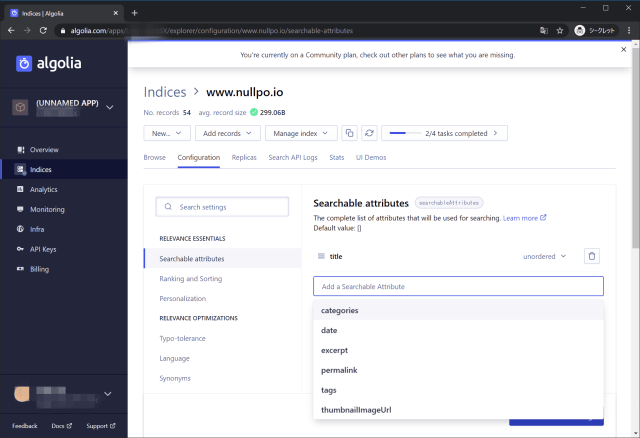
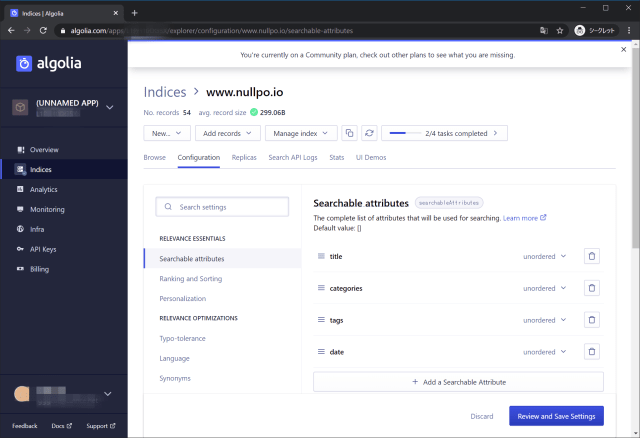
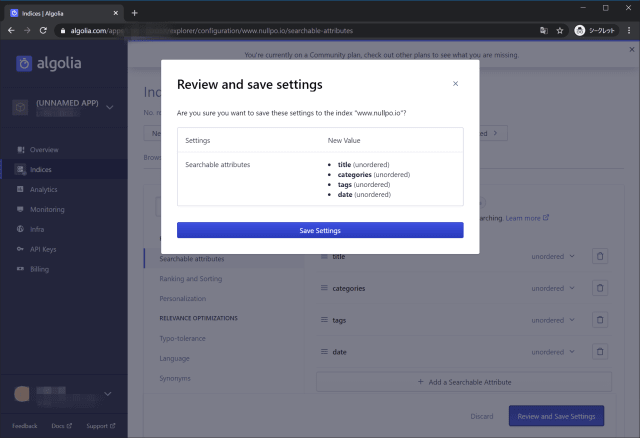
検索可能なAttributesを設定する。

AlgoliaIndex width=640

AlgoliaIndex width=640

AlgoliaIndex width=640

AlgoliaIndex width=640

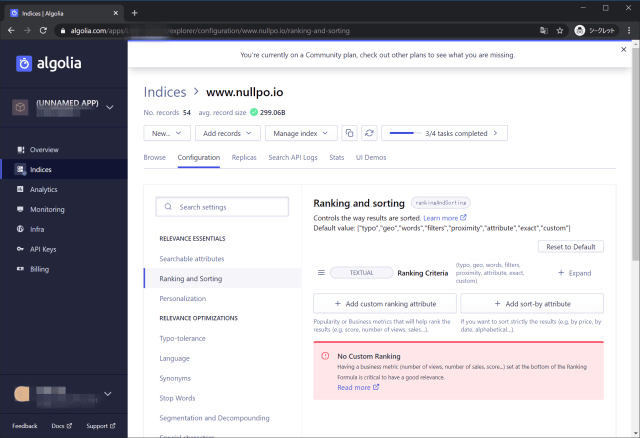
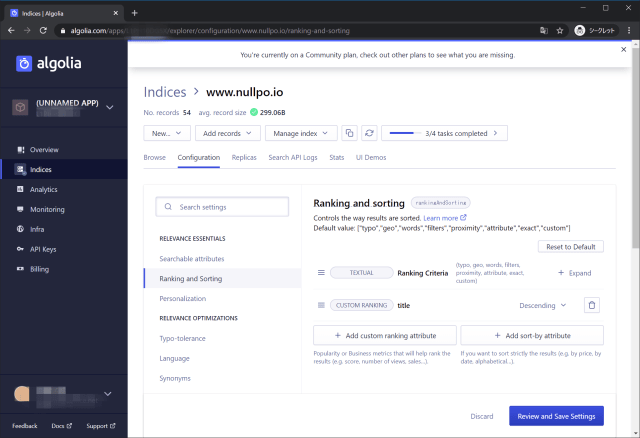
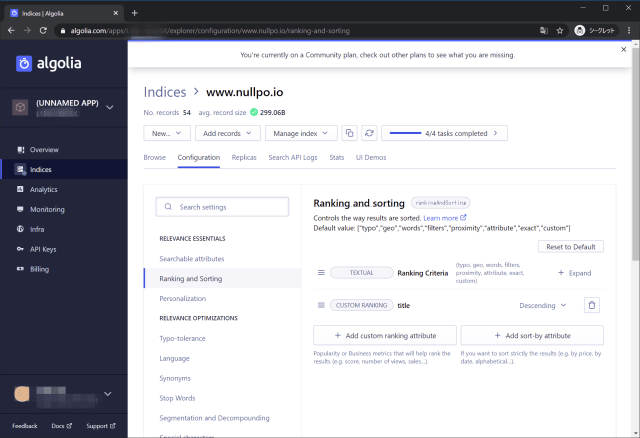
ランキングとソートの設定。

AlgoliaIndex width=640

AlgoliaIndex width=640

AlgoliaIndex width=640

AlgoliaIndex width=640

AlgoliaIndex width=640

AlgoliaIndex width=640

設定が有効化されているか確認する

以下の2点に注意。

  • npmモジュールはアップデートしない
  • APIキーを環境変数で渡すのではなく_config.ymlに設定する

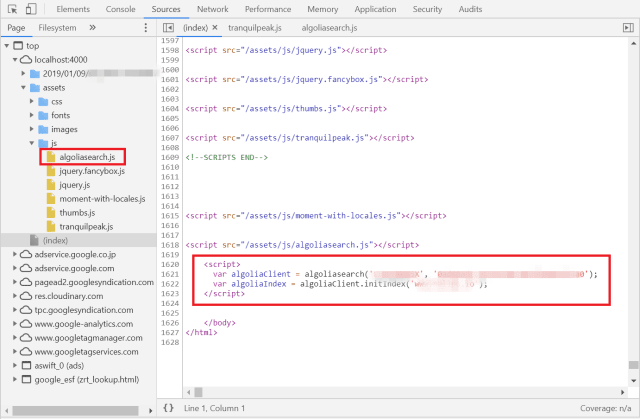
npmモジュールをアップデートした場合algoliasearch.jsが読み込まれない状態になった。
APIキーを環境変数でのみ指定し_config.ymlで指定していない場合、algoliaのスクリプトが反映されない状態になった。

AlgoliaSearch width=640

AlgoliaSearch width=640

コメント・シェア

リモートデスクトップのSession Shadowing

リモートデスクトップのセッションを共有して同じ画面を参照する機能。
RDPと比べて操作性は良くないので、参照用途に割り切った方がよさそう。

リモートデスクトップ設定

リモートデスクトップの有効化(PowerShell)

1
2
Get-ItemProperty -Path "HKLM:\SYSTEM\CurrentControlSet\Control\Terminal Server" -Name "fDenyTSConnections"
Get-ItemProperty -Path "HKLM:\SYSTEM\CurrentControlSet\Control\Terminal Server\WinStations\RDP-Tcp" -Name "UserAuthentication"

設定が必要な場合、以下を実行。

1
2
Set-ItemProperty -Path "HKLM:\SYSTEM\CurrentControlSet\Control\Terminal Server" -Name "fDenyTSConnections" -Type Dword -Value "0"
Set-ItemProperty -Path "HKLM:\SYSTEM\CurrentControlSet\Control\Terminal Server\WinStations\RDP-Tcp" -Name "UserAuthentication" -Type Dword -Value "0"

グループポリシーの設定

グループポリシーエディター(gpedit.msc)で以下の項目を編集する

英語版の場合(Computer Configuration -> Policies -> Administrative Templates -> Windows components -> Remote Desktop Services -> Remote Session Host -> Connections and called Set rules for remote control of Remote Desktop Services user sessions.

日本語版の場合(コンピュータの構成 -> 管理用テンプレート -> Windowsコンポーネント -> リモートデスクトップサービス -> リモートデスクトップセッションホスト -> 接続 -> リモートデスクトップサービスユーザセッションのリモート制御ルールを設定する

オプションはユーザーの許可なしでセッションを参照するにする。

GroupPolicyEditor width=640

Windows Defenderファイアウォールの設定

必要なポート

RDP(3389)とSMB(445)

  • リモートデスクトップ - シャドウ(TCP受信)
  • リモートデスクトップ - ユーザーモード(TCP受信)
  • リモートデスクトップ - ユーザーモード(UDP受信)
  • ファイルとプリンターの共有(SMB受信)

設定確認(PowerShell)

1
2
3
4
Get-NetFirewallRule -DisplayName "リモート デスクトップ - シャドウ (TCP 受信)"
Get-NetFirewallRule -DisplayName "リモート デスクトップ - ユーザー モード (TCP 受信)"
Get-NetFirewallRule -DisplayName "リモート デスクトップ - ユーザー モード (UDP 受信)"
Get-NetFirewallRule -DisplayName "ファイルとプリンターの共有 (SMB 受信)"

設定が必要な場合、以下を実行。

1
2
3
4
Set-NetFirewallRule -DisplayName "リモート デスクトップ - シャドウ (TCP 受信)" -Enabled True
Set-NetFirewallRule -DisplayName "リモート デスクトップ - ユーザー モード (TCP 受信)" -Enabled True
Set-NetFirewallRule -DisplayName "リモート デスクトップ - ユーザー モード (UDP 受信)" -Enabled True
Set-NetFirewallRule -DisplayName "ファイルとプリンターの共有 (SMB 受信)" -Enabled True

Session Shadowingで接続する

接続先のセッションIDを表示する

qwinsta /server:<Computer name or IP address>でセッションIDを確認。

接続方法

Mstsc.exe /shadow:<Session ID> /v:<Computer name or IP address> /prompt /noConsentPromptで既存のセッションに接続できる。

  • /noConsentPromptを指定しないと、既存のセッション側に接続を許可するか確認のポップアップが出る
  • /promptを指定するとログインプロンプトが表示される
  • /controlを指定すると、接続先が許可していれば、操作が可能になる

参考

コメント・シェア

Hexoでsitemap.xmlとrobots.txtを生成する

 
カテゴリー SSG   タグ

hexo-generator-seo-friendly-sitemap

_config.ymlに以下の設定を追加。

1
2
3
4
sitemap:
path: sitemap.xml
tag: false
category: false

タグやカテゴリのページは対象外とし、それ以外のページのサイトマップを生成する。
記事のFront-matterでsitemap: falseを指定した記事は対象外になる。

ssg-hexo-sitemap width=640

ファイル更新日で生成されている

hexo-generator-robotstxt

_config.ymlに以下の設定を追加。

1
2
3
4
5
6
7
8
9
10
11
12
robotstxt:
useragent: "*"
disallow:
- /all-categories/
- /categories/
- /all-tags/
- /tags/
- /all-archives/
- /assets/images/
- /assets/
allow:
sitemap: /sitemap.xml

ssg-hexo-sitemap width=640

コメント・シェア


nullpo

めも


募集中


Japan