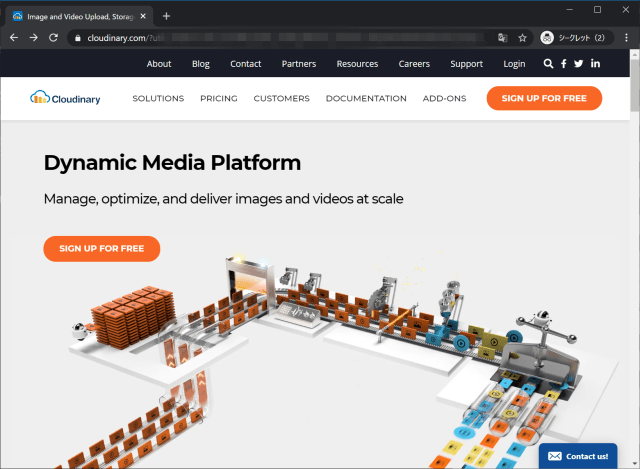
画像配信サービスCloudinary

 
カテゴリー SaaS   タグ

Cloudinary

Dynamic Media Platform: Manage, optimize, and deliver images and videos at scale

Cloudinaryはモダンなメディア配信サービス。アップロードされた画像データに対してURLで画像処理を指定することで動的な変換とCDN経由での配信を行う。
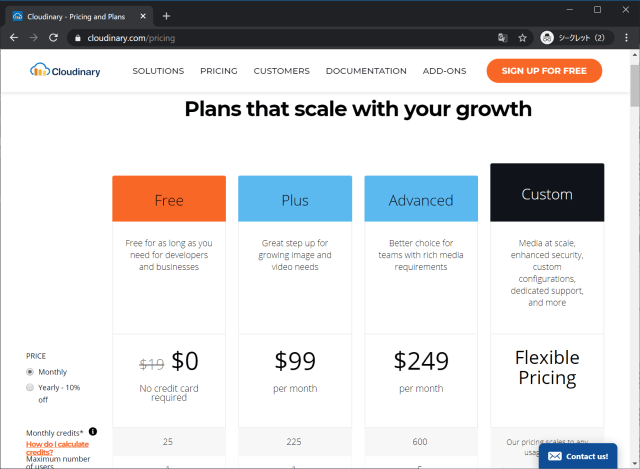
Cloudinary width=640

Cloudinary width=640

Cloudinary width=640

無料プランでできること

  • Upload widget and API
  • DAM media library
  • Search via the UI or API
  • Remote fetch
  • Automatic backup and revision tracking
  • Tons of image and video manipulations
  • Video transcoding and adaptive streaming
  • Automatic optimization
  • High performance delivery through a CDN
  • Powerful dashboard and online reports
  • Custom branding for upload widget
  • RESTful APIs
  • Support - forums, tickets and email
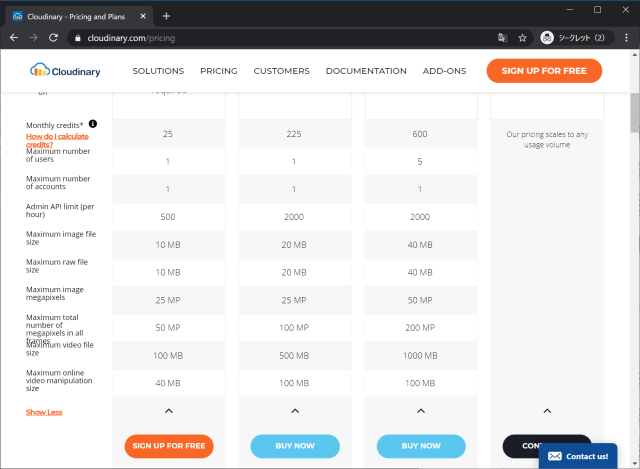
制限

Free Plan limit
Monthly credit 25
Maximum number of users 1
Maximum number of accounts 1
Admin API limit (per hour) 10 MB
Maximum image file size 10 MB
Maximum raw file size 25 MP
Maximum image megapixels 50 MP
Maximum video file size 100 MB
Maximum online video manipulation size 40 MB

1 credit = 1000 transformations or 1GB managed storage or 1GB net viewing bandwidth or 500 video processing seconds
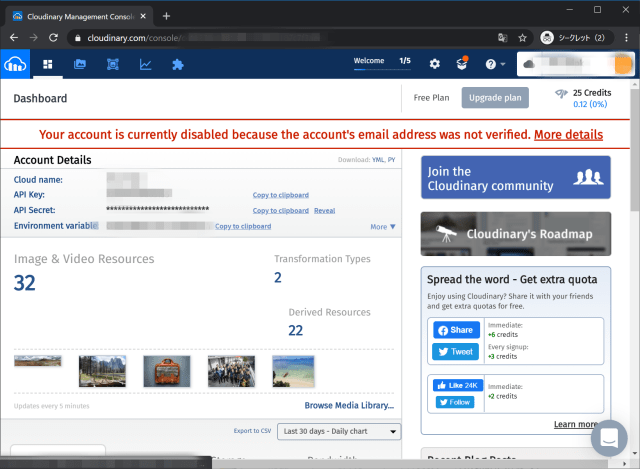
Cloudinary管理画面

Account Details

API-KeyやCLOUDINARY_URLを取得できる。
これらを使ってcloudinary-apiによる操作を行うことができる。
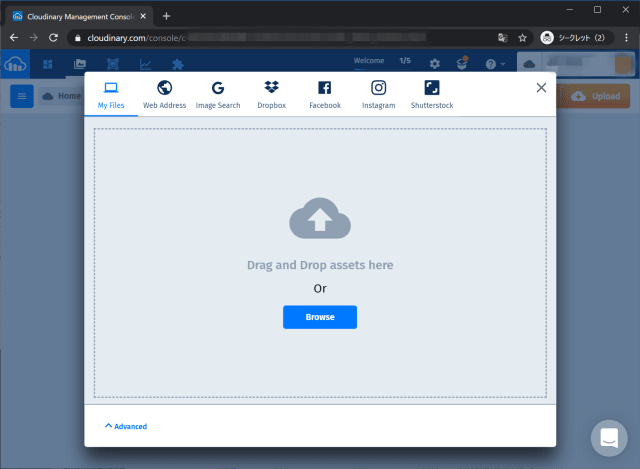
Cloudinary width=640

Cloudinary width=640

Media Library

Media Libraryから画像ファイルをアップロードできる。
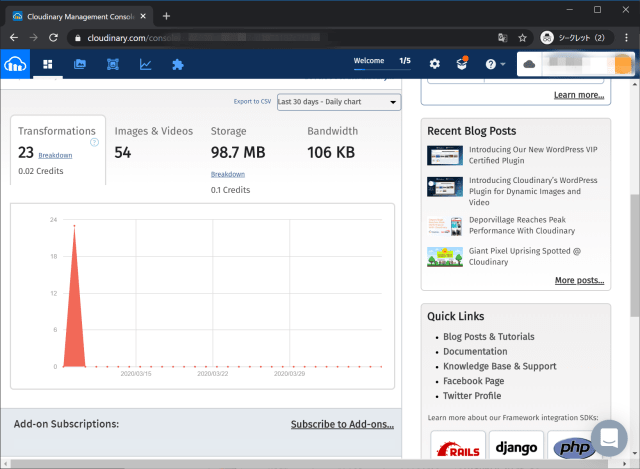
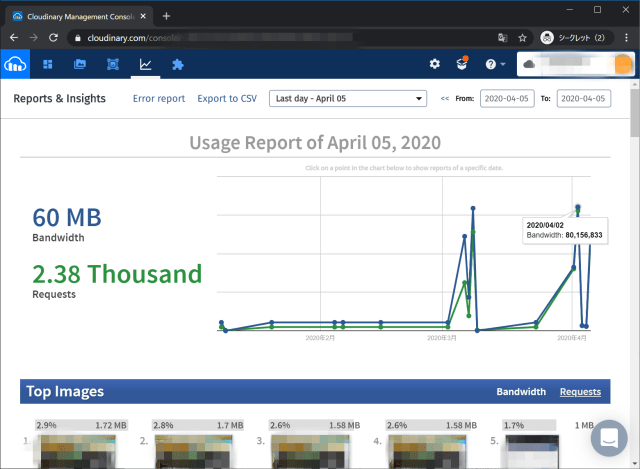
Cloudinary width=640

Cloudinary width=640

Dashboard / Reports

DashboardやReports画面で利用状況を確認できる。

Cloudinary width=640

Cloudinary width=640

画像アクセスとイメージ変換

イメージのURL

画像のURLは以下の様な形式。demo部分がユーザIDになっている。

https://res.cloudinary.com/demo/image/upload/q_auto:low/woman.jpg

q_auto:lowの部分が変換オプション

Image transformation reference

コメント・シェア

Webホスティング機能を利用する

s3_webhosting.yml

1
2
3
4
5
6
7
8
9
10
11
12
13
14
15
16
17
18
19
20
21
22
23
24
25
26
27
28
29
30
31
32
33
34
35
36
37
38
39
40
41
42
43
44
45
46
47
48
49
50
51
52
53
54
55
56
57
58
59
60
61
62
63
64
65
66
67
68
69
70
71
AWSTemplateFormatVersion: '2010-09-09'
Description: S3 Webhosting

# ------------------------------------------------------------ #
# Input Parameters
# ------------------------------------------------------------ #
Parameters:
S3BucketName:
Description: A name for the WebContents buckets.
Type: String
S3BucketNameLog:
Description: A name for the Log buckets.
Type: String

Resources:
# ------------------------------------------------------------ #
# S3
# ------------------------------------------------------------ #
S3BucketContents:
Type: AWS::S3::Bucket
#DeletionPolicy: Retain
Properties:
BucketName: !Sub ${S3BucketName}
AccessControl: PublicRead
WebsiteConfiguration:
IndexDocument: index.html
ErrorDocument: error.html
LoggingConfiguration:
DestinationBucketName: !Ref S3BucketLog
LogFilePrefix: !Sub "/logs/${S3BucketName}/"

S3BucketContentsPolicy:
Type: AWS::S3::BucketPolicy
Properties:
Bucket: !Ref S3BucketContents
PolicyDocument:
Statement:
Action:
- "s3:GetObject"
Effect: "Allow"
Resource: !Sub "arn:aws:s3:::${S3BucketName}/*"
Principal: "*"

S3BucketLog:
Type: "AWS::S3::Bucket"
Properties:
BucketName: !Ref S3BucketNameLog
AccessControl: LogDeliveryWrite
BucketEncryption:
ServerSideEncryptionConfiguration:
- ServerSideEncryptionByDefault:
SSEAlgorithm: AES256
LifecycleConfiguration:
Rules:
- Id: !Sub "${S3BucketNameLog}-log-LifeCycle"
Status: Enabled
Prefix: log/
ExpirationInDays: 365
Transitions:
- StorageClass: GLACIER
TransitionInDays: 180

# ------------------------------------------------------------ #
# Output Parameters
# ------------------------------------------------------------ #
Outputs:
S3BucketName:
Value: !Ref S3BucketContents
WebsiteURL:
Value: !GetAtt S3BucketContents.WebsiteURL
Description: URL for website hosted on S3

カスタムエラードキュメント

HTTP 404 Not Foundをカスタマイズすることができる。

1
2
3
WebsiteConfiguration:
IndexDocument: index.html
ErrorDocument: error.html

コンテンツのアップロード

1
2
3
4
5
6
7
8
$ aws s3 ls s3://web.nullpo.io
$ aws s3 cp contents/index.html s3://web.nullpo.io/
upload: contents/index.html to s3://web.nullpo.io/index.html
$ aws s3 cp contents/error.html s3://web.nullpo.io/
upload: contents/error.html to s3://web.nullpo.io/error.html
$ aws s3 ls s3://web.nullpo.io
2020-05-01 22:38:45 79 error.html
2020-05-01 22:38:37 79 index.html

S3バケットにコンテンツがあるとスタック削除で削除エラーになる

スタックの削除でStackStatusReason: The following resource(s) failed to delete: [S3BucketContents]のエラーとなる。
イベントでみるとThe bucket you tried to delete is not empty (Service: Amazon S3; Status Code: 409; Error Code: BucketNotEmpty;でバケットが空でないため削除できない。

デフォルトのDeletionPolicy: Deleteの場合、バケットを空にする必要がある。

AWS CloudFormation はスタックの削除時にリソースと (該当する場合) そのすべてのコンテンツを削除します。この削除ポリシーは、あらゆるリソースタイプに追加することができます。デフォルトでは、DeletionPolicy を指定しない場合、AWS CloudFormation はリソースを削除します。
Amazon S3 バケットでは、削除を成功させるためにはバケットのすべてのオブジェクトを削除する必要があります。

スタック自体はそのまま削除させ、空でないバケットはそのまま残す方法もある。
DeletionPolicy: Retainを指定すれば、コンテンツとバケットは残り、スタックは削除される。

S3バケットのコンテンツを空する

バケットのコンテンツを空にするにはaws s3 rmで削除が可能。

1
2
3
$ aws s3 rm s3://web.nullpo.io/ --recursive
delete: s3://web.nullpo.io/index.html
delete: s3://web.nullpo.io/error.html

S3バケットとコンテンツを削除する

バケットも削除するにはaws s3 rbを使用する。

1
2
3
4
5
6
$ aws s3 rb s3://web.nullpo.io/
remove_bucket failed: s3://web.nullpo.io/ An error occurred (BucketNotEmpty) when calling the DeleteBucket operation: The bucket you tried to delete is not empty
$ aws s3 rb s3://web.nullpo.io/ --force
delete: s3://web.nullpo.io/index.html
delete: s3://web.nullpo.io/error.html
remove_bucket: web.nullpo.io

ログはベストエフォート型の記録

アクセスログはすぐに出力されない。
テストした際にはアクセス可能になるまで、1時間程度を要した。

サーバーアクセスログレコードの配信は、ベストエフォートで行われます。ログ記録用に適切にバケットを設定した場合、そのバケットへのほとんどのリクエストについてログレコードが配信されます。ほとんどのログレコードは、記録された時間から数時間以内に配信されますが、配信間隔は短くなる場合もあります。
サーバーログの完全性や適時性は保証されません。リクエストのログレコードが、リクエストが実際に処理されてからかなり後に配信されたり、配信すらされないこともあり得ます。サーバーログの目的は、バケットに対するトラフィックの特性を理解することです。ログレコードが失われることはまれですが、すべてのリクエストが完全に報告されるとは限りません。

コメント・シェア

料金

料金体系はわかりにくいが、最低利用料はなく利用した分だけ。

データ転送アウト (インターネット/オリジン)
HTTP/HTTPS リクエスト
無効リクエスト
フィールドレベル暗号化リクエスト
CLOUDFRONT ディストリビューションに関連する、専用 IP カスタム SSL 証明書

12カ月利用枠として以下が利用できる。

50 GB のデータ送信
12 か月間無料
200 万件の HTTP および HTTPS リクエスト
毎月 1 年間

S3バケットをオリジンにしてキャッシュ配信する

cloudfront_s3.yml

1
2
3
4
5
6
7
8
9
10
11
12
13
14
15
16
17
18
19
20
21
22
23
24
25
26
27
28
29
30
31
32
33
34
35
36
37
38
39
40
41
42
43
44
45
46
47
48
49
50
51
52
53
54
55
56
57
58
59
60
61
62
63
64
65
66
67
68
69
70
71
72
73
74
75
76
77
78
79
80
81
82
83
84
85
86
87
88
89
90
91
92
93
94
95
96
97
98
99
100
101
102
103
104
105
106
107
108
109
110
111
112
113
114
115
116
117
118
119
120
121
122
123
124
125
126
127
128
129
130
131
132
133
134
135
136
137
138
139
140
141
142
143
144
145
146
147
148
149
150
151
152
153
154
155
156
157
158
159
160
161
162
163
164
165
166
167
168
169
170
171
172
173
174
175
176
177
178
179
180
181
182
183
184
185
186
187
188
189
190
191
192
193
194
195
196
197
198
199
200
201
202
203
204
205
206
207
208
209
210
211
212
213
214
AWSTemplateFormatVersion: "2010-09-09"
Description: Cloudfront + S3

Metadata:
# ------------------------------------------------------------ #
# Input Parameters
# ------------------------------------------------------------ #
"AWS::CloudFormation::Interface":
ParameterGroups:
- Label:
default: "S3 and CloudFront Configuration"
Parameters:
- DomainName
- S3BucketName
- MyHostedZoneId
- CFSSLCertificateId

ParameterLabels:
DomainName:
default: "example.com"
MyHostedZoneId:
default: "ZNXXXXXXXXX"
S3BucketName:
default: "myBucketName"
CFSSLCertificateId:
default: "CFSSLCertificateId"

Parameters:
DomainName:
Type: String
S3BucketName:
Type: String
MyHostedZoneId:
Type: String
CFSSLCertificateId:
Type: String

Resources:
# ------------------------------------------------------------ #
# S3 - Contents
# ------------------------------------------------------------ #
StaticContentsBcuket:
Type: "AWS::S3::Bucket"
Properties:
BucketName: !Ref S3BucketName

CloudFrontOriginAccessIdentity:
Type: "AWS::CloudFront::CloudFrontOriginAccessIdentity"
Properties:
CloudFrontOriginAccessIdentityConfig:
Comment: !Sub "access-identity-${StaticContentsBcuket}"

StaticContentsBcuketPolicy:
Type: "AWS::S3::BucketPolicy"
Properties:
Bucket: !Ref StaticContentsBcuket
PolicyDocument:
Statement:
- Action: "s3:GetObject"
Effect: Allow
Resource: !Sub "arn:aws:s3:::${StaticContentsBcuket}/*"
Principal:
CanonicalUser: !GetAtt CloudFrontOriginAccessIdentity.S3CanonicalUserId

CloudFrontLog:
Type: "AWS::S3::Bucket"
Properties:
BucketName: !Sub "log.${S3BucketName}"
AccessControl: LogDeliveryWrite
BucketEncryption:
ServerSideEncryptionConfiguration:
- ServerSideEncryptionByDefault:
SSEAlgorithm: AES256
LifecycleConfiguration:
Rules:
- Id: !Sub "${S3BucketName}-log-LifeCycle"
Status: Enabled
Prefix: log/
ExpirationInDays: 365
Transitions:
- StorageClass: GLACIER
TransitionInDays: 180

# ------------------------------------------------------------ #
# CloudFront
# ------------------------------------------------------------ #
# CloudFrontは利用可能になるまで時間がかかる
CloudFrontDistribution:
Type: "AWS::CloudFront::Distribution"
Properties:
DistributionConfig:
# PriceClass
# https://aws.amazon.com/jp/cloudfront/pricing/
# PriceClass_200は日本を含むが南米やオーストラリアは含まない
PriceClass: PriceClass_200

# Aliases
Aliases:
- !Ref DomainName

# Logging
Logging:
IncludeCookies: false
Bucket: !GetAtt CloudFrontLog.DomainName
Prefix: cloudfront-logs

# DefaultRootObject
DefaultRootObject: index.html

# CustomErrorResponses
CustomErrorResponses:
- ErrorCode: 403
ErrorCachingMinTTL: 30
ResponseCode: 403
ResponsePagePath: /error.html
- ErrorCode: 404
ErrorCachingMinTTL: 30
ResponseCode: 404
ResponsePagePath: /error.html

# CacheBehavior … キャッシュルール
#
# CacheBehaviors:
# CacheBehaviorがない場合はDefaultCacheBehaviorを使用する
DefaultCacheBehavior:
AllowedMethods:
- GET
- HEAD
CachedMethods:
- GET
- HEAD
Compress: true
# オリジンサーバがキャッシュ制御(Cache-Controlなど)を行わない場合のTTL
DefaultTTL: 3600
# FieldLevelEncryptionId: String
# クエリ文字列やCookieの処理方法
ForwardedValues:
Cookies:
Forward: none
QueryString: false
# LambdaFunctionAssociations:
# オリジンサーバがキャッシュ制御(Cache-Controlなど)を行った場合の最大TTL
MaxTTL: 86400
# オブジェクト更新チェックのTTL
MinTTL: 60
# PathPattern: String
# SmoothStreaming: Boolean
# リクエストをルーティングするオリジンID
TargetOriginId: !Sub "S3origin-${S3BucketName}"
# TrustedSigners:
ViewerProtocolPolicy: redirect-to-https

# HttpVersion … 使用するHTTPバージョン
# http2ならhttp2以下を使用する
HttpVersion: http2

# Enabled … 選択したディストリビューションの有効/無効
Enabled: true

# Origin … コンテンツ配信元
#
# S3をオリジンサーバにする場合、静的webホスティングを利用する必要はなく、S3バケットでいい。
# CloudFrontとS3の通信はHTTPSになる, 静的Webホスティング機能を利用した場合はHTTPになる。
# S3バケットの場合はIndex DocumentはROOTオブジェクトに対してのみ有効になる。
Origins:
- DomainName: !GetAtt StaticContentsBcuket.DomainName
Id: !Sub "S3origin-${S3BucketName}"
S3OriginConfig:
OriginAccessIdentity: !Sub "origin-access-identity/cloudfront/${CloudFrontOriginAccessIdentity}"

# ViewerCertificate
ViewerCertificate:
AcmCertificateArn: !Ref CFSSLCertificateId
# CloudFrontDefaultCertificate: Boolean
# IamCertificateId: String
MinimumProtocolVersion: TLSv1.1_2016
SslSupportMethod: sni-only

# ------------------------------------------------------------ #
# Route 53
# ------------------------------------------------------------ #
Route53RecordSetGroup:
Type: AWS::Route53::RecordSetGroup
Properties:
HostedZoneId: !Ref MyHostedZoneId
RecordSets:
- Name: !Sub "${DomainName}."
Type: A
AliasTarget:
HostedZoneId: Z2FDTNDATAQYW2
DNSName: !GetAtt CloudFrontDistribution.DomainName
EvaluateTargetHealth: false
- Name: !Sub 'www.${DomainName}'
Type: A
AliasTarget:
HostedZoneId: Z2FDTNDATAQYW2
DNSName: !GetAtt CloudFrontDistribution.DomainName
EvaluateTargetHealth: false

# ------------------------------------------------------------ #
# Output Parameters
# ------------------------------------------------------------ #
Outputs:
#BucketName
BucketName:
Value: !Ref StaticContentsBcuket

#DistributionID
DistributionID:
Value: !Ref CloudFrontDistribution

#DmainName
DomainName:
Value: !GetAtt CloudFrontDistribution.DomainName

parameters.json

オリジンサーバーとして使用するS3バケットと公開するドメイン名、DNSレコードを登録するRoute53のHostedZoneIdと別途発行した証明書のCertificateIdを指定する。

1
2
3
4
5
6
7
8
9
10
11
12
13
14
15
16
17
18
[
{
"ParameterKey": "S3BucketName",
"ParameterValue": "<domainname>.web"
},
{
"ParameterKey": "DomainName",
"ParameterValue": "<domainname>"
},
{
"ParameterKey": "MyHostedZoneId",
"ParameterValue": "<domainname>のHostedZoneId"
},
{
"ParameterKey": "CFSSLCertificateId",
"ParameterValue": "arn:aws:acm:us-east-1:XXXXXXXXXXXXXX:certificate/XXXXXXXXXXXXXXXXXXXXXXXXXXXXXXXXXXX"
}
]

オリジンサーバー(S3バケット)の設定

S3バケットのアクセス制御でAWS::CloudFront::CloudFrontOriginAccessIdentityによりCloudFrontからのアクセスを許可する。

キャッシュ(CroudFront)の設定

CroudFrontの設定の中心はCacheBehaviorでキャッシュルールを定義できるが、ここではDefaultの設定のみしかしていない。
サーバ証明書は別途CertificateManagerで発行したものを適用している。

DNSによる公開

ハードコーディングしているZ2FDTNDATAQYW2はCroudFrontの固定値で、AWS::Route53::RecordSetGroup AliasTargetに記述がある。

CloudFront distribution
Specify Z2FDTNDATAQYW2. This is always the hosted zone ID when you create an alias record that routes traffic to a CloudFront distribution.
Alias records for CloudFront can’t be created in a private zone.

キャッシュ配信を構築する

コンテンツを配置するバケットとキャッシュを作成し、コンテンツを置く。

1
2
3
4
5
6
7
8
$ aws cloudformation create-stack --stack-name tutorial-cloudfront-s3 --template-body "file://./cloudfront_s3.yml" --parameters "file://./parameters.json"
{
"StackId": "arn:aws:cloudformation:ap-northeast-1:XXXXXXXXXXXXX:stack/tutorial-cloudfront-s3/XXXXXXXXXXXXXXXXXXXXXXXXXXXXXXXXXXXXXXX"
}
$ aws s3 cp contents/index.html s3://<domainname>.web/
upload: contents/index.html to s3://<domainname>.web/index.html
$ aws s3 cp contents/error.html s3://<domainname>.web/
upload: contents/error.html to s3://<domainname>.web/error.html

Route53ホストゾーン width=640

CroudFront width=640

すぐに配信できるわけではない

CloudFormationのスタックがコンプリートになっても、キャッシュ配信はまだ使えない。作成直後にアクセスするとエラーになる。

キャッシュが有効になるまで width=640

一時間程度時間待ってアクセスすると、配置したコンテンツにアクセスできる。

キャッシュが有効になるまで width=640

キャッシュが有効になるまで width=640

コメント・シェア

料金

AWS Certificate Manager でプロビジョニングされたパブリック SSL/TLS 証明書は無料です。お支払いいただくのは、アプリケーションを実行するために作成した AWS リソースの料金のみです。

無料。

証明書を発行する

certmanager.yml

1
2
3
4
5
6
7
8
9
10
11
12
13
14
15
16
17
18
19
20
21
22
23
24
25
26
27
28
29
30
31
32
33
34
35
36
37
38
39
40
41
42
AWSTemplateFormatVersion: "2010-09-09"
Description: Amazon CertManager

Metadata:
# ------------------------------------------------------------ #
# Input Parameters
# ------------------------------------------------------------ #
"AWS::CloudFormation::Interface":
ParameterGroups:
- Label:
default: "Route53 public zone"
Parameters:
- DomainName

ParameterLabels:
DomainName:
default: "example.com"

Parameters:
DomainName:
Type: String

Resources:
# ------------------------------------------------------------ #
# CertificateManager
# ------------------------------------------------------------ #
MyZoneCertificate:
Type: AWS::CertificateManager::Certificate
Properties:
DomainName: !Ref DomainName
ValidationMethod: DNS

# ------------------------------------------------------------ #
# Output Parameters
# ------------------------------------------------------------ #
Outputs:
MyHostedZoneName:
Description: "DomainName."
Value: !Ref DomainName
MyZoneCertificateID:
Description: "Certificate ID."
Value: !Ref MyZoneCertificate

parameters.json

証明書を発行するドメイン名を指定する。

1
2
3
4
5
6
[
{
"ParameterKey": "DomainName",
"ParameterValue": "xxxxx.xxxxxx.xxxxxx"
}
]

証明書発行を実行

リージョンはus-east-1を指定する必要があるので注意する。

1
2
3
4
$ aws cloudformation create-stack --stack-name tutorial-certmanager --template-body "file://./certmanager.yml" --parameters "file://./parameters.json" --region us-east-1
{
"StackId": "arn:aws:cloudformation:us-east-1:XXXXXXXXX:stack/tutorial-certmanager/XXXXXXXXXXXXXXXXXXXXXXXXXXXXXXXXXXXX"
}

DNS認証はCloudformationで簡潔に表現できない

CertificateManagerでは検証保留中のまま。

CertificateManagerの状態 width=640

CloudFormationはエラーにならず、CREATE_IN_PROGRESSで止まっている。

CertificateManagerの状態 width=640

イベントを確認するとDNS検証で止まっていることがわかる。

CertificateManagerの状態 width=640

aws-cliを使ってDNSレコードを登録するシェルスクリプトを使用する

aws-cliを使ってCloudFormationの実行結果からDNS検証のために登録するDNSレコードを取得して、Route53に登録する。

aws cloudformationを実行している箇所でオプションに--region us-east-1を追加する。

1
2
3
4
5
6
7
8
$ bash dns-validation.sh <ドメイン名> <スタック名>
{
"ChangeInfo": {
"Id": "/change/XXXXXXXXXXXXXXXXXXXXXXXXXXXXXXXXXX",
"Status": "PENDING",
"SubmittedAt": "2019-12-06T05:27:00.867Z"
}
}

Route53上で登録されたDNS検証のためのに登録したレコードを確認できる。

CertificateManagerの状態 width=640

保留中になっていた処理が継続され、証明書が発行される。

CertificateManagerの状態 width=640

CertiticateManager上でも証明書発行済になる。

CertificateManagerの状態 width=640

取得した証明書を使うためのARNを取得。

1
2
$ aws cloudformation describe-stacks --region us-east-1 | jq '.Stacks[].Outputs[] | select( .OutputKey == "MyZoneCertificateID" ) | .OutputValue'
"arn:aws:acm:us-east-1:XXXXXXXXX:certificate/XXXXXXXXXXXXXXXXXXXXXXXXXXXXXXXXXXXX"

コメント・シェア

Route53でドメインゾーンをホストする

 
カテゴリー AWS   タグ

料金

ホストゾーンとレコード
0.50USD ホストゾーンごと / 月、最初の 25 ホストゾーン
0.10USD ホストゾーンごと / 月、追加ホストゾーン
上記の月額のホストゾーン料金は、1 か月に満たない分に対して日割り計算されません。ホストゾーンは作成した時点で課金され、翌月からは各月の初日に請求されます。テストができるように、作成後 12 時間以内に削除されたホストゾーンについては無料となっていますが、そのホストゾーンでのクエリには以下の料金が適用されます。

1 万件を超えるレコードを含むホストゾーンには追加料金がかかります。

1 つのホストゾーンに 500 個を超えるホストゾーン、または 1 万件を超えるレコードが必要な場合には、 お問い合わせください。

DNSホスティングはドメインレジストラで無料提供されていることが多いが、Route53は有料だ。テストで12時間以内なら無料。
しかし、信頼性は十分で機能も充実。

ホストゾーンを作成する

route53.yml

1
2
3
4
5
6
7
8
9
10
11
12
13
14
15
16
17
18
19
20
21
22
23
24
25
26
27
28
29
30
31
32
33
34
35
36
37
38
39
40
41
42
43
44
45
46
AWSTemplateFormatVersion: "2010-09-09"
Description: Route53 Public Zone

# ------------------------------------------------------------ #
# Input Parameters
# ------------------------------------------------------------ #
Metadata:
"AWS::CloudFormation::Interface":
ParameterGroups:
- Label:
default: "Route53 public zone"
Parameters:
- DomainName

ParameterLabels:
DomainName:
default: "example.com"

Parameters:
DomainName:
Type: String

Resources:
# ------------------------------------------------------------ #
# Route 53
# ------------------------------------------------------------ #
MyHostedZone:
Type: "AWS::Route53::HostedZone"
Properties:
HostedZoneConfig:
Comment: !Sub "My hosted zone for ${DomainName}"
Name: !Ref DomainName

# ------------------------------------------------------------ #
# Output Parameters
# ------------------------------------------------------------ #
Outputs:
MyHostedZoneName:
Description: "Hosted Zone Name."
Value: !Ref DomainName
MyHostedZoneID:
Description: "Hosted Zone ID."
Value: !Ref MyHostedZone
MyHostedZoneNameServers:
Description: "Name Servers."
Value: !Join [',', !GetAtt MyHostedZone.NameServers]

parameters.json

ホストするドメイン名

1
2
3
4
5
6
[
{
"ParameterKey": "DomainName",
"ParameterValue": "xxxxx.xxxxxx.xxxxxx"
}
]

デフォルトのバケットを作成する

Cloudformationでバケットを作成する。

1
2
3
4
5
6
7
8
9
10
11
12
13
14
15
16
17
18
19
$ aws cloudformation create-stack --stack-name tutorial-route53 --template-body "file://./route53.yml" --parameters "file://./parameters.json"
{
"StackId": "arn:aws:cloudformation:ap-northeast-1:XXXXXXXXX:stack/tutorial-route53/XXXXXXXXXXXXXXXXXXXXXXXXXXXXXXXXXXXX"
}
$ aws route53 list-hosted-zones
{
"HostedZones": [
{
"Id": "/hostedzone/XXXXXXXXXXXXXXXXXXXXXXXXXXXXX",
"Name": "xxxxx.xxxxxx.xxxxxx.",
"CallerReference": "XXXXXXXXXXXXXXXXXXXXXXXXXXX",
"Config": {
"Comment": "My hosted zone for xxxxx.xxxxxx.xxxxxx",
"PrivateZone": false
},
"ResourceRecordSetCount": 2
}
]
}

ドメインのネームサーバー設定

AWSマネジメントコンソールでネームサーバーを確認する

自動登録されたNSレコードを確認する。

Route53ホストゾーン width=640

Route53ホストゾーン width=640

Route53ホストゾーン width=640

Cloudformationの結果からネームサーバ一を確認する

CloudformationのOutputで出力した値をaws-cliで取得する。

1
2
$ aws cloudformation describe-stacks | jq '.Stacks[].Outputs[] | select( .OutputKey == "MyHostedZoneNameServers" ) | .OutputValue'
"ns-XXX.awsdns-XX.net,ns-XXX.awsdns-XX.co.uk,ns-XXX.awsdns-XX.org,ns-XXX.awsdns-XX.com"

ドメインレジストラでNSレコードを設定する

使用しているドメインのレジストラ側で使用するネームサーバーを設定する。

動作確認

登録反映まで少し待ってから、外部からdigなどを使って確認。

1
2
3
4
5
6
7
8
9
10
11
12
13
14
15
16
17
; <<>> DiG 9.11.4-P2-RedHat-9.11.4-16.P2.el7_8.2 <<>> NS -debug @XXXXX xxxxx.xxxxxx.xxxxxx
; (1 server found)
;; global options: +cmd
;; Got answer:
;; ->>HEADER<<- opcode: QUERY, status: NOERROR, id: 5460
;; flags: qr rd ra; QUERY: 1, ANSWER: 4, AUTHORITY: 0, ADDITIONAL: 1

;; OPT PSEUDOSECTION:
; EDNS: version: 0, flags:; udp: 4096
;; QUESTION SECTION:
;xxxxx.xxxxxx.xxxxxx. IN NS

;; ANSWER SECTION:
xxxxx.xxxxxx.xxxxxx. 172800 IN NS ns-XXX.awsdns-XX.co.uk.
xxxxx.xxxxxx.xxxxxx. 172800 IN NS ns-XXX.awsdns-XX.com.
xxxxx.xxxxxx.xxxxxx. 172800 IN NS ns-XXX.awsdns-XX.org.
xxxxx.xxxxxx.xxxxxx. 172800 IN NS ns-XXX.awsdns-XX.net.

ドメインの削除

デフォルトのレコード以外が残っていると削除できない

追加したレコードがある状態で、CloudFormationによりゾーンを削除するとエラーになる。削除する前に追加したレコードを削除する必要がある。

Route53ホストゾーンの削除 width=640

Route53ホストゾーンの削除 width=640

コメント・シェア

PCベンチマーク2019

 
カテゴリー Benchmark PC Windows   タグ

PCベンチマーク2019

2012年購入(Old)と2019年購入(New)の各種ベンチマーク比較。
2012年購入のPCに、新規購入した、RTX2070に交換した(Old+)も測定。

総評

ハードウェア構成を変更していないSSDも性能が引き出されてスコアアップしている。

ベンチマーク 項目 スコア(Old) スコア(Old+) スコア(New)
PassMark Rating 2962.7 3152.7 4438.9
PassMark CPU 7685.9 7517.0 17145.1
PassMark 2D Graphics 549.4 589.4 592.3
PassMark 3D Graphics 3828.2 11704.6 15161.5
PassMark Memory 2428.9 2421.1 1996.0
PassMark Disk 1334.7 1338.6 4377.4
CineBench CPU 1069pts 1058pts 3943pts
CineBench CPU(Single Core) 288pts 430pts
CineBench MP Ratio 3.71x 9.17x
FF14Bench 1920x1080 4370(快適) 12012(非常に快適) 13982(非常に快適)
FF15Bench 1920x1080 1648(動作困難) 8527(快適) 10939(とても快適)
DQXBench 1920x1080 13894(すごく快適) 18222(すごく快適)
PCMark10 Score 3546 5781
3DMark Score 5020 8460

DQベンチで、Oldは標準品質、Newは最高品質の実行

PC構成

PC構成(Old)

構成要素 ハードウェア名 ハードウェア構成 価格 購入日 当初価格 発売日
CPU Intel Core i5-3550 3.3GHz 4Core/4Thread 16,330円 2012/07/22 ?円 2012/04/xx
MotherBoard ASUS P8H77-V ATX, Intel H77 Chipset 7,799円 2012/07/22 11,980円 2012/04/xx
Memory ADATA AX3U1600GC4G9-2G DDR3 1600 4GB 2枚 3,500円 2012/07/22 ?円 2011/12/xx
Memory CFD Elixir W3U1600HQ-4G DDR3 1600 4GB 2枚 3,263円 2013/01/18 ?円 2012/03/xx
GPU GIGABYTE GTX 560 Ti GV-N560OC-1GI NVIDIA Geforce GTX 560 Ti 13,900円 2012/07/25 29,000円 2011/02/xx
Disk Ultimate SU650 ASU650SS-960GT-X SATA6Gbps 960GB 12,980円 2019/01/25 19,980円 2018/09/17
PowerSupply CORSAIR TX650 CMPSU-650TXV2 ATX650W 7,850円 2012/07/22 ?円 2011/03/xx

PC構成(Old+)

P8H77Vの古いファームウェアはUEFIに対応していなかったので、BIOSブートになっていた。

GPU-Z width=320

しかし、RTX2070はBIOSブートできず、UEFIブートで構成する必要がある。
UEFIブートはディスクの形式がMBRではなくGPTでくてはならないが、変換はできない。

MBR to GPT 1 width=640

MBR to GPT 2 width=640

P8H77Vのファームウェアを最新化し、OSを再インストールでUEFIブートに変更。

PC構成(New)

構成要素 ハードウェア名 ハードウェア構成 価格 購入日 当初価格 発売日
CPU AMD Ryzen 7 2700X Gold Edition 3.7GHz 8Core/16Threa 27,518円 2019/08/29 38,000円 2019/04/xx
MotherBoard ASUS TUF B450M-PLUS Gaming micro ATX, B450 Chipse 9,180円 2019/08/29 13,007円 2018/07/31
Memory CORSAIR CMK32GX4M2A2666C16 DDR4 2666(21300) 16GB 2枚 14,960円 2019/08/29 37,859円 2015/08/xx
Memory -円 xxxx/xx/xx -円 xxxx/xx/xx
GPU Palit NE62070015P2-1062A NVIDIA Geforce RTX 2070 8G 40,932円 2019/08/26 69,930円 2018/11/13
Disk Ultimate SU650 ASU650SS-960GT-X SATA6Gbps 960GB 12,980円 2019/01/25 19,980円 2018/09/17
PowerSupply CORSAIR HX850i CP-9020073-JP ATX850W 80+P 10,368円 2019/08/31 ?円 2014/08/xx

ベンチマーク

ベンチマークソフト

ベンチマーク結果(テキスト)

ベンチマーク(Old)

Passmark 1 of 3 width=640

Passmark 2 of 3 width=640

Passmark 3 of 3 width=640

CineBench 1 of 3 width=640

CineBench 2 of 3 width=640

CineBench 3 of 3 width=640

FF15 Bench width=640

FF14 Bench width=640

DQX Bench width=640

PCMark10 width=640

3DMark width=640

ベンチマーク(Old+)

Passmark 1 of 4 width=640

Passmark 2 of 4 width=640

Passmark 3 of 4 width=640

Passmark 4 of 4 width=640

Passmark cpu width=640

Passmark 2d graphics width=640

Passmark 3d graphics width=640

Passmark memory width=640

CineBench width=640

FF15 Bench width=640

FF15 Bench 4K width=640

FF14 Bench width=640

ベンチマーク(New)

Passmark 1 of 2 width=640

Passmark 2 of 2 width=640

Passmark cpu width=640

Passmark 2d graphics width=640

Passmark 3d graphics width=640

Passmark memory width=640

Passmark disk width=640

CineBench 1 of 2 width=640

CineBench 2 of 2 width=640

FF15 Bench normal width=640

FF15 Bench high width=640

FF14 Bench width=640

DQX Bench width=640

DQX Bench high 1 of 3 width=640

DQX Bench high 2 of 3 width=640

DQX Bench high 3 of 3 width=640

PCMark10 width=640

3DMark width=640

HDbench 2k width=640

HDbench 4k width=640

コメント・シェア

Windows 10をクリーンインストール記録

 
カテゴリー PC Windows   タグ

インストールメディアの作成

最新のWindows 10インストーラを作成してWindows 10をインストールする。

作成したインストーラー用USBメモリをカスタマイズして、ライセンスコードを自動入力させる設定を行う。

自動入力はsourcesフォルダーに以下の内容のpid.txtファイルを作成する。

1
2
[PID]
Value=XXXXX-XXXXX-XXXXX-XXXXX-XXXXX

Windows 10のインストール

特記事項なし。

nVidiaコントロールパネルのインストール

Windows Storeでnvidiaコントロールパネルのインストール

nVidiaコントロールパネルのインストール width=640

nVidiaドライバーのインストール

最新のnVidiaドライバからダウンロード。必要なドライバーのみ選択してインストール

  1. グラフィックスドライバー
  2. HDオーディオドライバー
  3. USBC Driver

最新のnVidiaドライバインストール1 width=640

最新のnVidiaドライバインストール2 width=640

最新のnVidiaドライバインストール3 width=640

最新のnVidiaドライバインストール4 width=480

最新のnVidiaドライバインストール5 width=480

最新のnVidiaドライバインストール6 width=480

最新のnVidiaドライバインストール7 width=480

最新のnVidiaドライバインストール8 width=480

Windowsサンドボックスの有効化

Windowsの機能の有効化または無効化Windowsサンドボックスを有効化する

windowsサンドボックス width=480

不要なWindowsアプリのアンインストール

PowerShellを管理者として実行してCandyCrushなどのいらないゲームを削除

1
2
3
4
Get-AppxPackage king.com.CandyCrushFriends | Remove-AppxPackage
Get-AppxPackage king.com.FarmHeroesSaga | Remove-AppxPackage
Get-AppxPackage Microsoft.ZuneMusic | Remove-AppxPackage
Get-AppxPackage SpotifyAB.SpotifyMusic | Remove-AppxPackage

Windows 10の初期設定

最近使用したファイル/よく使うファイルの無効化

エクスプローラーなどで表示される最近使用したファイルよく使うファイルを無効化する。

1
2
3
Set-ItemProperty -Path 'HKCU:\SOFTWARE\Microsoft\Windows\CurrentVersion\Explorer' -Name "ShowRecent" -Value 0
Set-ItemProperty -Path 'HKCU:\SOFTWARE\Microsoft\Windows\CurrentVersion\Explorer' -Name "ShowFrequent" -Value 0
gpupdate

コルタナの検索履歴の無効化

1
2
Set-ItemProperty -Path 'HKLM:\SOFTWARE\Microsoft\Windows Search' -Name "SetupCompletedSuccessfully" -Value 0
gpupdate

タイムラインの無効化

1
2
Set-ItemProperty -Path 'HKLM:\SOFTWARE\Policies\Microsoft\Windows\System' -Name "EnableActivityFeed" -Value 0
gpupdate

Windows 10の全般設定のプライバシーオプションを変更する

設定 -> 全般

Windows10の全般設定 width=640

Microsoft Storeの設定のアプリの自動更新等を無効化する

MicrosoftStore -> 設定

Microsoft Storeの設定 width=640

Office 365のインストール

Visual Studio Codeのインストール

Editor: Font FamilyMS Gothic(等幅フォント)に変更する。
Terminal › Integrated: Font Familymonospaceのみしか対応していない。

1
'MS Gothic', Consolas, 'Courier New', monospace

VSCodeフォントファミリー設定 width=800

STEAMのインストール

Firefoxのインストール

履歴を残さないようにする

Firefoxの履歴設定 width=640

Firefoxのプライバシー設定 width=640

設定後のトップページ width=640

プライベートウインドウで起動させる
C:\ProgramData\Microsoft\Windows\Start Menu\ProgramsFirefoxショートカット-privateを追加

プライベートウインドウ width=480

Chromeのインストール

シークレットモードで起動させる
C:\ProgramData\Microsoft\Windows\Start Menu\ProgramsGoogle Chromeショートカットに--incognitoを追加

シークレットモード width=480

コメント・シェア

S3バケットを作成する

 
カテゴリー AWS   タグ

空のS3バケットを作成する

s3_default.yml

1
2
3
4
5
6
7
8
9
10
11
12
13
14
15
16
17
18
19
20
21
22
23
24
25
26
27
28
29
30
31
32
AWSTemplateFormatVersion: '2010-09-09'
Description: S3 Normal Bucket

# ------------------------------------------------------------ #
# Input Parameters
# ------------------------------------------------------------ #
Parameters:
S3BucketName:
Description: Type of this BacketName.
Type: String

Resources:
# ------------------------------------------------------------ #
# S3
# ------------------------------------------------------------ #
S3Bucket:
Type: AWS::S3::Bucket
Properties:
BucketName: !Sub ${S3BucketName}
AccessControl: Private
PublicAccessBlockConfiguration:
BlockPublicAcls: True
BlockPublicPolicy: True
IgnorePublicAcls: True
RestrictPublicBuckets: True

# ------------------------------------------------------------ #
# Output Parameters
# ------------------------------------------------------------ #
Outputs:
S3BucketName:
Value: !Ref S3Bucket

parameters.json

指定するバケット名はAWSで一意の物にする必要があるため、よくあるキーワードなどはエラーになる。ドメイン名などを付与して一意な名前にする。

1
2
3
4
5
6
[
{
"ParameterKey": "S3BucketName",
"ParameterValue": "testxxxxxxxxxx"
}
]

デフォルトのバケットを作成する

Cloudformationでバケットを作成する。

1
2
3
4
5
6
$ aws cloudformation create-stack --stack-name tutorial-s3-bucket --template-body "file://./s3_default.yml" --parameters "file://./parameters.json"
{
"StackId": "arn:aws:cloudformation:ap-northeast-1:XXXXXXXXX:stack/tutorial-s3-bucket/XXXXXXXXXXXXXXXXXXXXXXXXXXXXXXXXXXXX"
}
$ aws s3 ls
2019-11-26 19:30:00 testxxxxxxxxxx

AWSコンソールで作成された状態を確認。

S3バケット width=640

S3バケット width=640

S3のライフサイクル設定で有効期間を設定する

s3_expiration.yml

1
2
3
4
5
6
7
8
9
10
11
12
13
14
15
16
17
18
19
20
21
22
23
24
25
26
27
28
29
30
31
32
33
34
35
36
37
AWSTemplateFormatVersion: '2010-09-09'
Description: S3Bcuket with expiration

# ------------------------------------------------------------ #
# Input Parameters
# ------------------------------------------------------------ #
Parameters:
S3BucketName:
Description: Type of this BacketName.
Type: String

Resources:
# ------------------------------------------------------------ #
# S3
# ------------------------------------------------------------ #
S3Bucket:
Type: AWS::S3::Bucket
Properties:
BucketName: !Sub ${S3BucketName}
AccessControl: Private
PublicAccessBlockConfiguration:
BlockPublicAcls: True
BlockPublicPolicy: True
IgnorePublicAcls: True
RestrictPublicBuckets: True
LifecycleConfiguration:
Rules:
- Id: LifeCycleRule
Status: Enabled
ExpirationInDays: 365

# ------------------------------------------------------------ #
# Output Parameters
# ------------------------------------------------------------ #
Outputs:
S3BucketName:
Value: !Ref S3Bucket

ライフサイクル設定を追加してスタック更新

1
2
3
4
$ aws cloudformation update-stack --stack-name tutorial-s3-bucket --template-body "file://./s3_expiration.yml" --parameters "file://./parameters.json"
{
"StackId": "arn:aws:cloudformation:ap-northeast-1:XXXXXXXXX:stack/tutorial-s3-bucket/XXXXXXXXXXXXXXXXXXXXXXXXXXXXXXXXXXXX"
}

AWSコンソール上で確認すると、ライフサイクルルールが作成されている。

S3バケット width=640

コメント・シェア

ELB(ALB)でマルチAZロードバランシング

 
カテゴリー AWS   タグ

ElasticLoadbalancer(ApplicationLoadBalancer)によるロードバランシング

alb-ec2.yml (EC2)

ネットワークはマルチAZPublicSubnetAPublicSubnetBのサブネットを持つVPCとして作成。
各サブネットにそれぞれEC2インスタンスを配置する。

インスタンスに対するSSHによる管理アクセスは許可するが、WebコンテンツへのアクセスはALBからのみしか許可しない。
ただし、ALBのIPアドレスを明示できないので、同一VPCからのアクセスを許可する。
WebSecurityGroupSecurityGroupIngresのみNLB編と異なる。

1
2
3
4
5
6
7
8
9
10
11
12
13
14
15
16
17
18
19
20
21
22
23
24
25
26
27
28
29
30
31
32
33
34
35
36
37
38
39
40
41
42
43
44
45
46
47
48
49
50
51
52
53
54
55
56
57
58
59
60
61
62
63
64
65
66
67
68
69
70
71
72
73
74
# ------------------------------------------------------------ #
# EC2
# ------------------------------------------------------------ #
ManagementSecurityGroup:
Type: AWS::EC2::SecurityGroup
Properties:
GroupDescription: Enable SSH access via port 22
VpcId: !Ref VPC
Tags:
- Key: Name
Value: !Sub "${AWS::StackName}-management-sg"
SecurityGroupIngress:
- CidrIp: !Ref AllowSshFrom
IpProtocol: tcp
FromPort: '22'
ToPort: '22'

WebSecurityGroup:
Type: AWS::EC2::SecurityGroup
Properties:
GroupDescription: Enable HTTP(S) access via port 80+443
VpcId: !Ref VPC
Tags:
- Key: Name
Value: !Sub "${AWS::StackName}-web-sg"
SecurityGroupIngress:
- CidrIp: !Ref VpcCidrBlock
IpProtocol: tcp
FromPort: '80'
ToPort: '80'
- CidrIp: !Ref VpcCidrBlock
IpProtocol: tcp
FromPort: '443'
ToPort: '443'

PublicSubetAInstance:
Type: AWS::EC2::Instance
Properties:
ImageId: !Ref ImageID
InstanceType: t2.micro
SecurityGroupIds:
- Fn::GetAtt: [ ManagementSecurityGroup, GroupId ]
- Fn::GetAtt: [ WebSecurityGroup, GroupId ]
KeyName: !Ref KeyName
SubnetId: !Ref PublicSubnetA
Tags:
- Key: Name
Value: !Sub "${AWS::StackName}-PublicSubnetA-Instance"
UserData: !Base64
Fn::Sub: |
#!/bin/bash
apt-get update
apt-get install -y apache2
echo "<HTML>PUBLIC SUBNET A</HTML>" > /var/www/html/index.html

PublicSubetBInstance:
Type: AWS::EC2::Instance
Properties:
ImageId: !Ref ImageID
InstanceType: t2.micro
SecurityGroupIds:
- Fn::GetAtt: [ ManagementSecurityGroup, GroupId ]
- Fn::GetAtt: [ WebSecurityGroup, GroupId ]
KeyName: !Ref KeyName
SubnetId: !Ref PublicSubnetB
Tags:
- Key: Name
Value: !Sub "${AWS::StackName}-PublicSubnetB-Instance"
UserData: !Base64
Fn::Sub: |
#!/bin/bash
apt-get update
apt-get install -y apache2
echo "<HTML>PUBLIC SUBNET B</HTML>" > /var/www/html/index.html

alb-ec2.yml (ALB)

  • セキュリティグループを適用する
  • ヘルスチェックはHTTPによるステータスコードのチェック
  • スティッキーの設定は無効化(ロードバランシングの様子を見たい)
1
2
3
4
5
6
7
8
9
10
11
12
13
14
15
16
17
18
19
20
21
22
23
24
25
26
27
28
29
30
31
32
33
34
35
36
37
38
39
40
41
42
43
44
45
46
47
48
49
50
51
52
53
54
55
56
57
58
59
60
61
62
63
64
65
66
67
68
69
70
71
72
73
74
75
76
77
78
79
80
81
82
83
84
85
86
87
88
89
90
91
92
93
94
95
96
97
98
99
# ------------------------------------------------------------ #
# ElasticLoadBalancer
# ------------------------------------------------------------ #
InternetALBSecurityGroup:
Type: AWS::EC2::SecurityGroup
Properties:
GroupDescription: Enable HTTP(S) access via port 80+443
VpcId: !Ref VPC
Tags:
- Key: Name
Value: !Sub "${AWS::StackName}-lb-sg"
SecurityGroupIngress:
- CidrIp: 0.0.0.0/0
FromPort: '80'
IpProtocol: tcp
ToPort: '80'
- CidrIp: 0.0.0.0/0
FromPort: '443'
IpProtocol: tcp
ToPort: '443'

InternetALBTargetGroup:
Type: "AWS::ElasticLoadBalancingV2::TargetGroup"
Properties:
VpcId: !Ref VPC
Name: !Sub "${AWS::StackName}-tg"
Protocol: HTTP
Port: 80
HealthCheckProtocol: HTTP
HealthCheckPath: "/"
HealthCheckPort: "traffic-port"
HealthyThresholdCount: 2
UnhealthyThresholdCount: 2
HealthCheckTimeoutSeconds: 5
HealthCheckIntervalSeconds: 10
Matcher:
HttpCode: 200
Tags:
- Key: Name
Value: !Sub "${AWS::StackName}-tg"
TargetGroupAttributes:
- Key: "deregistration_delay.timeout_seconds"
Value: 300
- Key: "stickiness.enabled"
Value: false
- Key: "stickiness.type"
Value: lb_cookie
- Key: "stickiness.lb_cookie.duration_seconds"
Value: 86400
Targets:
- Id: !Ref PublicSubetAInstance
Port: 80
- Id: !Ref PublicSubetBInstance
Port: 80

InternetALB:
Type: "AWS::ElasticLoadBalancingV2::LoadBalancer"
Properties:
Name: !Sub "${AWS::StackName}-alb"
Tags:
- Key: Name
Value: !Sub "${AWS::StackName}-alb"
# ロードバランサーのタイプ (default: application)
Type: application
Scheme: "internet-facing"
LoadBalancerAttributes:
- Key: "deletion_protection.enabled"
Value: false
- Key: "idle_timeout.timeout_seconds"
Value: 60
SecurityGroups:
- !Ref InternetALBSecurityGroup
Subnets:
- !Ref PublicSubnetA
- !Ref PublicSubnetB

InternetALBListener:
Type: "AWS::ElasticLoadBalancingV2::Listener"
Properties:
DefaultActions:
- TargetGroupArn: !Ref InternetALBTargetGroup
Type: forward
LoadBalancerArn: !Ref InternetALB
Port: 80
Protocol: HTTP

# ------------------------------------------------------------ #
# Output Parameters
# ------------------------------------------------------------ #
Outputs:
PublicSubnetAInstanceIP:
Description: "Management Public IP"
Value: !GetAtt PublicSubetAInstance.PublicIp
PublicSubnetBInstanceIP:
Description: "Management Public IP"
Value: !GetAtt PublicSubetBInstance.PublicIp
InternetALBPublicDomainName:
Description: "Public access Domain Name"
Value: !GetAtt InternetALB.DNSName

システムの構築する

1
2
3
4
$ aws cloudformation update-stack --stack-name tutorial-alb-ec2 --template-body "file://./alb-ec2.yml" --parameters "file://./parameters.json"
{
"StackId": "arn:aws:cloudformation:ap-northeast-1:XXXXXXXXXXX:stack/tutorial-alb-ec2/XXXXXXXXXXXXXXXXXXX"
}

作成が完了したら、ロードバランサーに付与されたDNSNameでアクセスする。

1
2
$ aws elbv2 describe-load-balancers | jq -r '.LoadBalancers[] | select (.LoadBalancerName == "tutorial-alb-ec2-alb") | .DNSName'
tutorial-alb-ec2-alb-XXXXXXXXXX.ap-northeast-1.elb.amazonaws.com

ALBロードバランシング width=640

ALBロードバランシング width=640

接続できないときに

ヘルスチェックの状況を確認する

1
2
3
4
5
6
7
8
9
10
11
12
13
14
15
16
17
18
19
20
21
22
23
24
25
26
27
28
29
30
31
32
33
34
35
36
37
38
39
40
41
42
43
44
45
46
47
48
49
50
51
52
53
54
55
56
57
58
59
60
61
62
63
64
65
66
67
68
69
70
71
72
73
74
75
76
77
78
79
80
81
82
$aws elbv2 describe-target-groups | jq -r '.TargetGroups[] | select (.TargetGroupName == "tutorial-alb-ec2-tg")'
{
"TargetGroupArn": "arn:aws:elasticloadbalancing:ap-northeast-1:XXXXXXXXXXX:targetgroup/tutorial-alb-ec2-tg/XXXXXXXXXXXXXX",
"TargetGroupName": "tutorial-alb-ec2-tg",
"Protocol": "HTTP",
"Port": 80,
"VpcId": "vpc-XXXXXXXXXXXXXXXXXXX",
"HealthCheckProtocol": "HTTP",
"HealthCheckPort": "traffic-port",
"HealthCheckEnabled": true,
"HealthCheckIntervalSeconds": 10,
"HealthCheckTimeoutSeconds": 5,
"HealthyThresholdCount": 2,
"UnhealthyThresholdCount": 2,
"HealthCheckPath": "/",
"Matcher": {
"HttpCode": "200"
},
"LoadBalancerArns": [
"arn:aws:elasticloadbalancing:ap-northeast-1:XXXXXXXXXXX:loadbalancer/app/tutorial-alb-ec2-alb/XXXXXXXXXXXXXXXXXXX"
],
"TargetType": "instance"
}

$aws elbv2 describe-target-groups | jq -r '.TargetGroups[] | select (.TargetGroupName == "tutorial-alb-ec2-tg") | .TargetGroupArn'
arn:aws:elasticloadbalancing:ap-northeast-1:XXXXXXXXXXX:targetgroup/tutorial-alb-ec2-tg/XXXXXXXXXXXXXX

$aws elbv2 describe-target-health --target-group-arn arn:aws:elasticloadbalancing:ap-northeast-1:XXXXXXXXXXX:targetgroup/tutorial-alb-ec2-tg/XXXXXXXXXXXXXX
{
"TargetHealthDescriptions": [
{
"Target": {
"Id": "i-XXXXXXXXXXXXXXXXXXX",
"Port": 80
},
"HealthCheckPort": "80",
"TargetHealth": {
"State": "unhealthy",
"Reason": "Target.ResponseCodeMismatch",
"Description": "Health checks failed with these codes: [502]"
}
},
{
"Target": {
"Id": "i-XXXXXXXXXXXXXXXXXXX",
"Port": 80
},
"HealthCheckPort": "80",
"TargetHealth": {
"State": "unhealthy",
"Reason": "Target.ResponseCodeMismatch",
"Description": "Health checks failed with these codes: [502]"
}
}
]
}

$aws elbv2 describe-target-health --target-group-arn arn:aws:elasticloadbalancing:ap-northeast-1:XXXXXXXXXXX:targetgroup/tutorial-alb-ec2-tg/XXXXXXXXXXXXXX
{
"TargetHealthDescriptions": [
{
"Target": {
"Id": "i-XXXXXXXXXXXXXXXXXXX",
"Port": 80
},
"HealthCheckPort": "80",
"TargetHealth": {
"State": "healthy"
}
},
{
"Target": {
"Id": "i-XXXXXXXXXXXXXXXXXXX",
"Port": 80
},
"HealthCheckPort": "80",
"TargetHealth": {
"State": "healthy"
}
}
]
}

コメント・シェア

ELB(NLB)でマルチAZロードバランシング

 
カテゴリー AWS   タグ

ElasticLoadbalancer(NetworkLoadBalancer)によるロードバランシング

nlb-ec2.yml (EC2)

ネットワークはマルチAZPublicSubnetAPublicSubnetBのサブネットを持つVPCとして作成。
各サブネットにそれぞれEC2インスタンスを配置する。

NLBはクライアントからのリクエストを終端せずにEC2インスタンスへ中継するため、Webコンテンツへのアクセスをすべて許可する。
WebSecurityGroupSecurityGroupIngresのみALB編と異なる。

1
2
3
4
5
6
7
8
9
10
11
12
13
14
15
16
17
18
19
20
21
22
23
24
25
26
27
28
29
30
31
32
33
34
35
36
37
38
39
40
41
42
43
44
45
46
47
48
49
50
51
52
53
54
55
56
57
58
59
60
61
62
63
64
65
66
67
68
69
70
71
72
73
74
# ------------------------------------------------------------ #
# EC2
# ------------------------------------------------------------ #
ManagementSecurityGroup:
Type: AWS::EC2::SecurityGroup
Properties:
GroupDescription: Enable SSH access via port 22
VpcId: !Ref VPC
Tags:
- Key: Name
Value: !Sub "${AWS::StackName}-management-sg"
SecurityGroupIngress:
- CidrIp: !Ref AllowSshFrom
IpProtocol: tcp
FromPort: '22'
ToPort: '22'

WebSecurityGroup:
Type: AWS::EC2::SecurityGroup
Properties:
GroupDescription: Enable HTTP(S) access via port 80+443
VpcId: !Ref VPC
Tags:
- Key: Name
Value: !Sub "${AWS::StackName}-web-sg"
SecurityGroupIngress:
- CidrIp: 0.0.0.0/0
IpProtocol: tcp
FromPort: '80'
ToPort: '80'
- CidrIp: 0.0.0.0/0
IpProtocol: tcp
FromPort: '443'
ToPort: '443'

PublicSubetAInstance:
Type: AWS::EC2::Instance
Properties:
ImageId: !Ref ImageID
InstanceType: t2.micro
SecurityGroupIds:
- Fn::GetAtt: [ ManagementSecurityGroup, GroupId ]
- Fn::GetAtt: [ WebSecurityGroup, GroupId ]
KeyName: !Ref KeyName
SubnetId: !Ref PublicSubnetA
Tags:
- Key: Name
Value: !Sub "${AWS::StackName}-PublicSubnetA-Instance"
UserData: !Base64
Fn::Sub: |
#!/bin/bash
apt-get update
apt-get install -y apache2
echo "<HTML>PUBLIC SUBNET A</HTML>" > /var/www/html/index.html

PublicSubetBInstance:
Type: AWS::EC2::Instance
Properties:
ImageId: !Ref ImageID
InstanceType: t2.micro
SecurityGroupIds:
- Fn::GetAtt: [ ManagementSecurityGroup, GroupId ]
- Fn::GetAtt: [ WebSecurityGroup, GroupId ]
KeyName: !Ref KeyName
SubnetId: !Ref PublicSubnetB
Tags:
- Key: Name
Value: !Sub "${AWS::StackName}-PublicSubnetB-Instance"
UserData: !Base64
Fn::Sub: |
#!/bin/bash
apt-get update
apt-get install -y apache2
echo "<HTML>PUBLIC SUBNET B</HTML>" > /var/www/html/index.html

nlb-ec2.yml (NLB)

  • ロードバランサーのタイプとしてType: networkを明示する
  • セキュリティグループを適用できない
  • ヘルスチェックはTCPによるポートチェック
1
2
3
4
5
6
7
8
9
10
11
12
13
14
15
16
17
18
19
20
21
22
23
24
25
26
27
28
29
30
31
32
33
34
35
36
37
38
39
40
41
42
43
44
45
46
47
48
49
50
51
52
53
54
55
56
57
58
59
# ------------------------------------------------------------ #
# ElasticLoadBalancer
# ------------------------------------------------------------ #
InternetNLBTargetGroup:
Type: "AWS::ElasticLoadBalancingV2::TargetGroup"
Properties:
VpcId: !Ref VPC
Name: !Sub "${AWS::StackName}-tg"
Protocol: TCP
Port: 80
Tags:
- Key: Name
Value: !Sub "${AWS::StackName}-tg"
TargetGroupAttributes:
- Key: "deregistration_delay.timeout_seconds"
Value: 300
Targets:
- Id: !Ref PublicSubetAInstance
Port: 80
- Id: !Ref PublicSubetBInstance
Port: 80

InternetNLB:
Type: "AWS::ElasticLoadBalancingV2::LoadBalancer"
Properties:
Name: !Sub "${AWS::StackName}-nlb"
Tags:
- Key: Name
Value: !Sub "${AWS::StackName}-nlb"
# ロードバランサーのタイプ (default: application)
Type: network
Scheme: "internet-facing"
Subnets:
- !Ref PublicSubnetA
- !Ref PublicSubnetB

InternetNLBListener:
Type: "AWS::ElasticLoadBalancingV2::Listener"
Properties:
DefaultActions:
- TargetGroupArn: !Ref InternetNLBTargetGroup
Type: forward
LoadBalancerArn: !Ref InternetNLB
Port: 80
Protocol: TCP

# ------------------------------------------------------------ #
# Output Parameters
# ------------------------------------------------------------ #
Outputs:
PublicSubnetAInstanceIP:
Description: "Management Public IP"
Value: !GetAtt PublicSubetAInstance.PublicIp
PublicSubnetBInstanceIP:
Description: "Management Public IP"
Value: !GetAtt PublicSubetBInstance.PublicIp
InternetNLBPublicDomainName:
Description: "Public access Domain Name"
Value: !GetAtt InternetNLB.DNSName

システムの構築する

1
2
3
4
$ aws cloudformation update-stack --stack-name tutorial-nlb-ec2 --template-body "file://./nlb-ec2.yml" --parameters "file://./parameters.json"
{
"StackId": "arn:aws:cloudformation:ap-northeast-1:XXXXXXXXXXX:stack/tutorial-nlb-ec2/XXXXXXXXXXXXXXXXXXX"
}

作成が完了したら、ロードバランサーに付与されたDNSNameでアクセスする。

1
2
$ aws elbv2 describe-load-balancers | jq -r '.LoadBalancers[] | select (.LoadBalancerName == "tutorial-nlb-ec2-nlb") | .DNSName'
tutorial-alb-ec2-nlb-XXXXXXXXXXXXXXXX.ap-northeast-1.amazonaws.com

NLBロードバランシング width=640

同じコネクションからのアクセスは同じインスタンスに振られる。
ロードバランシングの様子を見たい場合は別のブラウザ等でアクセス。

コメント・シェア


nullpo

めも


募集中


Japan