PCベンチマーク2019
2012年購入(Old)と2019年購入(New)の各種ベンチマーク比較。
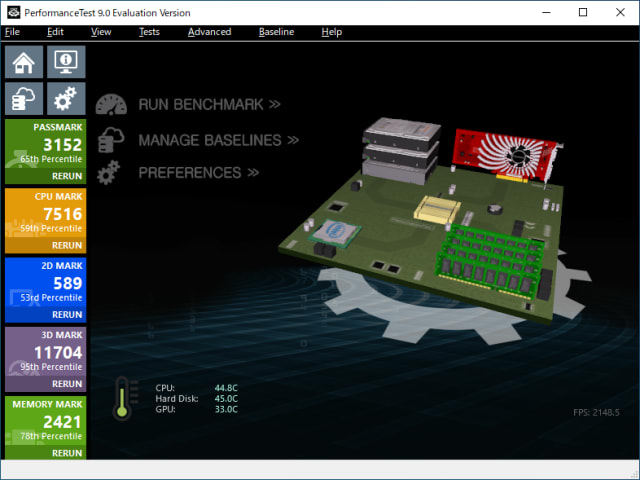
2012年購入のPCに、新規購入した、RTX2070に交換した(Old+)も測定。
総評
ハードウェア構成を変更していないSSDも性能が引き出されてスコアアップしている。
| ベンチマーク | 項目 | スコア(Old) | スコア(Old+) | スコア(New) |
|---|---|---|---|---|
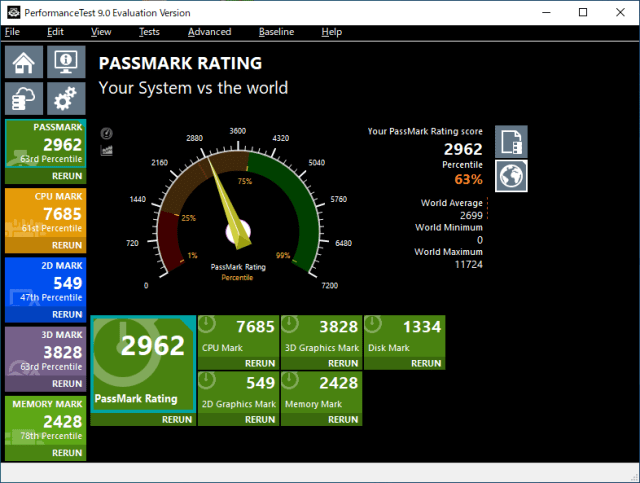
| PassMark | Rating | 2962.7 | 3152.7 | 4438.9 |
| PassMark | CPU | 7685.9 | 7517.0 | 17145.1 |
| PassMark | 2D Graphics | 549.4 | 589.4 | 592.3 |
| PassMark | 3D Graphics | 3828.2 | 11704.6 | 15161.5 |
| PassMark | Memory | 2428.9 | 2421.1 | 1996.0 |
| PassMark | Disk | 1334.7 | 1338.6 | 4377.4 |
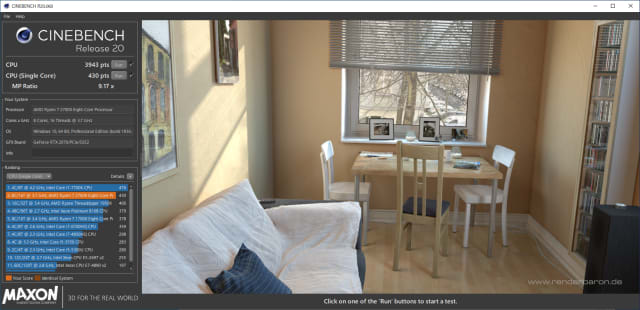
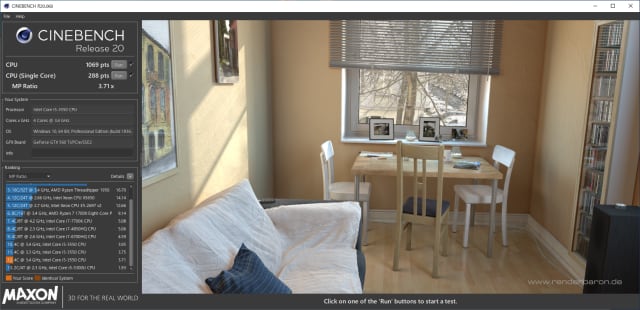
| CineBench | CPU | 1069pts | 1058pts | 3943pts |
| CineBench | CPU(Single Core) | 288pts | - | 430pts |
| CineBench | MP Ratio | 3.71x | - | 9.17x |
| FF14Bench | 1920x1080 | 4370(快適) | 12012(非常に快適) | 13982(非常に快適) |
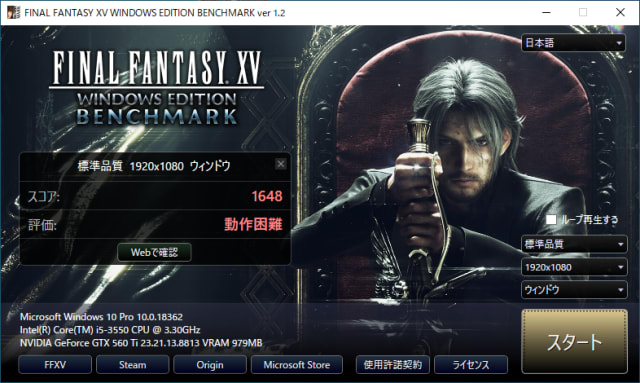
| FF15Bench | 1920x1080 | 1648(動作困難) | 8527(快適) | 10939(とても快適) |
| DQXBench | 1920x1080 | 13894(すごく快適) | - | 18222(すごく快適) |
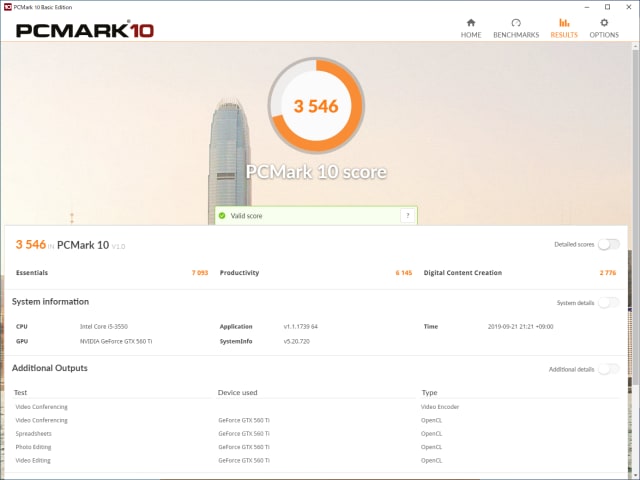
| PCMark10 | Score | 3546 | - | 5781 |
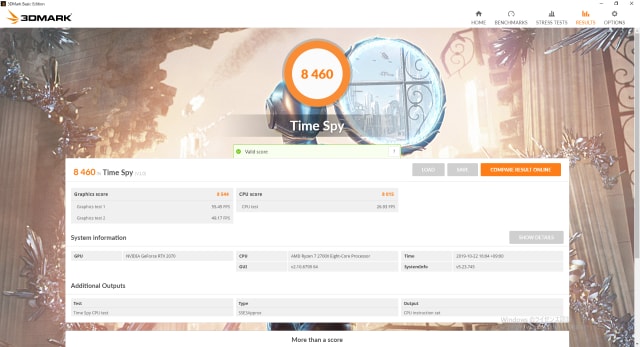
| 3DMark | Score | 5020 | - | 8460 |
DQベンチで、Oldは標準品質、Newは最高品質の実行
PC構成
PC構成(Old)
| 構成要素 | ハードウェア名 | ハードウェア構成 | 価格 | 購入日 | 当初価格 | 発売日 |
|---|---|---|---|---|---|---|
| CPU | Intel Core i5-3550 | 3.3GHz 4Core/4Thread | 16,330円 | 2012/07/22 | ?円 | 2012/04/xx |
| MotherBoard | ASUS P8H77-V | ATX, Intel H77 Chipset | 7,799円 | 2012/07/22 | 11,980円 | 2012/04/xx |
| Memory | ADATA AX3U1600GC4G9-2G | DDR3 1600 4GB 2枚 | 3,500円 | 2012/07/22 | ?円 | 2011/12/xx |
| Memory | CFD Elixir W3U1600HQ-4G | DDR3 1600 4GB 2枚 | 3,263円 | 2013/01/18 | ?円 | 2012/03/xx |
| GPU | GIGABYTE GTX 560 Ti GV-N560OC-1GI | NVIDIA Geforce GTX 560 Ti | 13,900円 | 2012/07/25 | 29,000円 | 2011/02/xx |
| Disk | Ultimate SU650 ASU650SS-960GT-X | SATA6Gbps 960GB | 12,980円 | 2019/01/25 | 19,980円 | 2018/09/17 |
| PowerSupply | CORSAIR TX650 CMPSU-650TXV2 | ATX650W | 7,850円 | 2012/07/22 | ?円 | 2011/03/xx |
- Intel Core i-3550
- ASUS P8H77-V
- GIGABYTE GTX 560 Ti GV-N560OC-1GI
- CFD Elixir W3U1600HQ-4G
- ADATA AX3U1600GC4G9-2G
- Ultimate SU650 ASU650SS-960GT-X NTT-X Store限定モデル
- CORSAIR TX650 CMPSU-650TXV2
PC構成(Old+)
P8H77Vの古いファームウェアはUEFIに対応していなかったので、BIOSブートになっていた。

しかし、RTX2070はBIOSブートできず、UEFIブートで構成する必要がある。
UEFIブートはディスクの形式がMBRではなくGPTでくてはならないが、変換はできない。

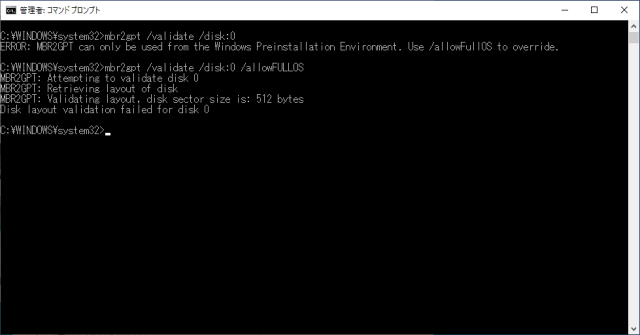
P8H77Vのファームウェアを最新化し、OSを再インストールでUEFIブートに変更。
PC構成(New)
| 構成要素 | ハードウェア名 | ハードウェア構成 | 価格 | 購入日 | 当初価格 | 発売日 |
|---|---|---|---|---|---|---|
| CPU | AMD Ryzen 7 2700X Gold Edition | 3.7GHz 8Core/16Threa | 27,518円 | 2019/08/29 | 38,000円 | 2019/04/xx |
| MotherBoard | ASUS TUF B450M-PLUS Gaming | micro ATX, B450 Chipse | 9,180円 | 2019/08/29 | 13,007円 | 2018/07/31 |
| Memory | CORSAIR CMK32GX4M2A2666C16 | DDR4 2666(21300) 16GB 2枚 | 14,960円 | 2019/08/29 | 37,859円 | 2015/08/xx |
| Memory | - | - | -円 | xxxx/xx/xx | -円 | xxxx/xx/xx |
| GPU | Palit NE62070015P2-1062A | NVIDIA Geforce RTX 2070 8G | 40,932円 | 2019/08/26 | 69,930円 | 2018/11/13 |
| Disk | Ultimate SU650 ASU650SS-960GT-X | SATA6Gbps 960GB | 12,980円 | 2019/01/25 | 19,980円 | 2018/09/17 |
| PowerSupply | CORSAIR HX850i CP-9020073-JP | ATX850W 80+P | 10,368円 | 2019/08/31 | ?円 | 2014/08/xx |
- AMD Ryzen 7 2700X Gold Edition
- AMD Ryzen 7 2700X
- AMD第2世代Ryzenプロセッサ対応のB450チップセットを搭載するマザーボード7製品を発表
- ASUS TUF B450M-PLUS Gaming
- CORSAIR CMK32GX4M2A2666C16
- Palit NE62070015P2-1062A
- CORSAIR HX850i CP-9020073-JP
ベンチマーク
ベンチマークソフト
- PassMark
- CineBench R20
- ファイナルファンタジーXIV: 漆黒のヴィランズ ベンチマーク
- ファイナルファンタジーXVベンチマーク
- ドラゴンクエストXベンチマークソフト
- PCMARK10
- 3DMARK
- TechPowerUp GPU-Z
ベンチマーク結果(テキスト)
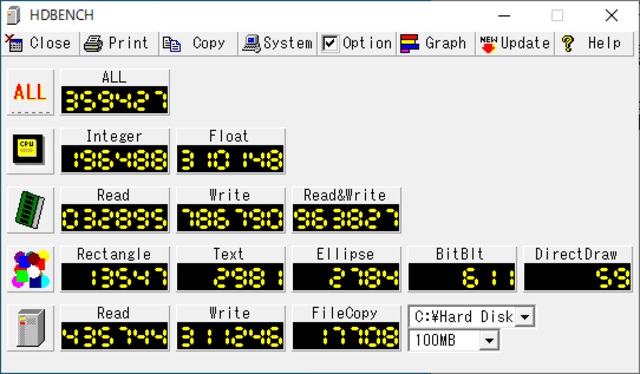
- HDBench Old+
- Passmark Old+
- Passmarkシステム構成(サマリ)Old+
- Passmarkシステム構成(詳細)Old+
- Passmarkシステム構成(ベースライン)Old+
- FF14Bench OLD+RTX2070
- HDBench(2K) New
- HDBench(4K) New
ベンチマーク(Old)


ベンチマーク(Old+)


ベンチマーク(New)